By: Team AY1920S2-CS2103T-F10-4 Since: Jan 2020 Licence: MIT
1. Introduction
1.1. Purpose
This document describes the architecture and system design of Mod Manager.
1.2. Audience
The developer guide is for software developers, designers and testers who wants to understand the architecture and system design of Mod Manager.
2. Setting Up
Refer to the guide here.
3. Design
3.1. Architecture
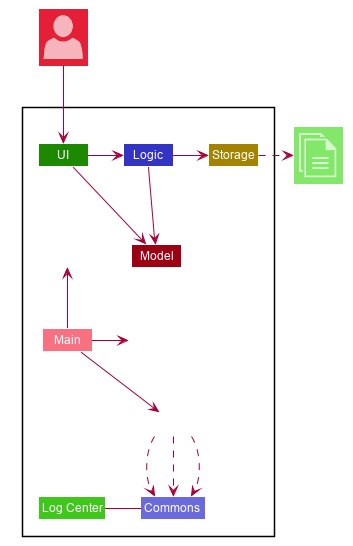
The Architecture Diagram given above explains the high-level design of the App. Given below is a quick overview of each component.
-
At app launch: Initializes the components in the correct sequence, and connects them up with each other.
-
At shut down: Shuts down the components and invokes cleanup method where necessary.
Commons represents a collection of classes used by multiple other components.
The following class plays an important role at the architecture level:
-
LogsCenter: Used by many classes to write log messages to the App’s log file.
The rest of the App consists of four components.
Each of the four components
-
Defines its API in an
interfacewith the same name as the Component. -
Exposes its functionality using a
{Component Name}Managerclass.
For example, the Logic component (see the class diagram given below) defines it’s API in the Logic.java interface and exposes its functionality using the LogicManager.java class.
How the architecture components interact with each other
The Sequence Diagram below shows how the components generically interact with each other for the scenario where the user issues the command some command.
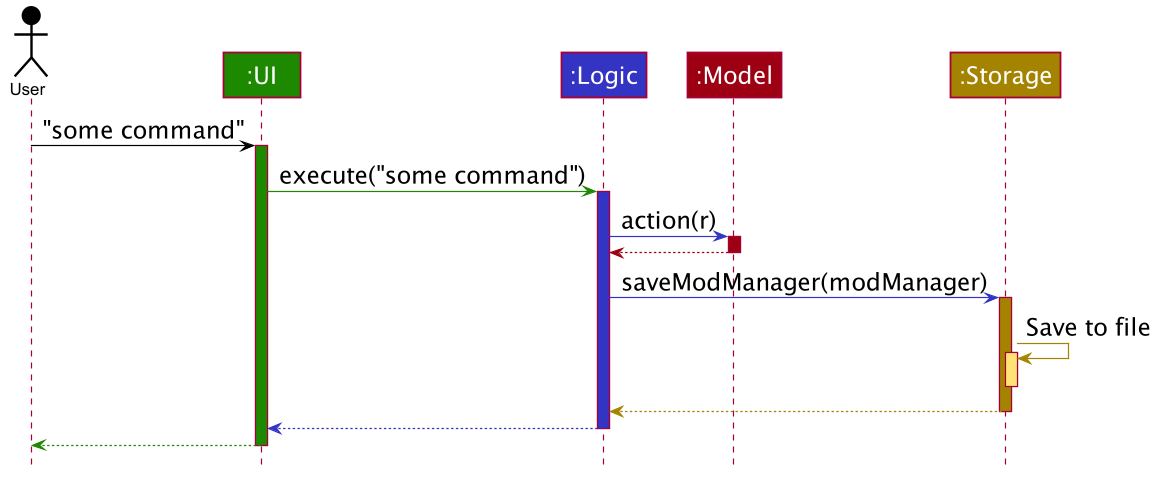
some command CommandThe sections below give more details of each component.
3.2. UI Component
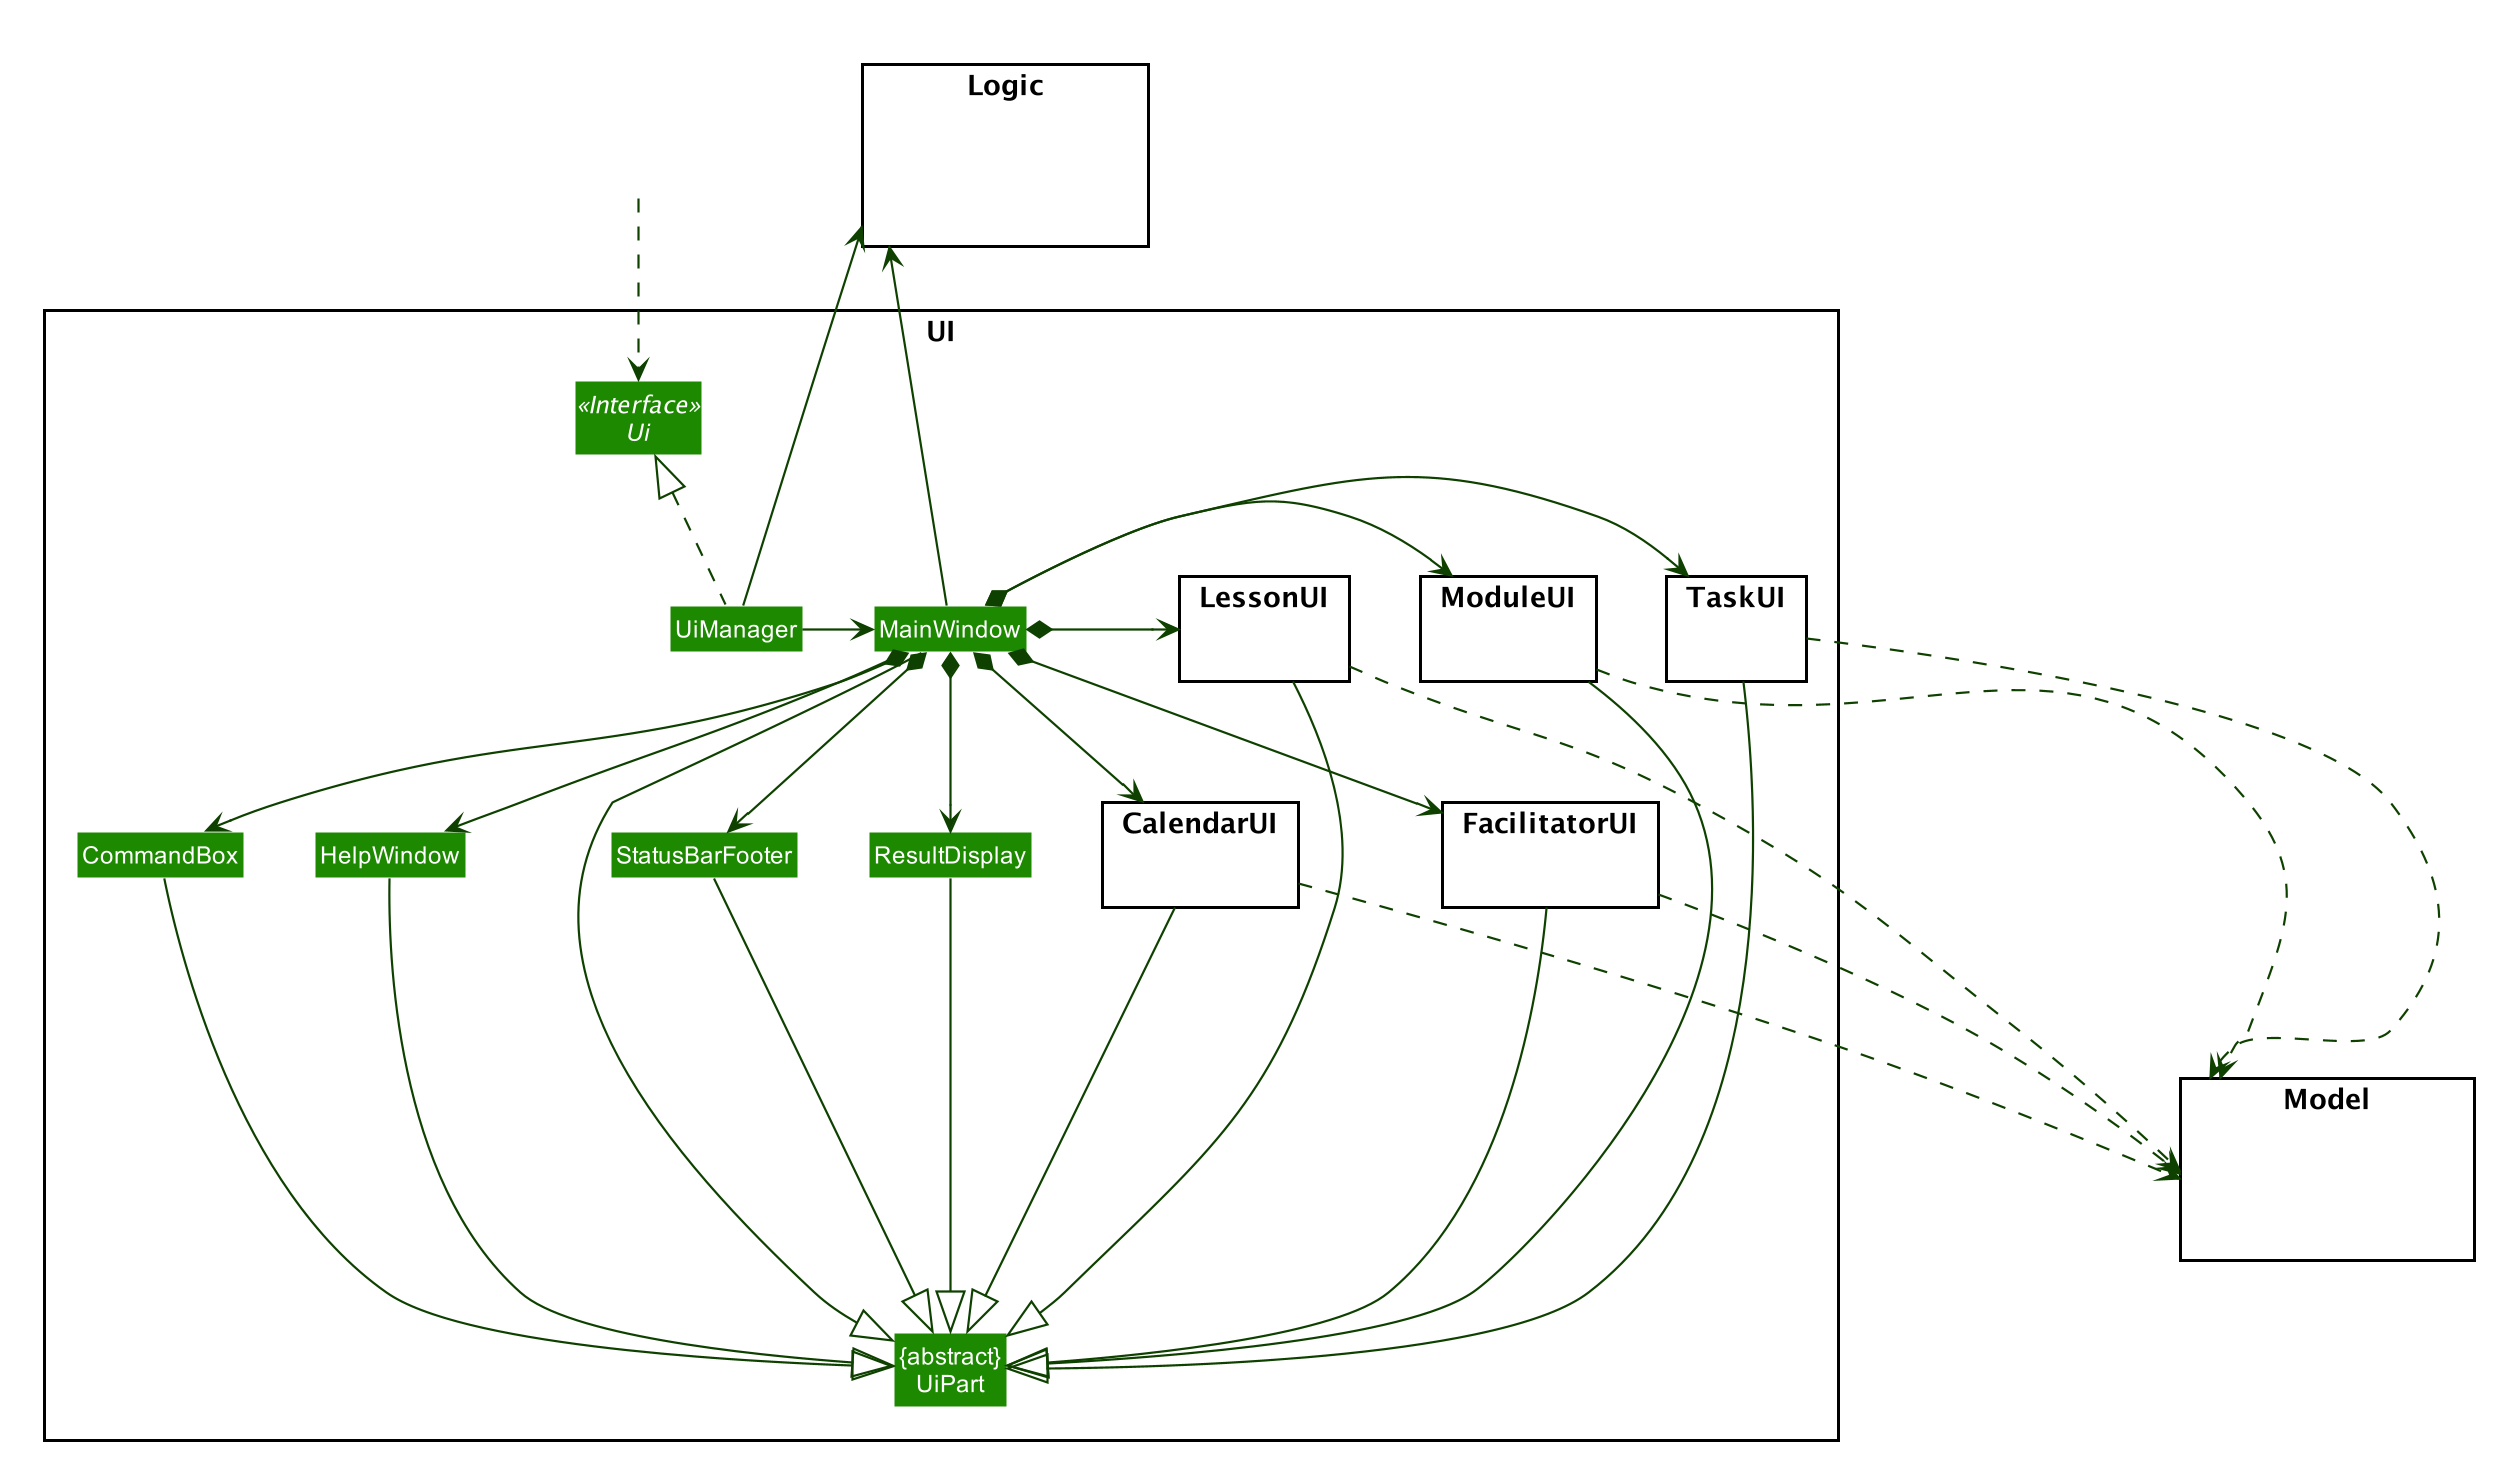
API : Ui.java
The UI consists of a MainWindow that is made up of parts e.g.CommandBox, ResultDisplay, HelpWindow, StatusBarFooter etc. All these, including the MainWindow, inherit from the abstract UiPart class.
The UI component uses JavaFx UI framework. The layout of these UI parts are defined in matching .fxml files that are in the src/main/resources/view folder. For example, the layout of the MainWindow is specified in MainWindow.fxml
The UI component,
-
Executes user commands using the
Logiccomponent. -
Listens for changes to
Modeldata so that the UI can be updated with the modified data.
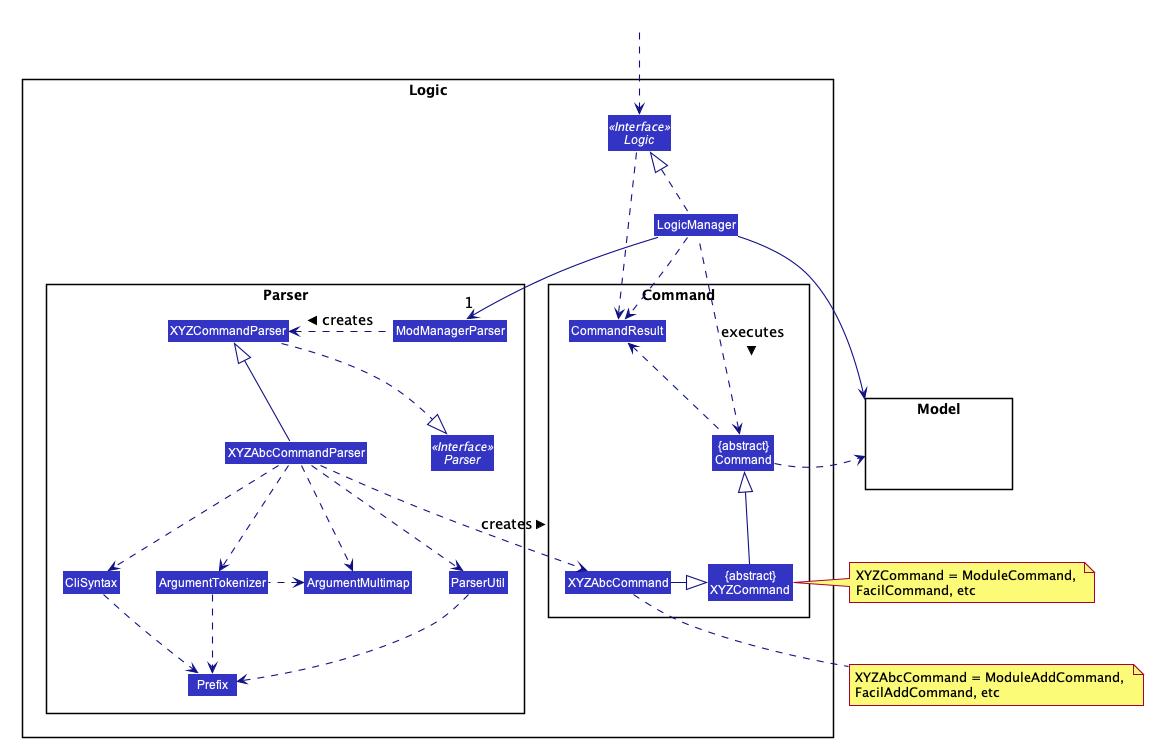
3.3. Logic Component
API :
Logic.java
-
Logicuses theModManagerParserclass to parse the user command. -
ModManagerParserwill then create the appropriate parser object to continue parsing the command. This parser object will then determine the specific kind of the user command and let a subtype parser of it do the rest of the parsing work. -
This results in a
Commandobject which is executed by theLogicManager. -
The command execution can affect the
Model(e.g. adding a facilitator). -
The result of the command execution is encapsulated as a
CommandResultobject which is passed back to theUi. -
In addition, the
CommandResultobject can also instruct theUito perform certain actions, such as displaying help to the user.
This logic component design is chosen because we have many commands that can be grouped with the same keyword (e.g. mod, task, lesson, etc).
The design provides good abstraction for the developers without cluttering a particular parser class.
3.4. Model Component

API : Model.java
The Model,
-
stores a
UserPrefobject that represents the user’s preferences. -
stores a
DoableActionListcapturing effects of user commands that can add/edit/delete entities, i.e. what is added, edited, or deleted. -
stores the Mod Manager data.
-
exposes many unmodifiable
ObservableListthat can be 'observed' e.g. the UI can be bound to this list so that the UI automatically updates when the data in the list change. -
does not depend on any of the other three components.
More detailed designs of important sub-components are below.
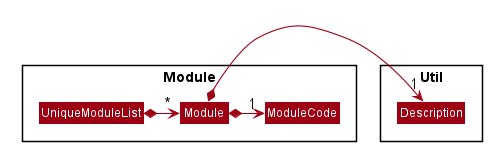
3.4.1. Module (Lu Shing)
-
The
Modulepackage contains a concrete classModule. -
A
Modulecontains aModuleCodeand aDescriptionof the module. -
A
UniqueModuleListcomprises of instances ofModule.
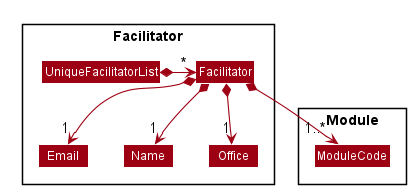
3.4.2. Facilitator (Lu Shing)
-
The
Facilitatorpackage contains a concrete classFacilitator. -
A
Facilitatorcontains aName,EmailandOffice. -
A
Facilitatoralso contains at least oneModuleCodeto indicate whichModulethe facilitator belongs to. -
A
UniqueFacilitatorListcomprises of instances ofFacilitator.
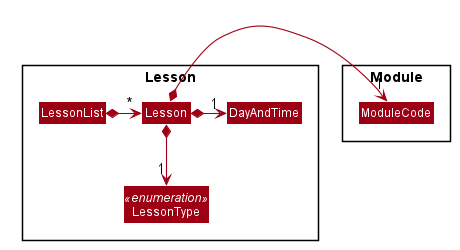
3.4.3. Lesson (Lu Shing)
-
The
Lessonpackage contains a concrete classLesson. -
A
Lessoncontains aDayAndTimewhich indicates which day of the week and the time the lesson is on. -
A
Lessonalso contains aLessonTypeand aModuleCodeto indicate whichModulethe lesson belongs to. -
A
LessonListcomprises of instances ofLesson.
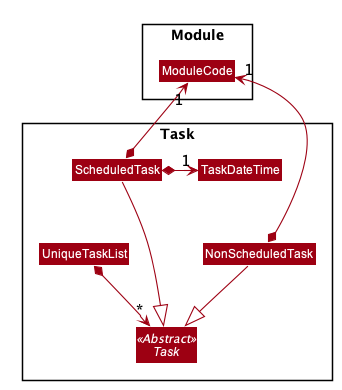
3.4.4. Task (Nhat)
-
The
Taskpackage contains an abstract classTask. It has two concrete subclasses:ScheduledTaskandNonScheduledTask. -
A
ScheduledTaskcontains aTaskDateTimeto indicate its date and time. -
A
NonScheduledTaskrepresents a task whose date and time are not specified, so it does not contain aTaskDateTime. -
Any
Taskwould contain aModuleCodeto indicate whichModuleit is a task of. -
A
UniqueTaskListcomprises of instances ofNonScheduledTaskandScheduledTask.
3.4.5. Calendar
-
The
Calendarpackage contains a concrete classCalendarwhich represents a calendar date.
3.4.6. DoableAction (Nhat)
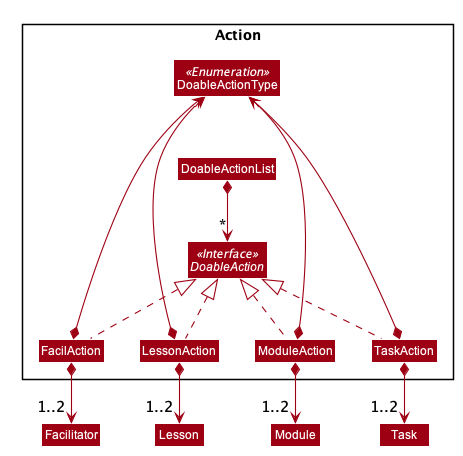
-
DoableActionis an interface of actions that can be undone/redone in Mod Manager, stored in theActionpackage. -
Actual implementations of
DoableActionareModuleAction,LessonAction,FacilAction, andTaskAction, each of which has aDoableActionTypevalue to assist how the undo/redo process is carried out. -
A
DoableActionListcomprises of instances of classes mentioned above.
3.5. Storage Component
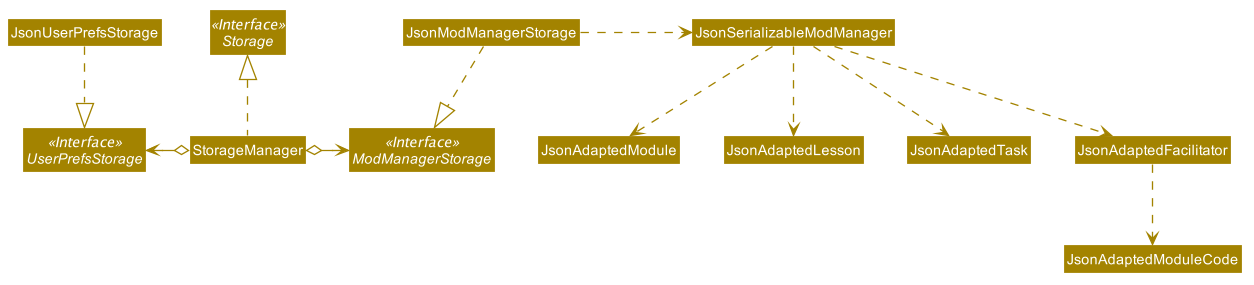
API : Storage.java
The Storage component,
-
can save
UserPrefobjects in json format and read it back. -
can save the Mod Manager data in json format and read it back.
3.6. Common Classes
Classes used by multiple components are in the seedu.address.commons package.
4. Implementation
This section describes some noteworthy details on how certain features are implemented.
4.1. General Features
There are a few general features implemented to help users improve their workflow with Mod Manager.
These are: undo and redo feature, navigating through past commands with up/down keys, clear command, and help command.
4.1.1. Implementation Details
Undo/Redo command (Nhat)
Each add/edit/delete action is captured as a DoableAction. Every time a DoableAction is performed, it will be recorded
to the DoableActionList. Thus, after each add/edit/delete command execution, a suitable DoableAction will be be
created and recorded. Other sections might not mention this again.
DoableActionList stores two Stacks of DoableAction called primary and secondary.
The mechanism of undo is given below. For redo, it is exactly the same.
-
The user executes the
undocommand. TheUndoCommandParsercreates anUndoCommand. -
LogicManagerexecutes theUndoCommand. -
ModelManagercallsundomethod ofDoableActionListto reverse the effect of the most previousDoableAction.
Navigating through past commands with up/down keys (Nhat)
This feature applies to each usage session. The mechanism is below.
-
Each time the user types anything and presses Enter in the
CommandBox, the input will be saved to theUserInputHistory. -
When an
upkey is pressed, the latest previous input will be retrieved fromUserInputHistoryand display at theCommandBox. If there are no previous inputs to show, theCommandBoxwill either stay the same or become empty. -
When a
downkey is pressed, the most previously input seen by pressingupwill be shown at theCommandBox. When there are no inputs to show, theCommandBoxwill become empty.
Clear command
This command simply clears all the data from the system. The action is not undo-able. Its mechanism is simple.
-
The user inputs a clear command.
-
ModelManagerwill replace the currentModManagerinstance with a newly created one that doesn’t contain any data.
Help command
This command will pop up a window showing a link to the User Guide. The user simply inputs a help command and the window will appear.
4.1.2. Design Considerations (Nhat)
Aspect: Undo/Redo Implementation
-
Alternative 1: Saves the entire database every time an add/edit/delete action occurs.
-
Pros: Easy to implement.
-
Cons: High memory consumption during a usage session, and potentially causing lag if the database is huge.
-
-
Alternative 2 (current choice): Each feature that involves adding/editing/deleting data to the database would have a corresponding class extending
DoableAction. For example, Module Management feature would have aModuleActionclass that extendsDoableAction. This special class will contain specific details on how to revert the effect of each add/edit/delete action.-
Pros: Low memory consumption during a usage session, leading to potentially more consistent performance.
-
Cons: Difficult to implement.
-
Alternative 2 was chosen as it could provide better performance with a huge database, and partly because our team enjoyed some extra challenge.
4.2. Module Management Feature
The module feature manages the modules in Mod Manager and is represented by the Module class.
A module has a ModuleCode and an optional Description.
It supports the following operations:
-
add- Adds a module to Mod Manager. -
list- Lists all modules in Mod Manager. -
view- Views information of a module in Mod Manager. -
edit- Edits a module in Mod Manager. -
delete- Deletes a module in Mod Manager.
4.2.1. Implementation Details
Adding a module (Zi Xin)
The add module feature allows users to add a module to Mod Manager.
This feature is facilitated by ModuleCommandParser, ModuleAddCommandParser and ModuleAddCommand.
The operation is exposed in the Model interface as Model#addModule().
Given below is an example usage scenario and how the module add mechanism behaves at each step:
-
The user executes the module add command and provides the module code and description of the module to be added.
-
ModuleAddCommandParsercreates a newModulebased on the module code and description. -
ModuleAddCommandParsercreates a newModuleAddCommandbased on the module. -
LogicManagerexecutes theModuleAddCommand. -
ModManageradds the module to theUniqueModuleList. -
ModuleAddCommandcreates a newModuleActionbased on the module to be added. -
ModelManageradds theModuleActionto theDoableActionList.
The following sequence diagram shows how the module add command works:
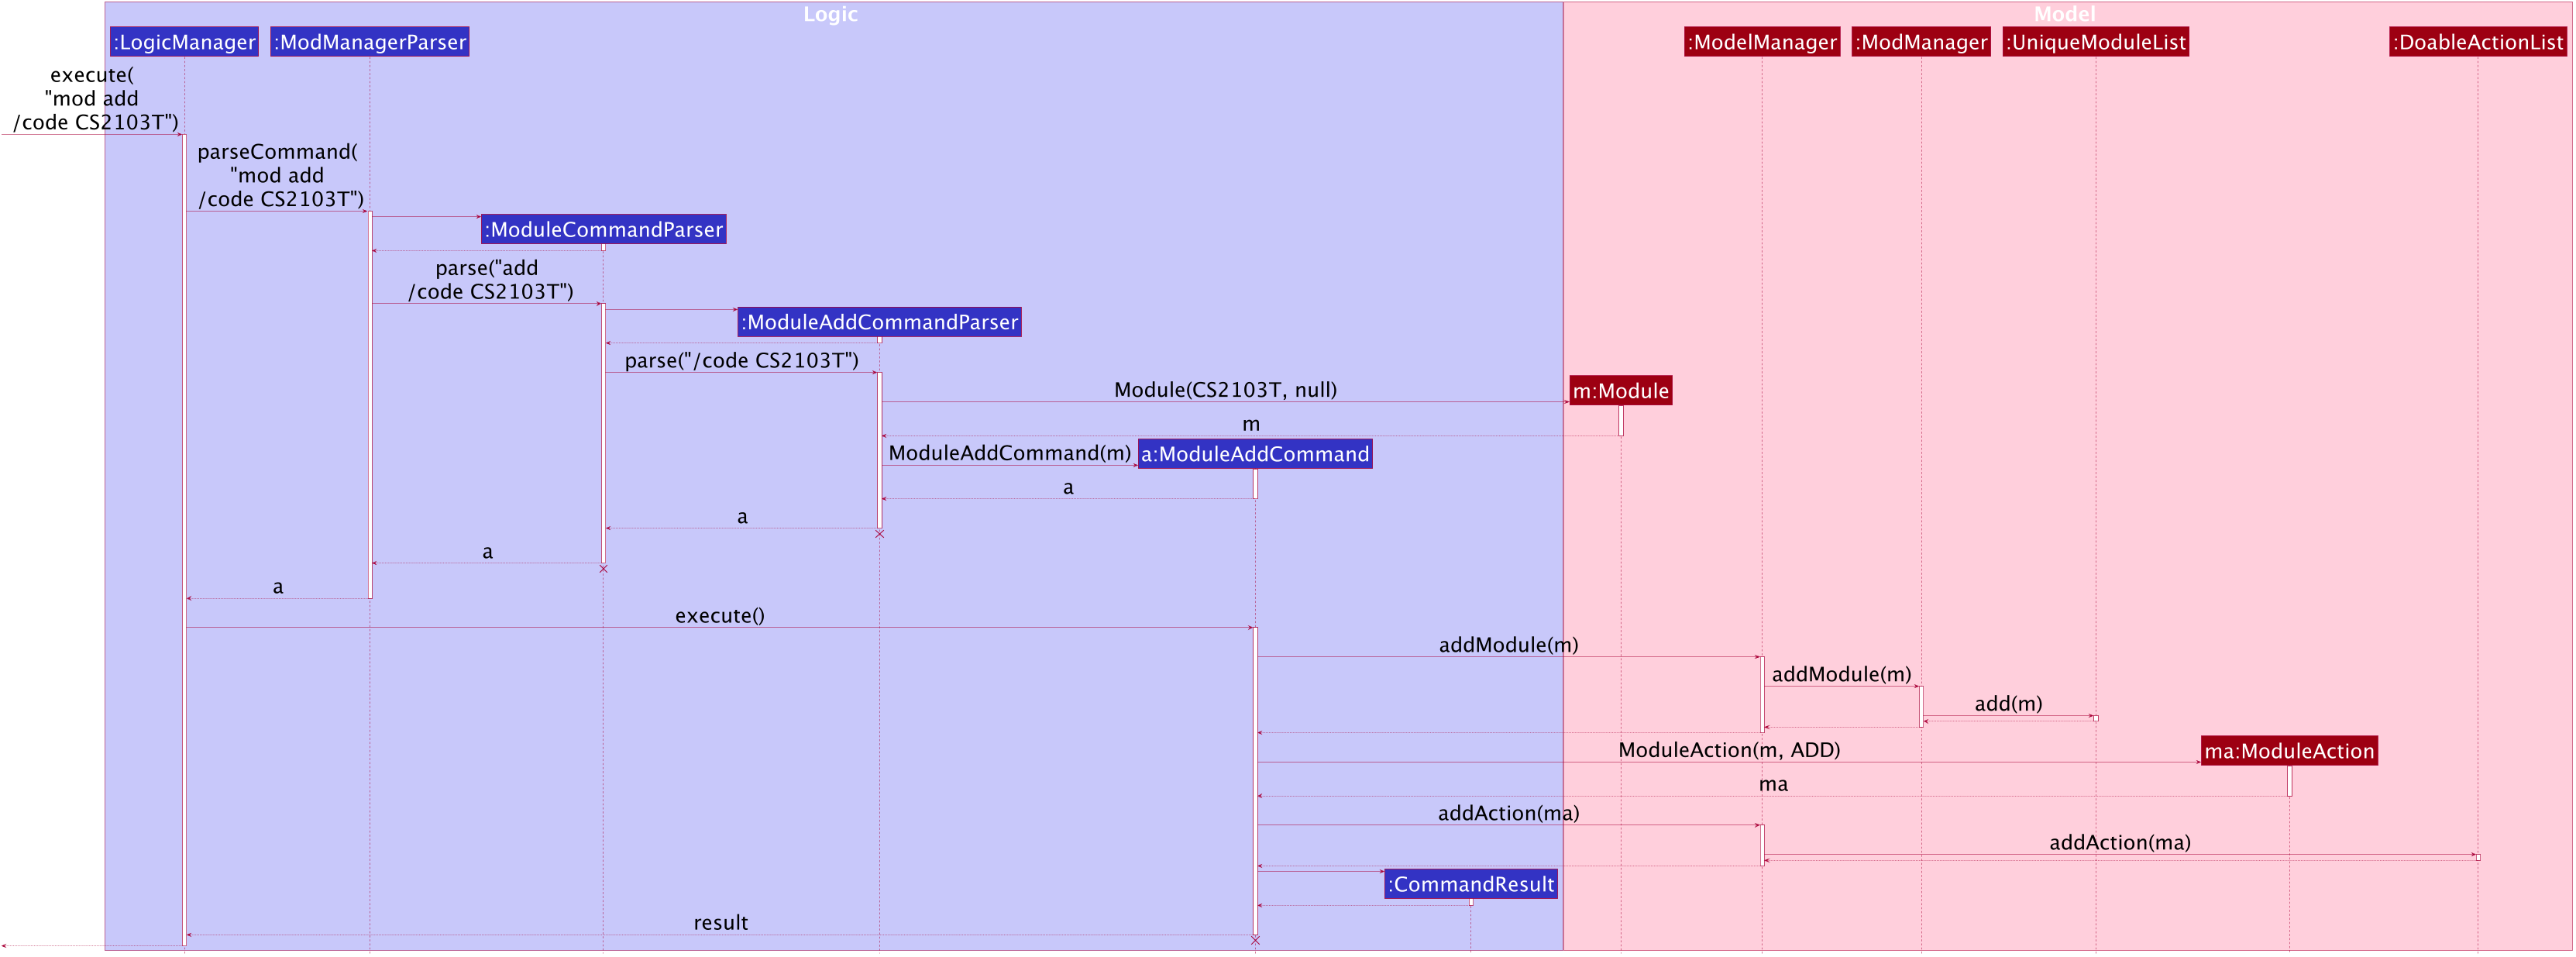
mod add Command
The lifeline for ModuleCommandParser, ModuleAddCommandParser and ModuleAddCommand should end at
the destroy marker (X) but due to a limitation of PlantUML, the lifeline reaches the end of diagram.
|
The following activity diagram summarizes what happens when a user executes a module add command:
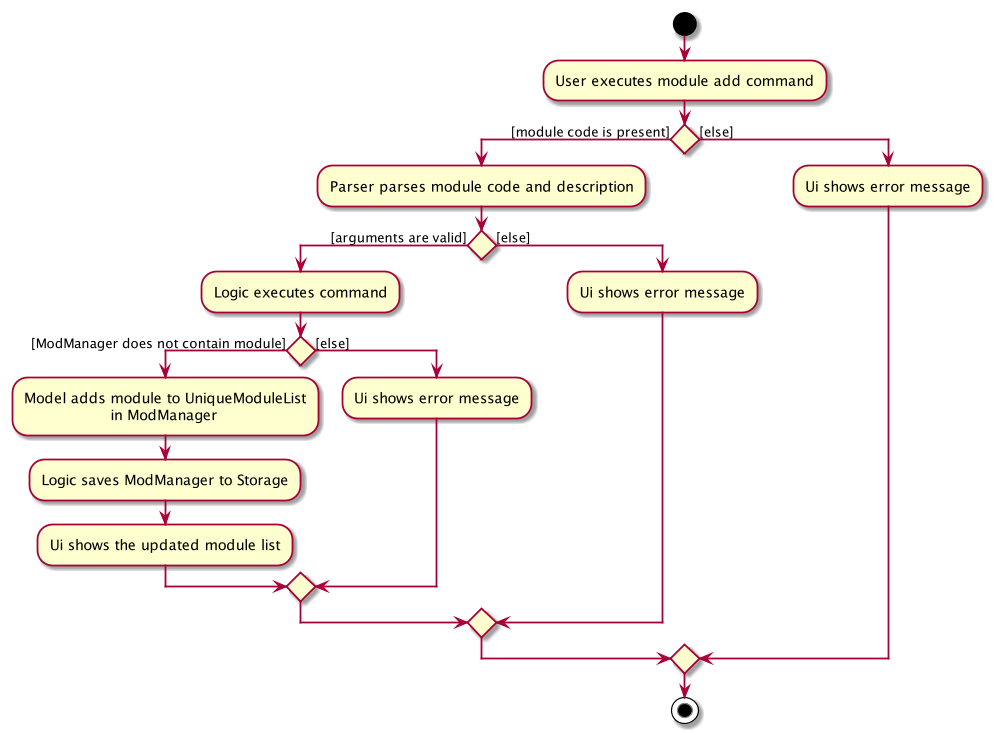
mod add CommandListing all modules (Zi Xin)
The list module feature allows users to list all modules in Mod Manager.
This feature is facilitated by ModuleCommandParser, ModuleViewCommandParser and ModuleViewCommand.
The operation is exposed in the Model interface as Model#updateFilteredModuleList().
Given below is an example usage scenario and how the module list mechanism behaves at each step:
-
The user executes the module list command.
-
ModuleCommandParsercreates a newModuleListCommand. -
LogicManagerexecutes theModuleListCommand. -
ModelManagerupdates thefilteredModulesinModelManager.
The following sequence diagram shows how the module list command works:
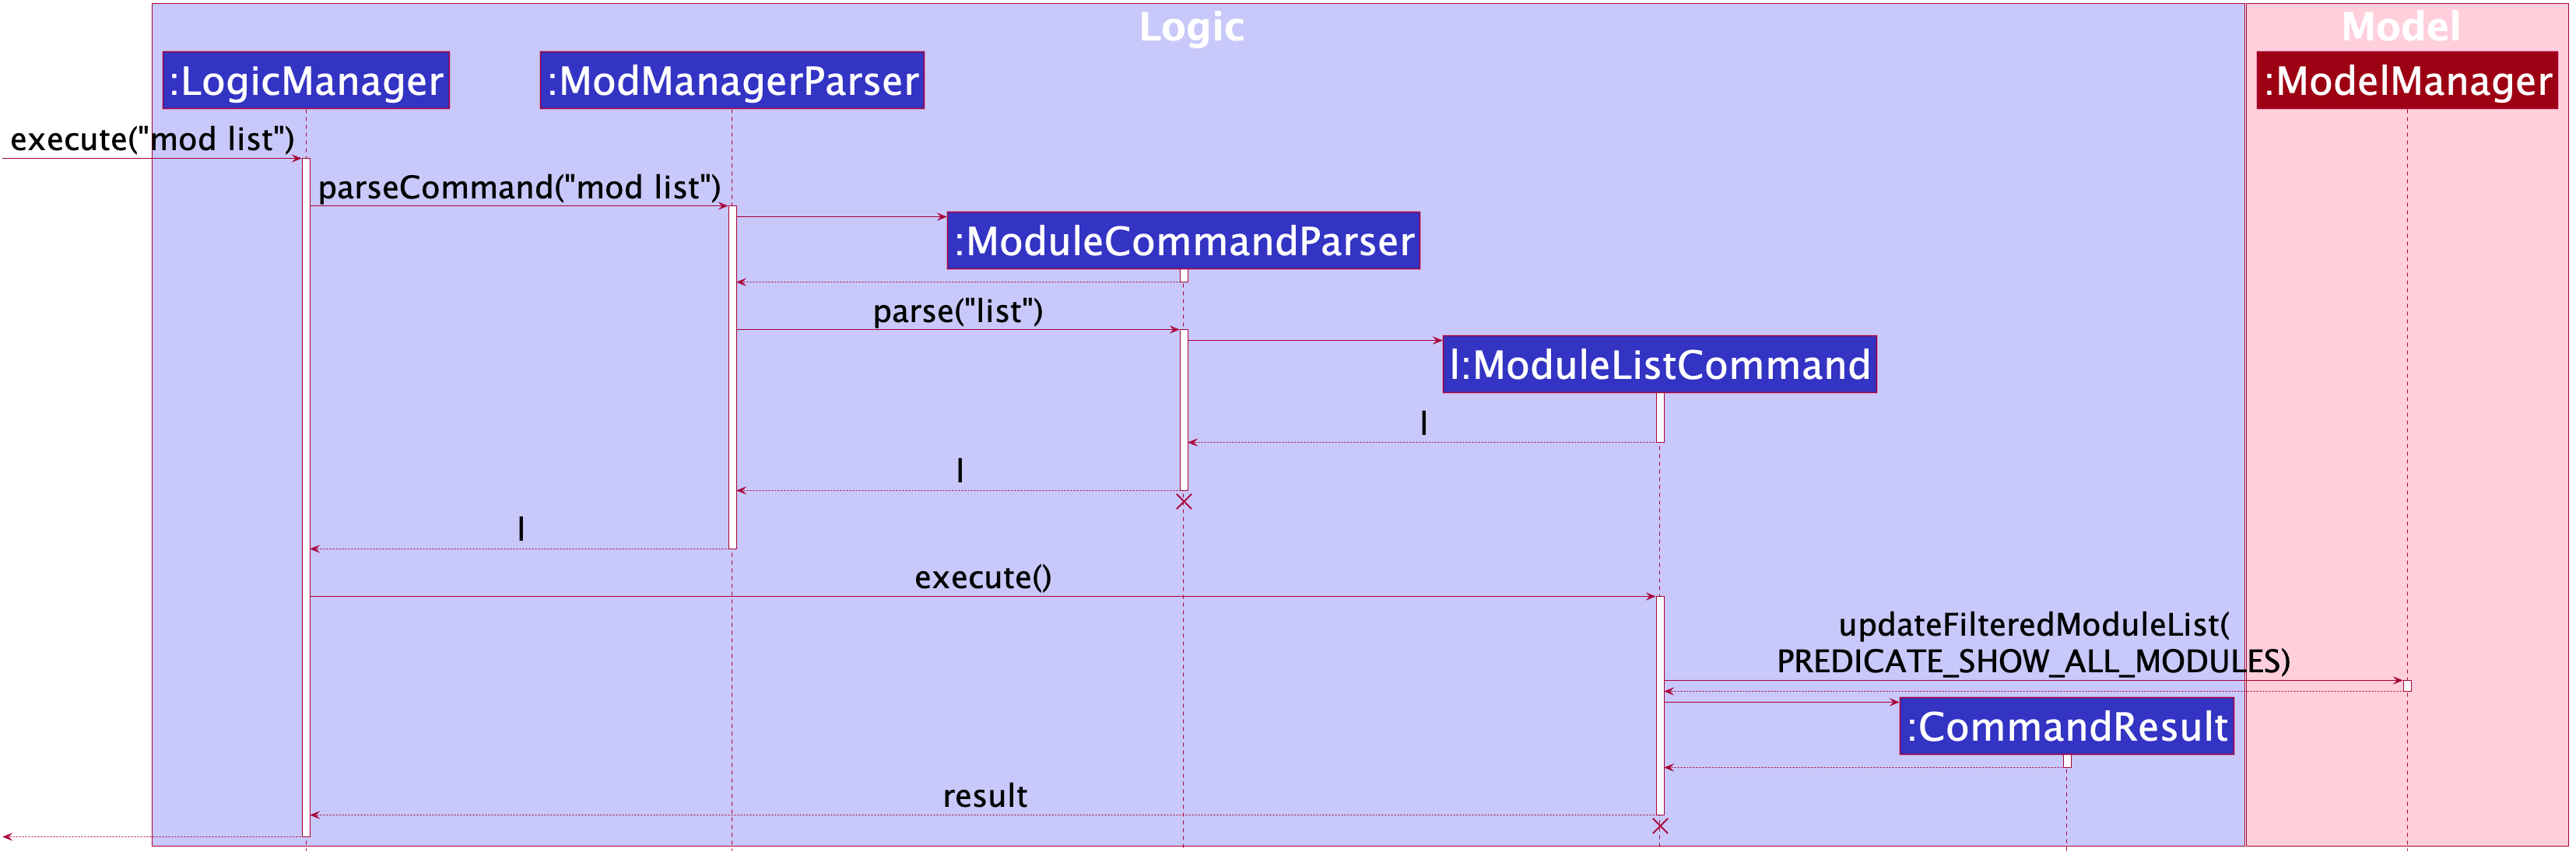
mod list Command
The lifeline for ModuleCommandParser and ModuleListCommand should end at
the destroy marker (X) but due to a limitation of PlantUML, the lifeline reaches the end of diagram.
|
The following activity diagram summarizes what happens when a user executes a module list command:

mod list CommandViewing a module (Zi Xin)
The view module feature allows users to view information of a module in Mod Manager.
This feature is facilitated by ModuleCommandParser and ModuleViewCommand.
The operation is exposed in the Model interface as Model#updateModule().
Given below is an example usage scenario and how the module view mechanism behaves at each step:
-
The user executes the module view command and provides the module code of the module to be viewed.
-
ModuleViewCommandParsercreates a newModuleViewCommandbased on the module. -
LogicManagerexecutes theModuleViewCommand. -
ModelManagerupdates themoduleviewed and the respective lists inModelManager.
The following sequence diagram shows how the module view command works:
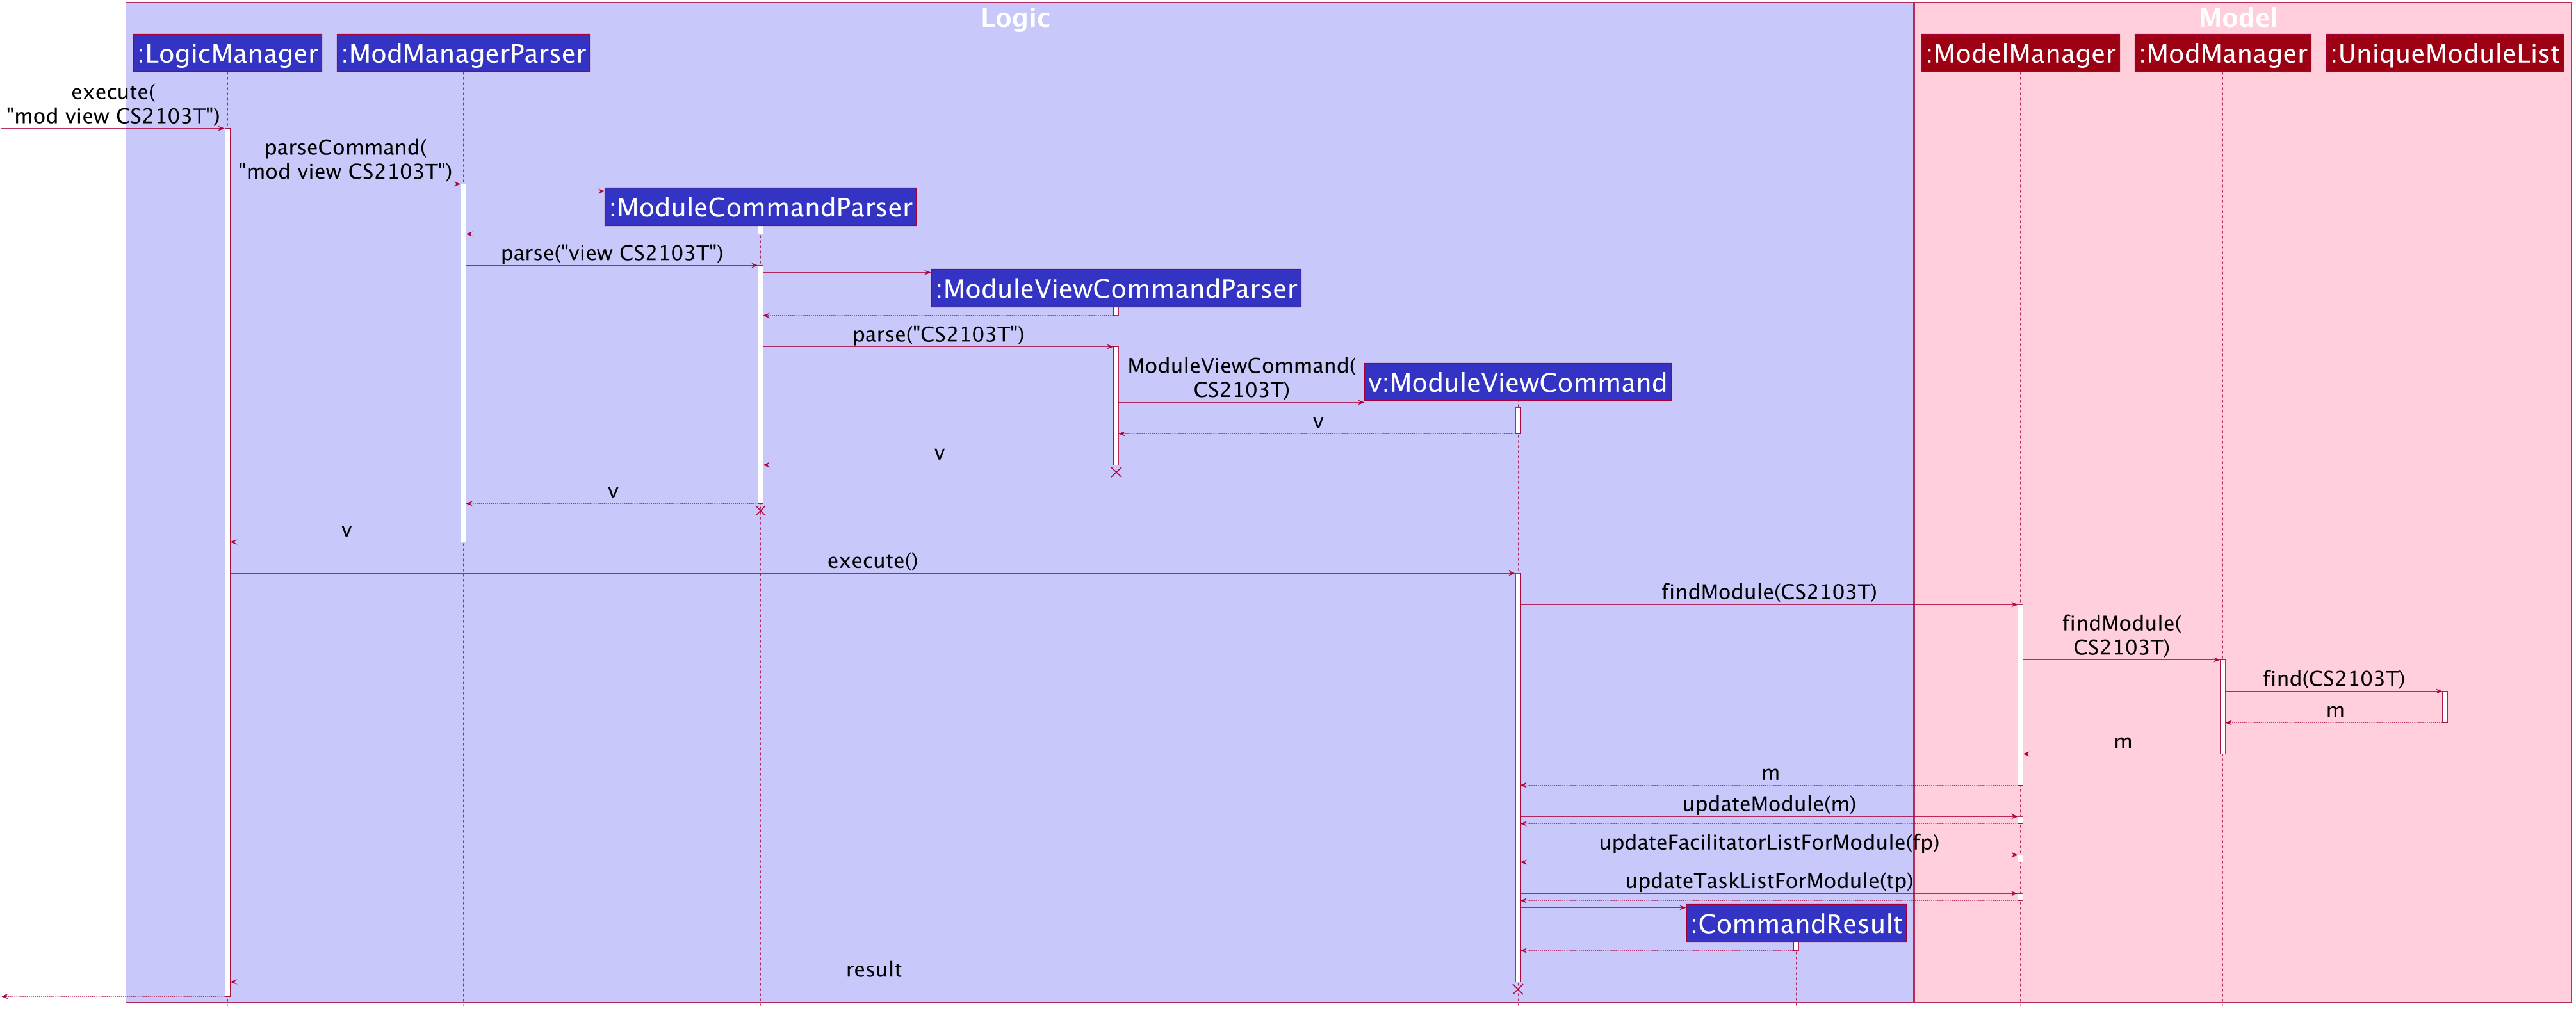
mod view Command
The lifeline for ModuleCommandParser, ModuleViewCommandParser and ModuleViewCommand should end at
the destroy marker (X) but due to a limitation of PlantUML, the lifeline reaches the end of diagram.
|
The following activity diagram summarizes what happens when a user executes a module view command:
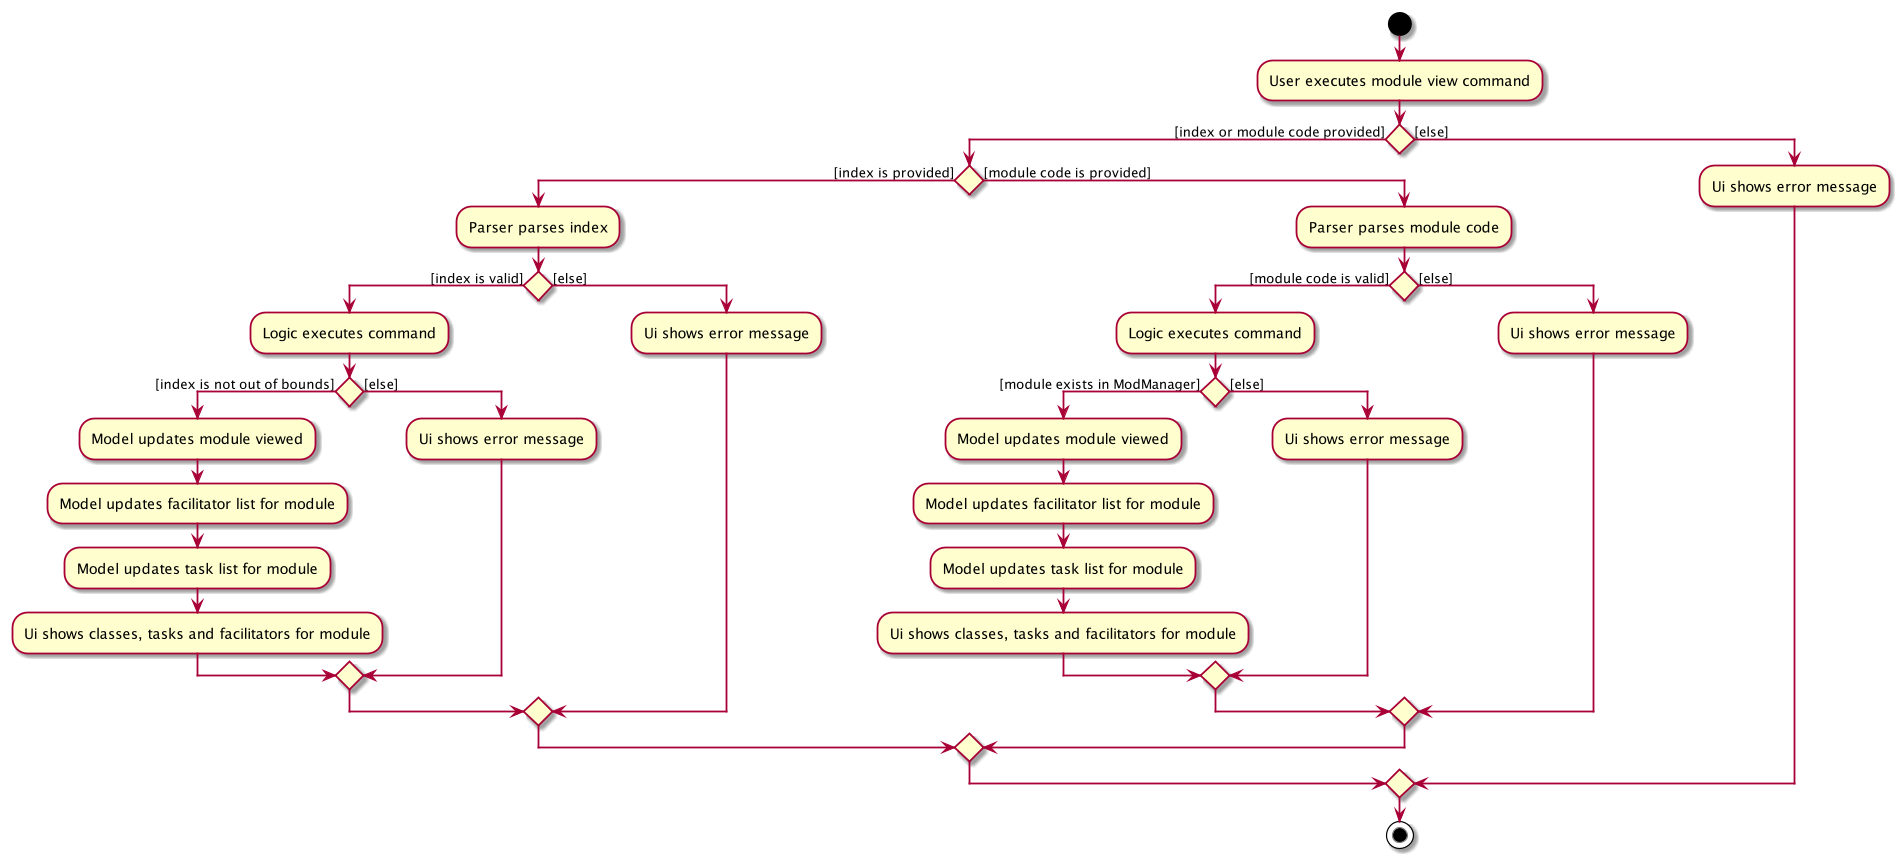
mod view CommandEditing a module (Zi Xin)
The edit module feature allows users to edit a module from Mod Manager.
This feature is facilitated by ModuleCommandParser, ModuleEditCommandParser and ModuleEditCommand.
The operation is exposed in the Model interface as Model#setModule().
Given below is an example usage scenario and how the module edit mechanism behaves at each step:
-
The user executes the module edit command and provides the index or module code of the module to be edited and the fields to be edited.
-
ModuleEditCommandParsercreates a newEditModuleDescriptorwith the fields to be edited. -
ModuleEditCommandParsercreates a newModuleEditCommandbased on the index or module code andEditModuleDescriptor. -
LogicManagerexecutes theModuleEditCommand. -
ModuleEditCommandretrieves the module to be edited. -
ModuleEditCommandcreates a newModule. -
ModManagersets the existing module to the new module in theUniqueModuleList. -
ModuleEditCommandcreates a newModuleActionbased on the module to be edited and the new module. -
ModelManageradds theModuleActionto theDoableActionList.
The following sequence diagram shows how the module edit command works:
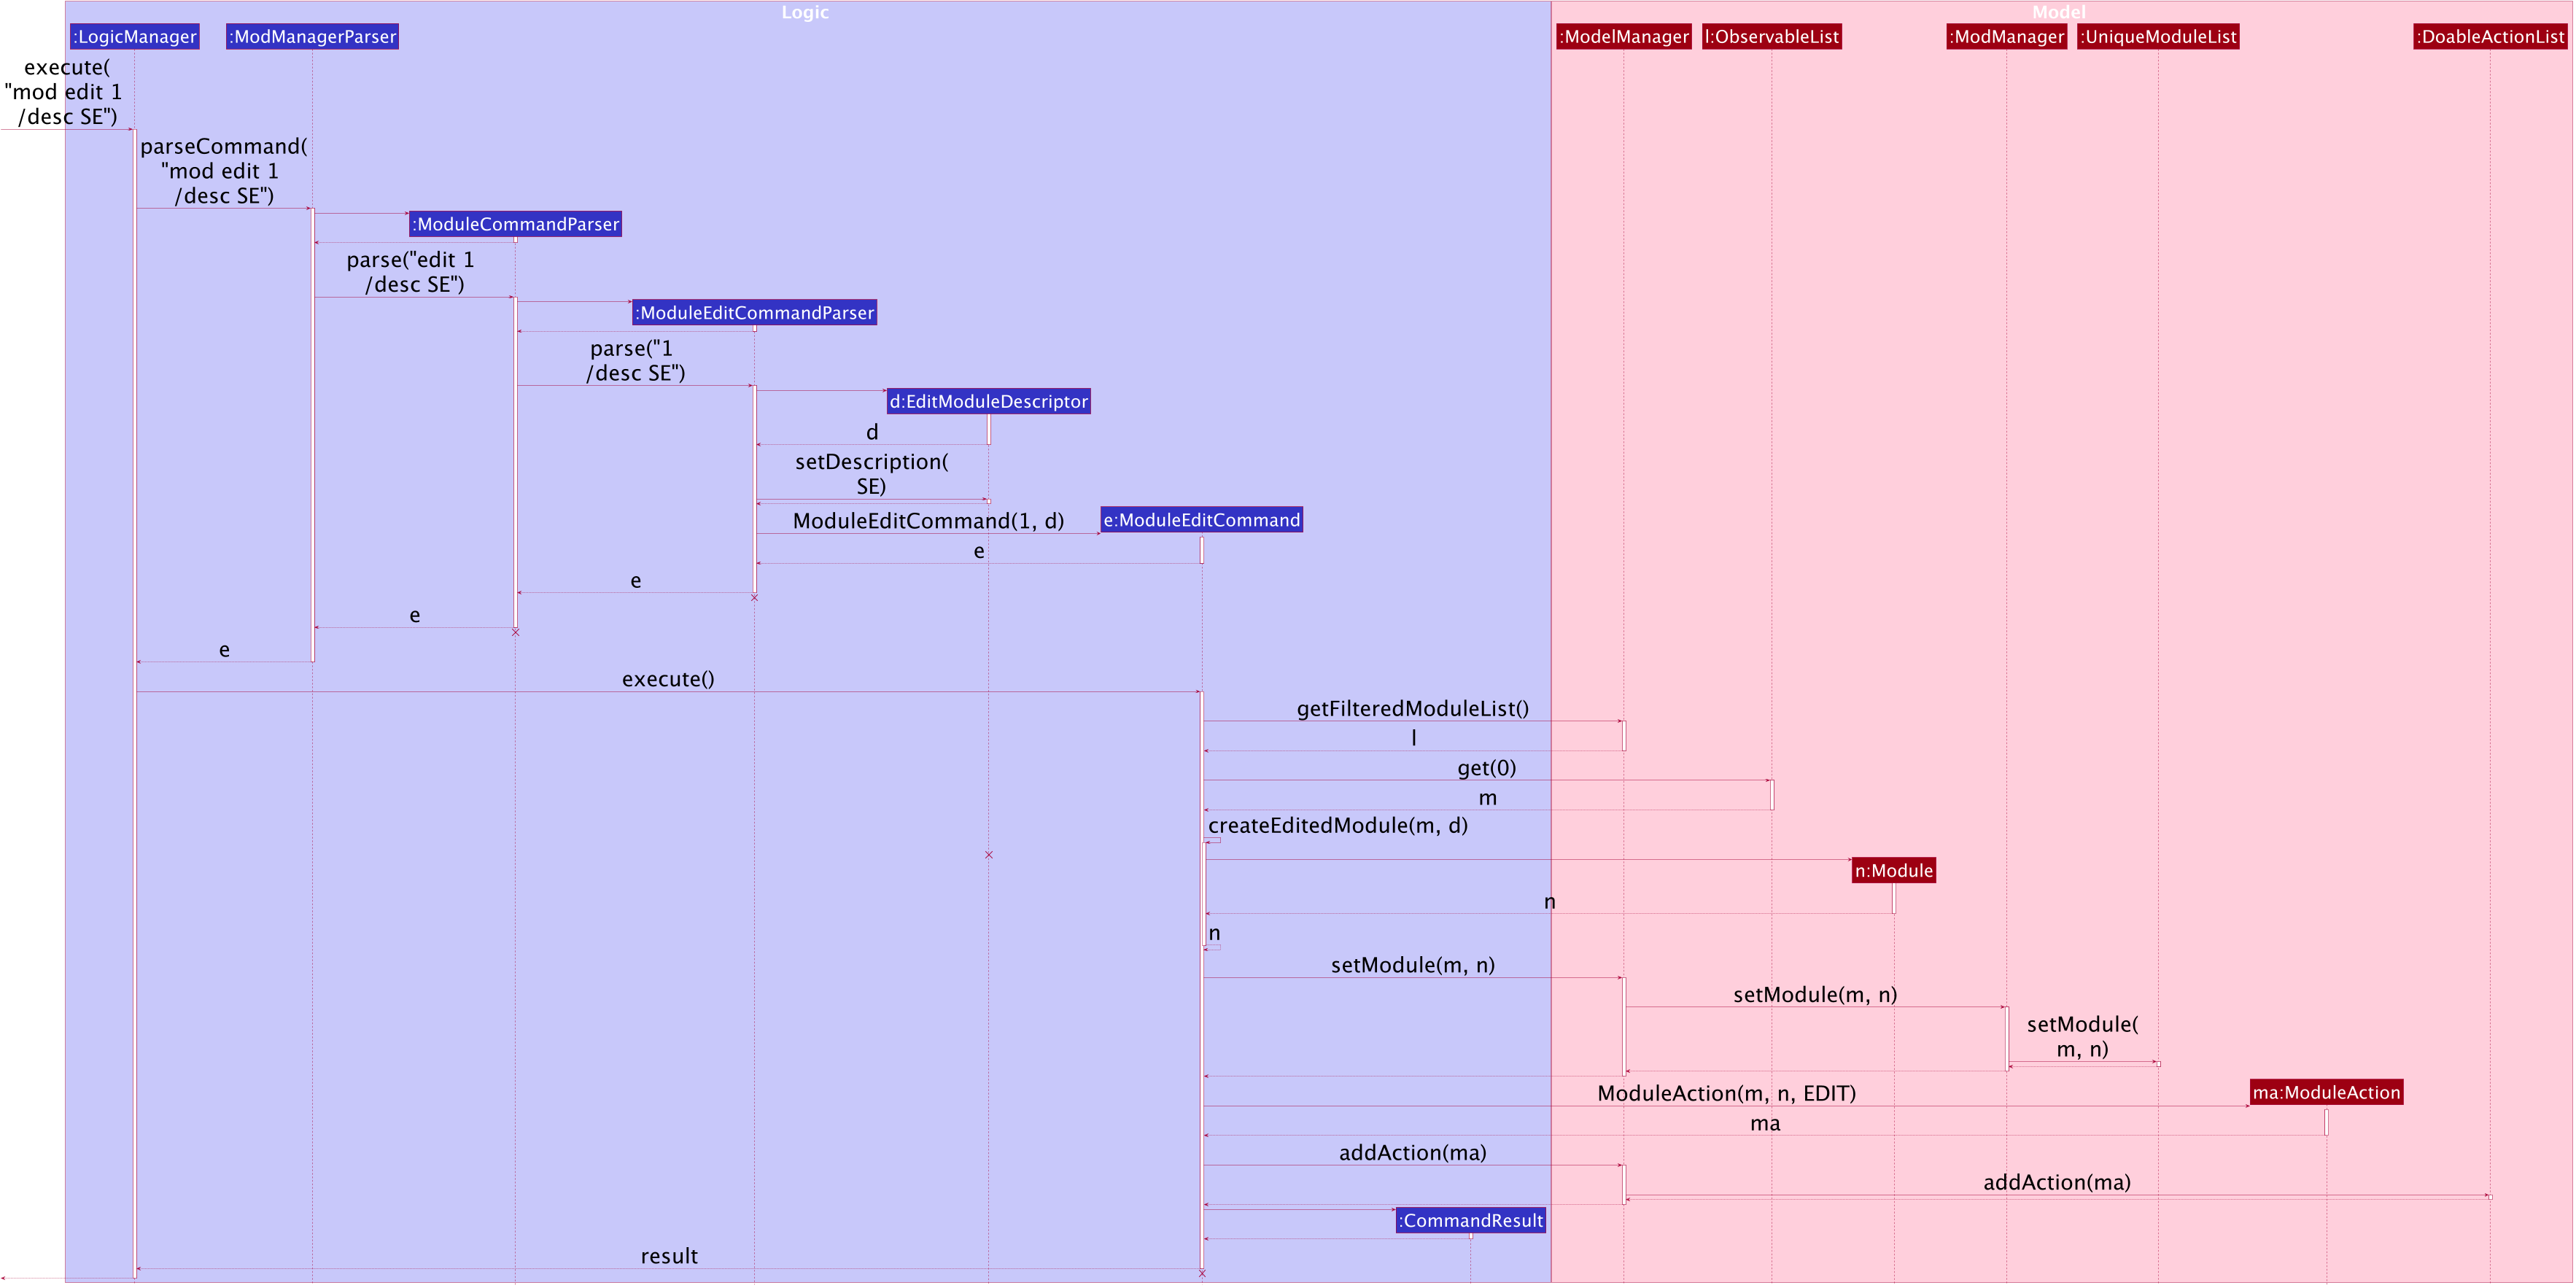
mod edit Command
The lifeline for ModuleCommandParser, ModuleEditCommandParser, EditModuleDescriptor and ModuleEditCommand should end at
the destroy marker (X) but due to a limitation of PlantUML, the lifeline reaches the end of the diagram.
|
The following activity diagram summarizes what happens when a user executes a module edit command:
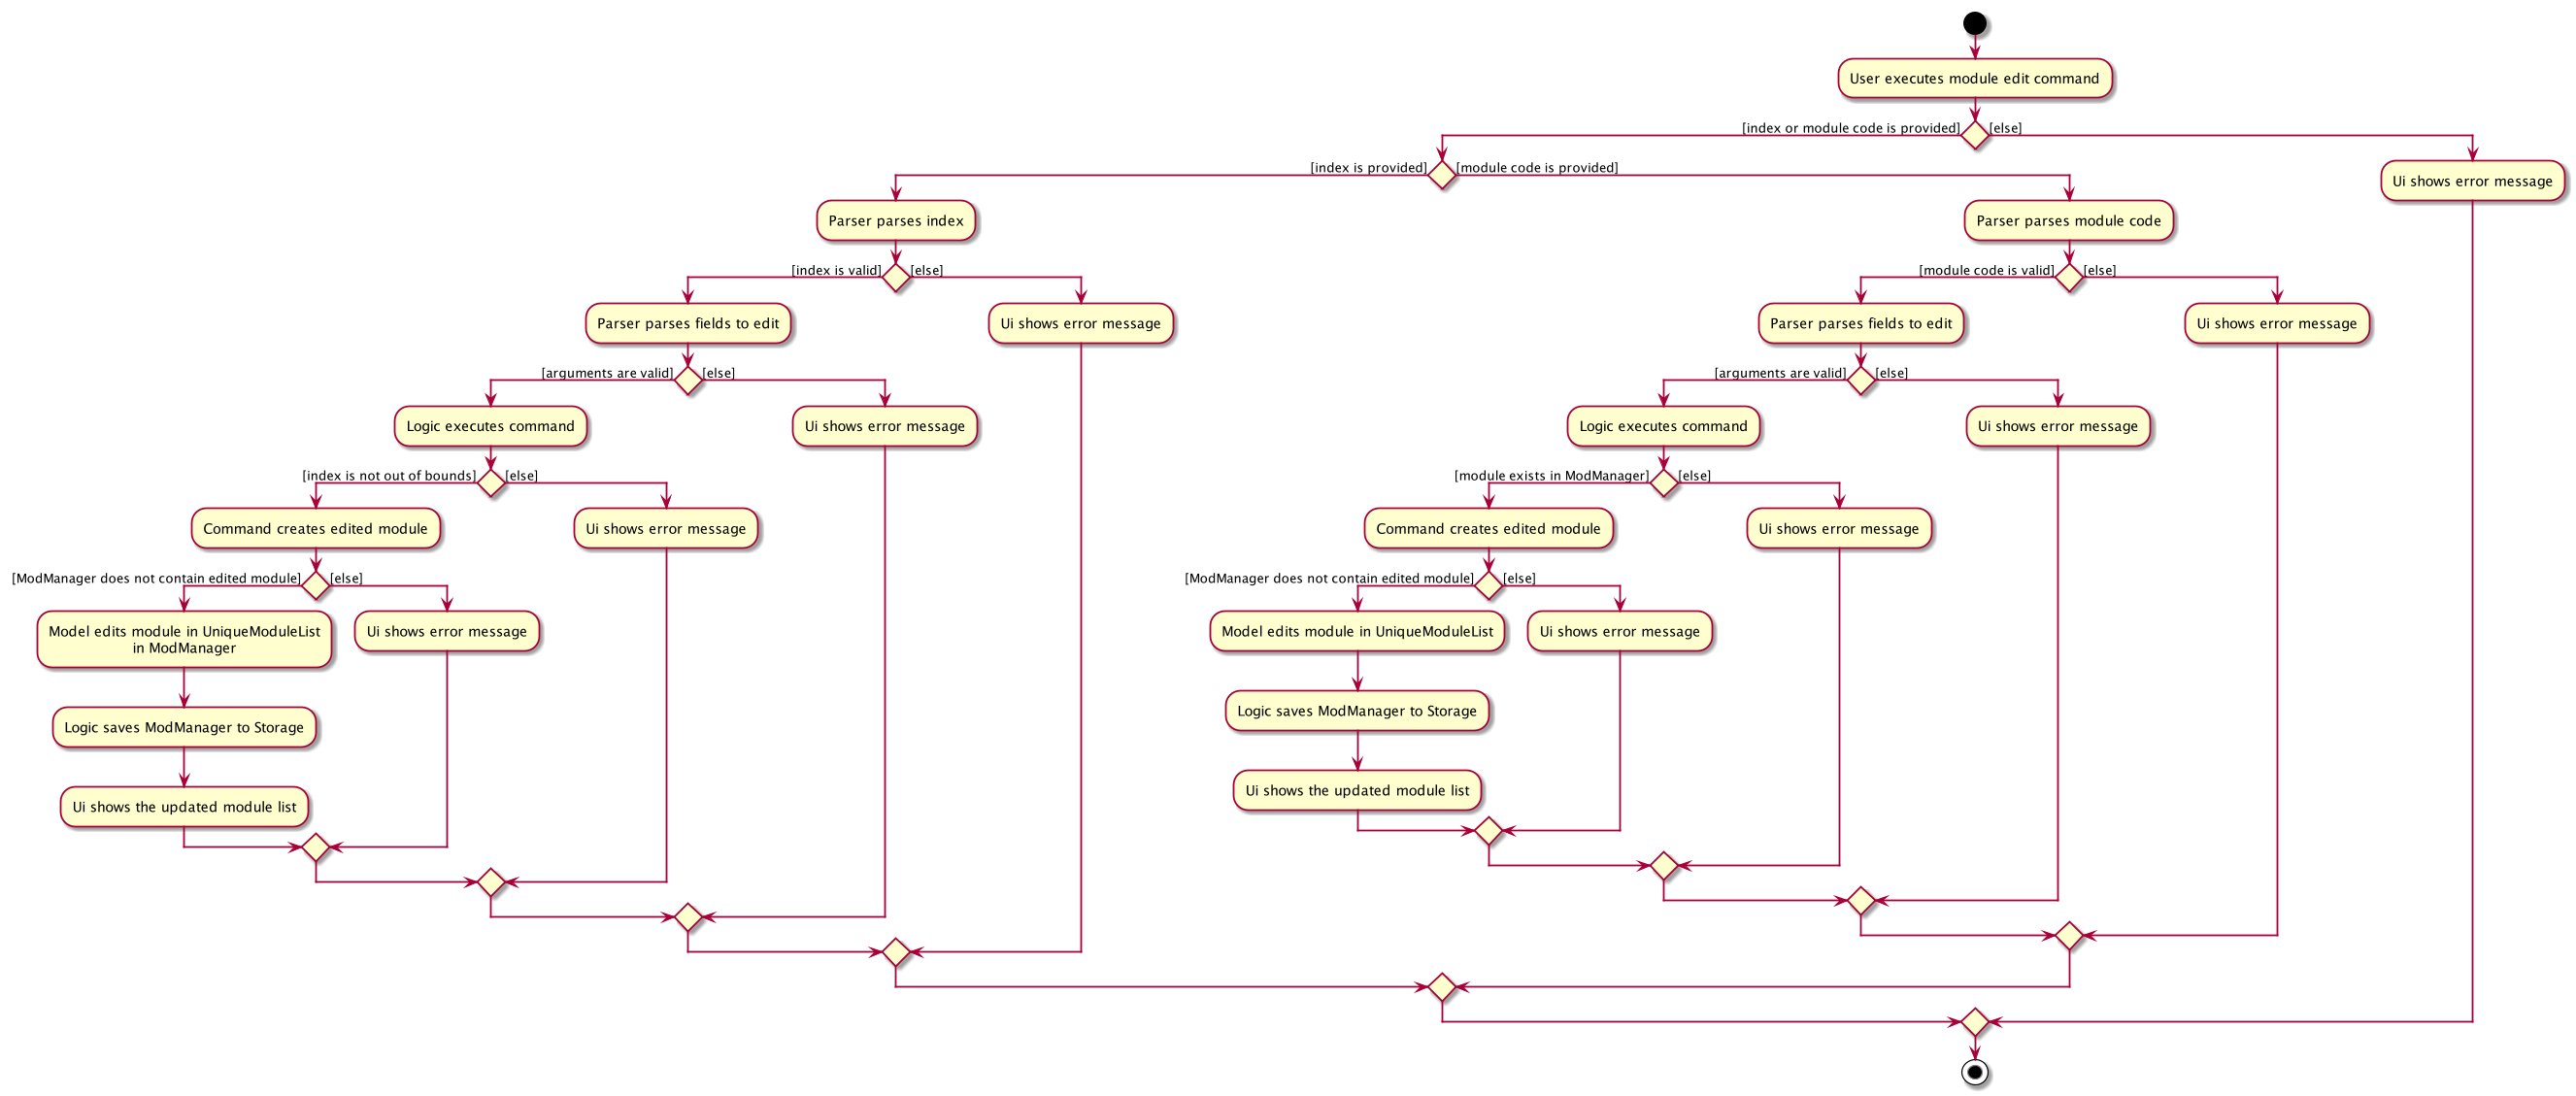
mod edit CommandDeleting a module (Zi Xin)
The delete module feature allows users to delete a module from Mod Manager.
This feature is facilitated by ModuleCommandParser, ModuleDeleteCommandParser and ModuleDeleteCommand.
The operation is exposed in the Model interface as Model#deleteModule().
Given below is an example usage scenario and how the module delete mechanism behaves at each step:
-
The user executes the module delete command and provides the index or module code of the module to be deleted.
-
ModuleDeleteCommandParsercreates a newModuleDeleteCommandbased on the index or module code. -
LogicManagerexecutes theModuleDeleteCommand. -
ModuleDeleteCommandretrieves the module to be deleted. -
ModManagerdeletes the module from theUniqueModuleList. -
ModManagerdeletes facilitators of the module from theUniqueFacilitatorList. -
ModManagerdeletes tasks of the module from theUniqueTaskList. -
ModManagerdeletes lessons of the module from theLessonList. -
ModuleDeleteCommandcreates a newModuleActionbased on the module to be deleted. -
ModelManageradds theModuleActionto theDoableActionList.
The following sequence diagram shows how the module delete command works:
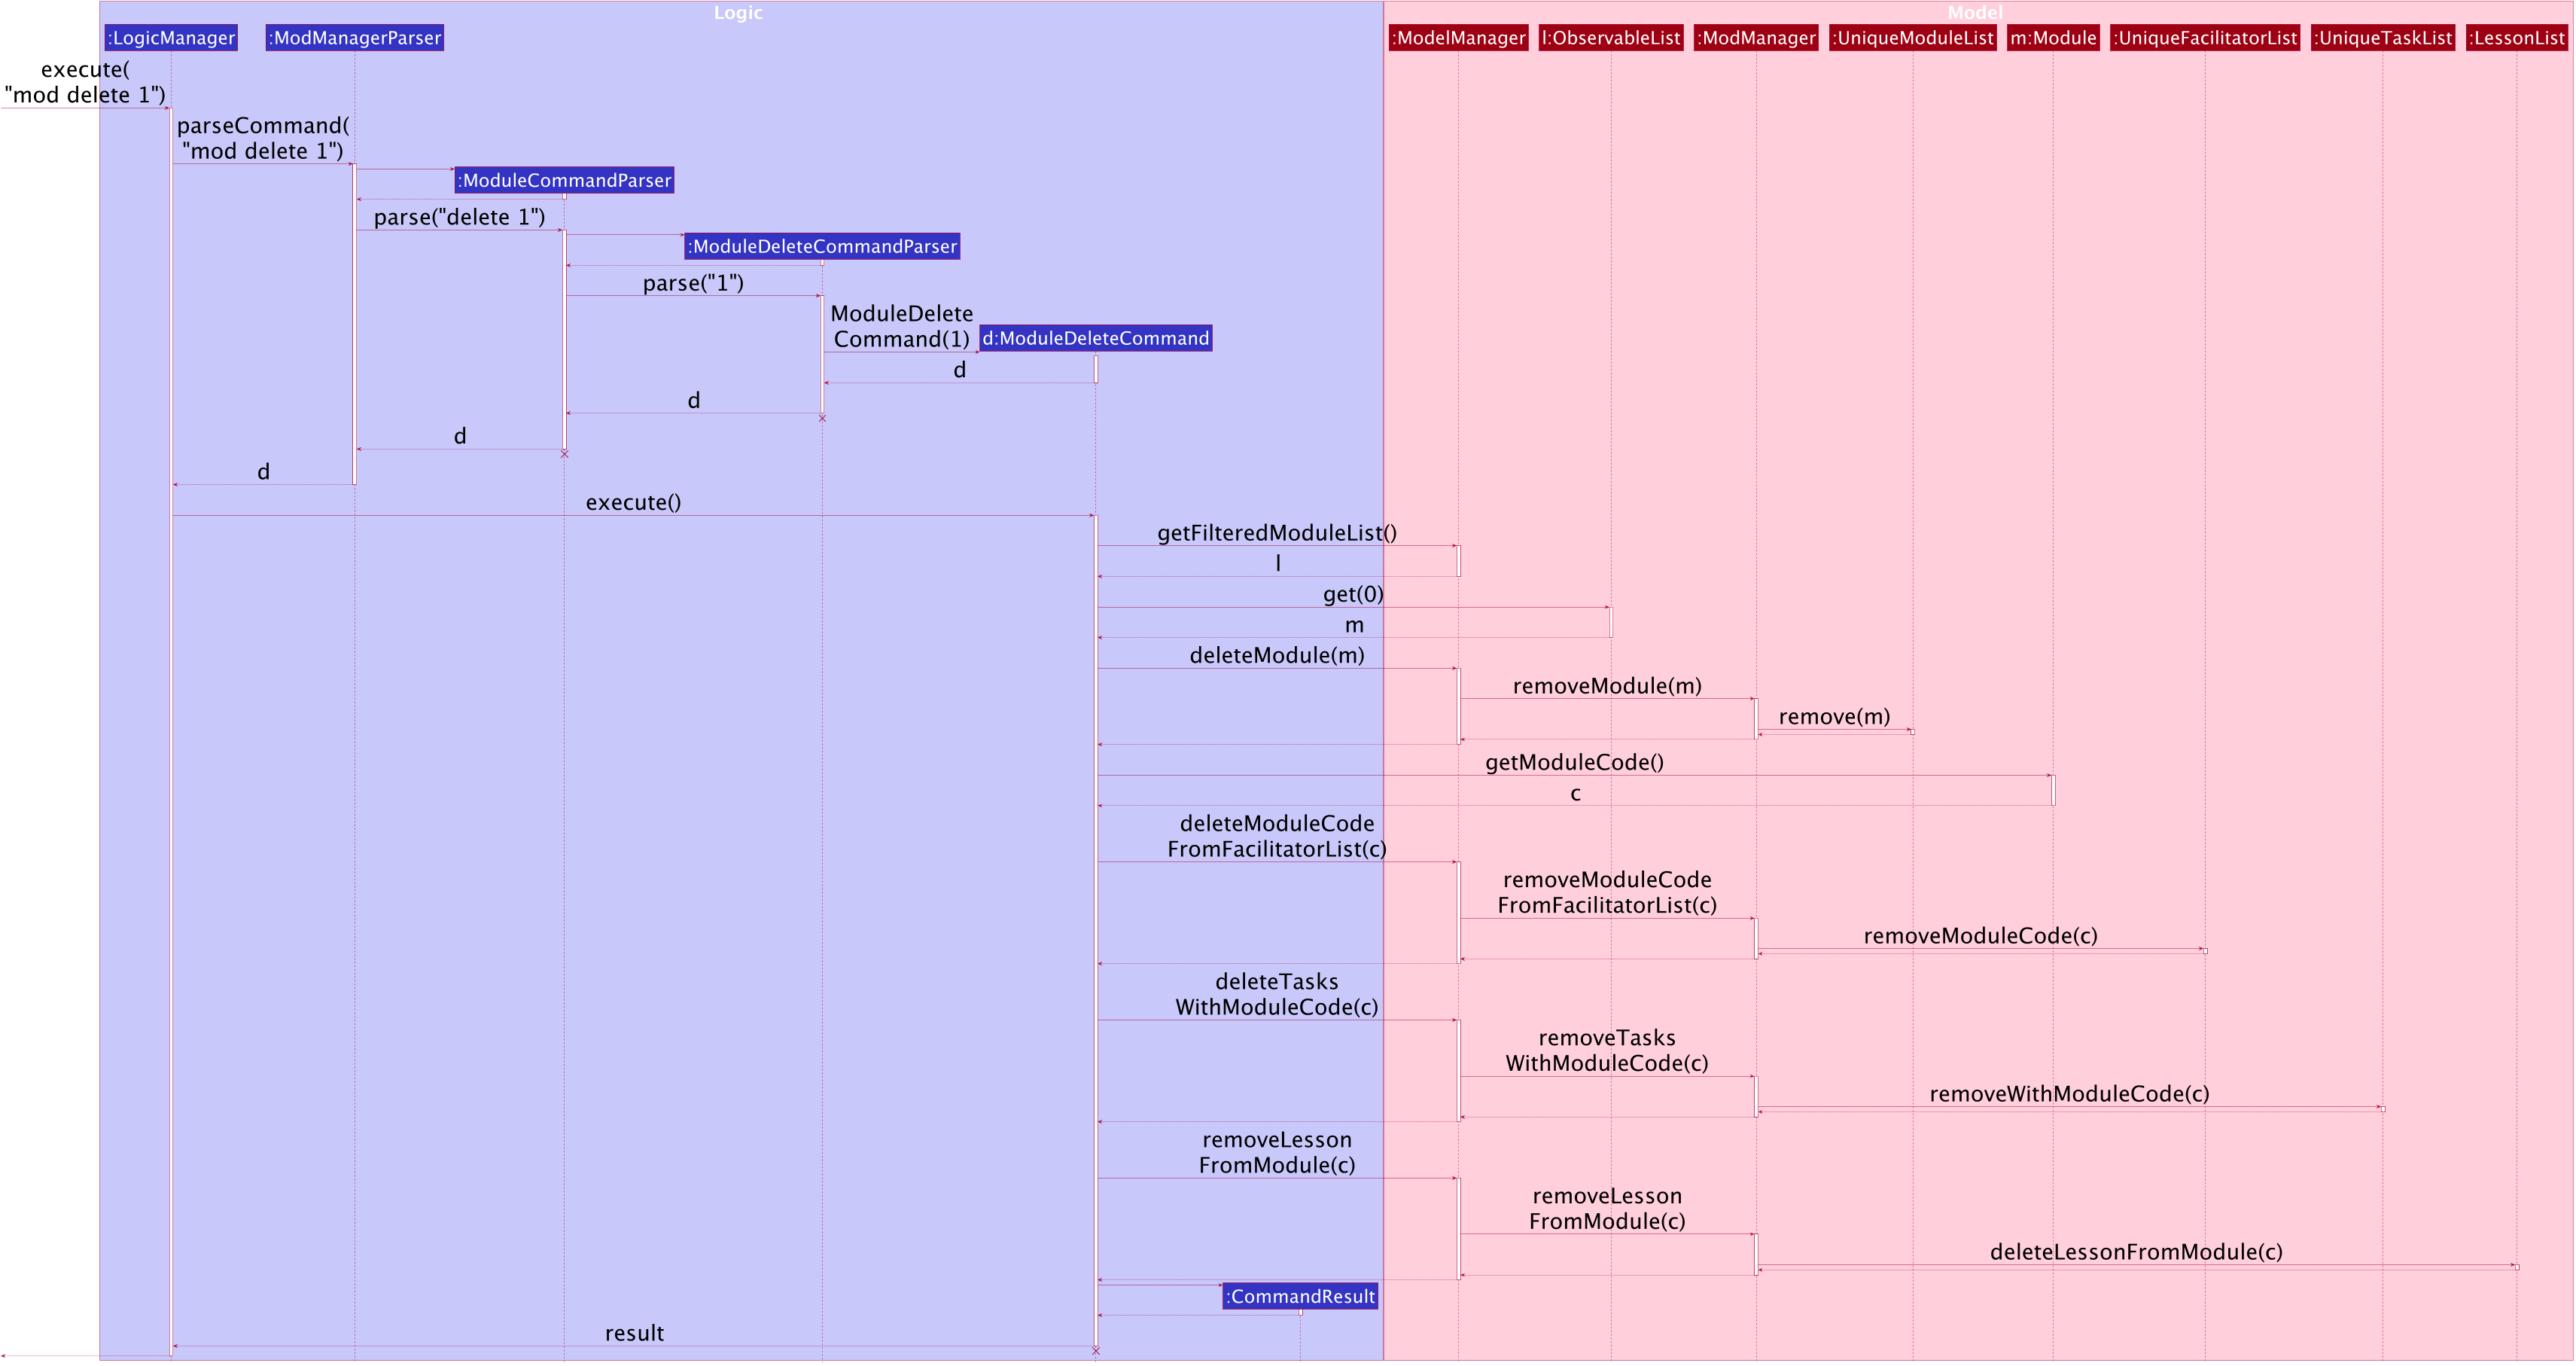
mod delete Command
The lifeline for ModuleCommandParser, ModuleDeleteCommandParser and ModuleDeleteCommand should end at
the destroy marker (X) but due to a limitation of PlantUML, the lifeline reaches the end of the diagram.
|
The following activity diagram summarizes what happens when a user executes a module delete command:
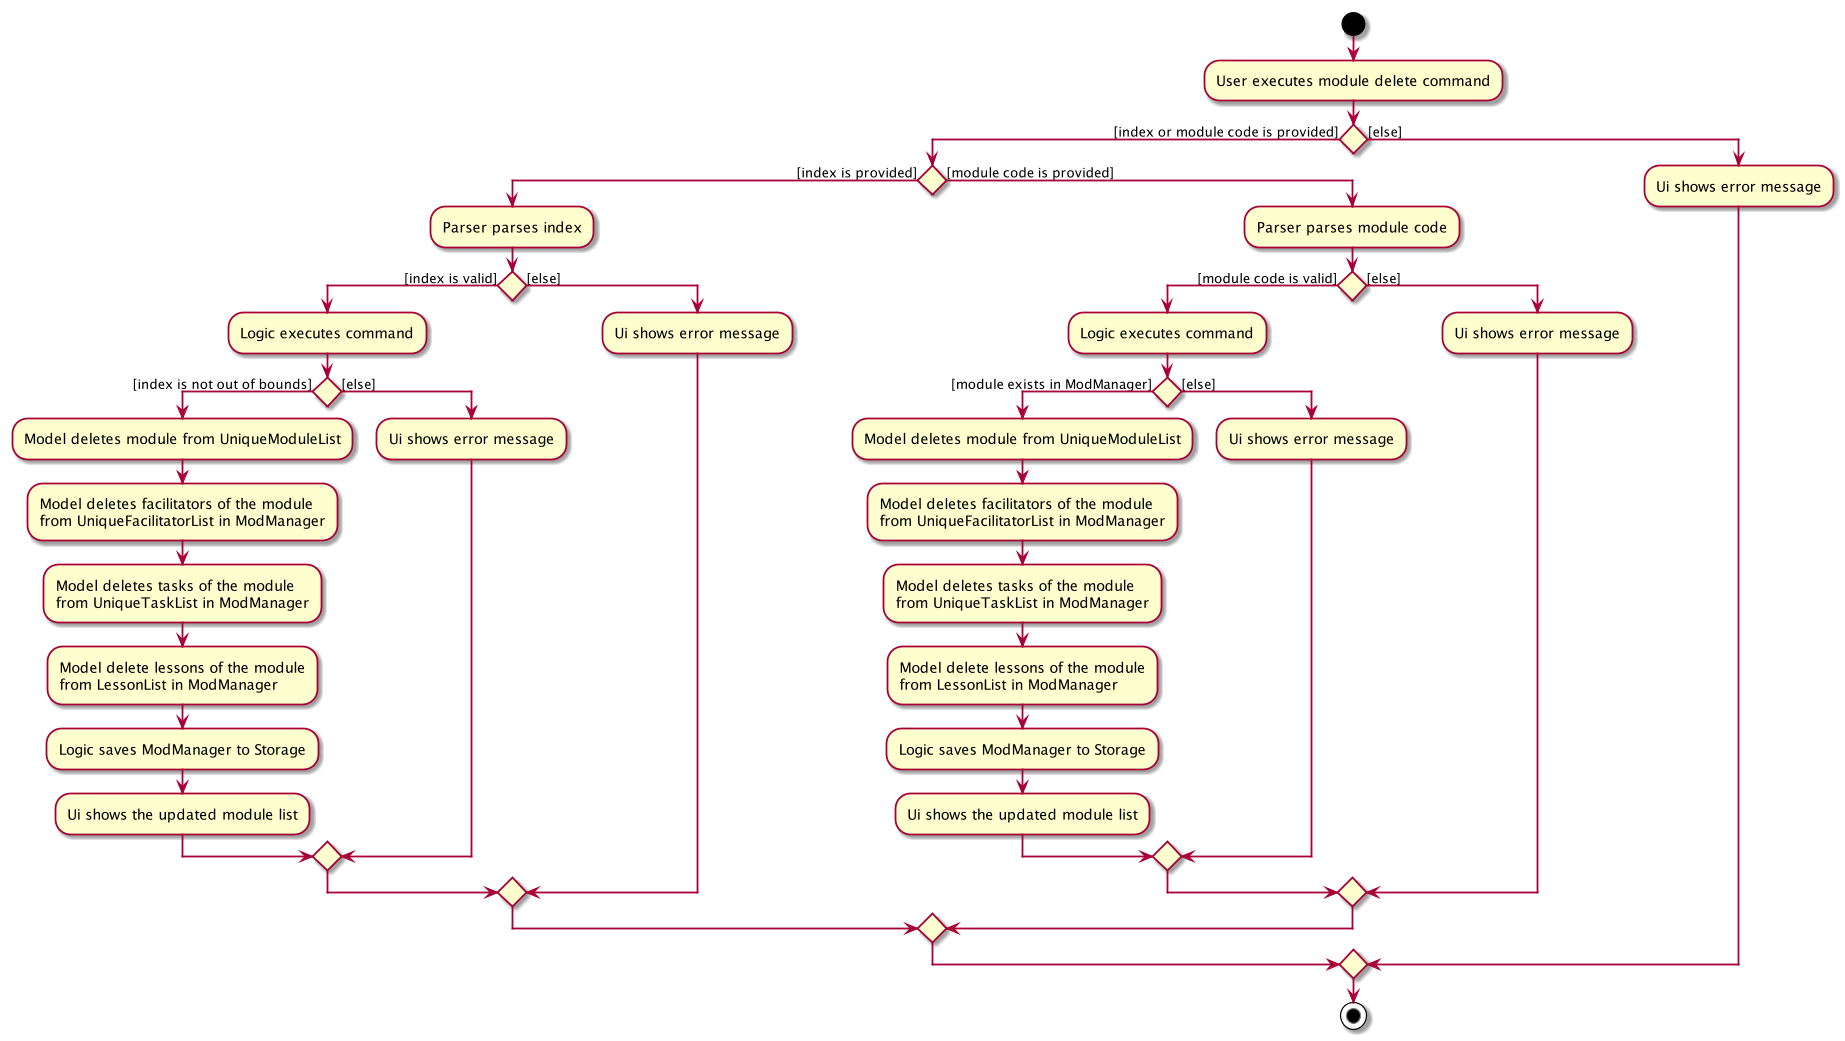
mod delete Command4.2.2. Design Considerations (Zi Xin)
Aspect: Support for editing module code
-
Alternative 1 (current choice): Allow users to edit the module code of a module.
-
Pros: More flexibility for users.
-
Cons: More complex implementation as the classes, tasks and facilitators all store module codes and have to be edited too.
-
-
Alternative 2: Allow users to only edit the description of a module.
-
Pros: Easier to implement.
-
Cons: More rigid for users.
-
Alternative 1 is chosen as it gives users more flexibility and is more user-friendly.
4.3. Class Management Feature
The class feature manages the classes in Mod Manager and is represented by the Lesson class.
A class has a ModuleCode, LessonType, DayAndTime and venue which is a String.
It supports the following operations:
-
add- Adds a class to Mod Manager. -
find- Finds specific classes in Mod Manager. -
edit- Edits a class in Mod Manager. -
delete- Deletes a class in Mod Manager.
4.3.1. Implementation Details
Adding a class (Heidi)
The add class command allows user to add a class to Mod Manager. This feature is facilitated by LessonCommandParser, LessonAddCommandParser and LessonAddCommand. The operation is exposed in the Model interface as Model#addLesson().
Given below is an example usage scenario and how the lesson add mechanism behaves at each step.
-
The user executes the lesson add command and provides the module code, lesson type, day, start time, end time and venue of the lesson to be added.
-
LessonAddCommandParsercreates a newLesson, then a newLessonAddCommand. -
LogicManagerexecutes theLessonAddCommand. -
ModManageradds theLessontoLessonList.
The following sequence diagram shows how the lesson add command works:
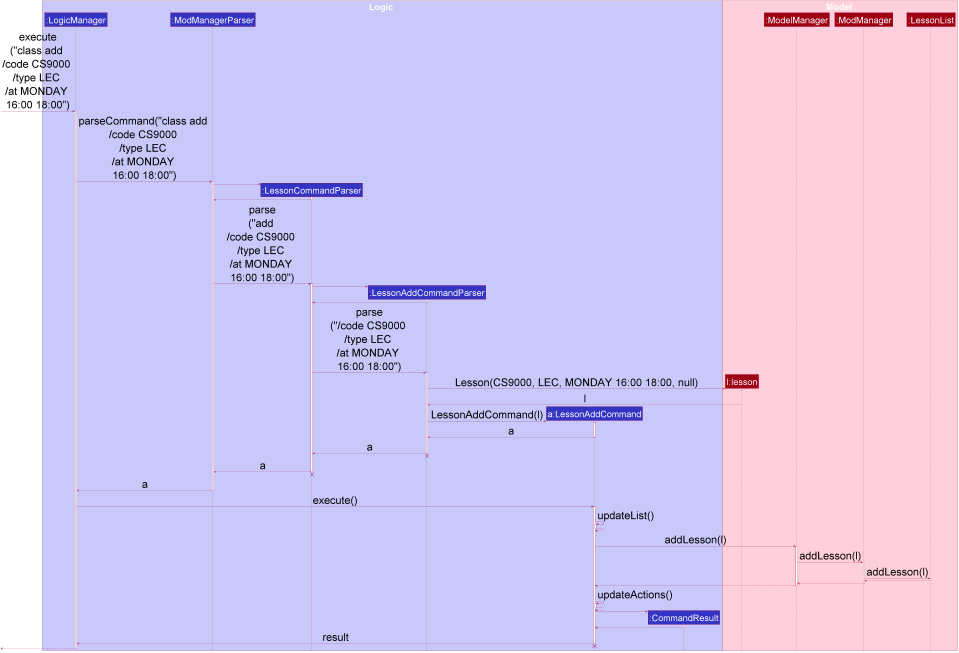
class add Command
The lifeline for LessonCommandParser, LessonAddCommandParser and LessonAddCommand should end at the destroy marker (X) but due to a limitation of PlantUML, the lifeline reaches the end of diagram.
|
The following activity diagram summarizes what happens when a user executes a lesson add command:
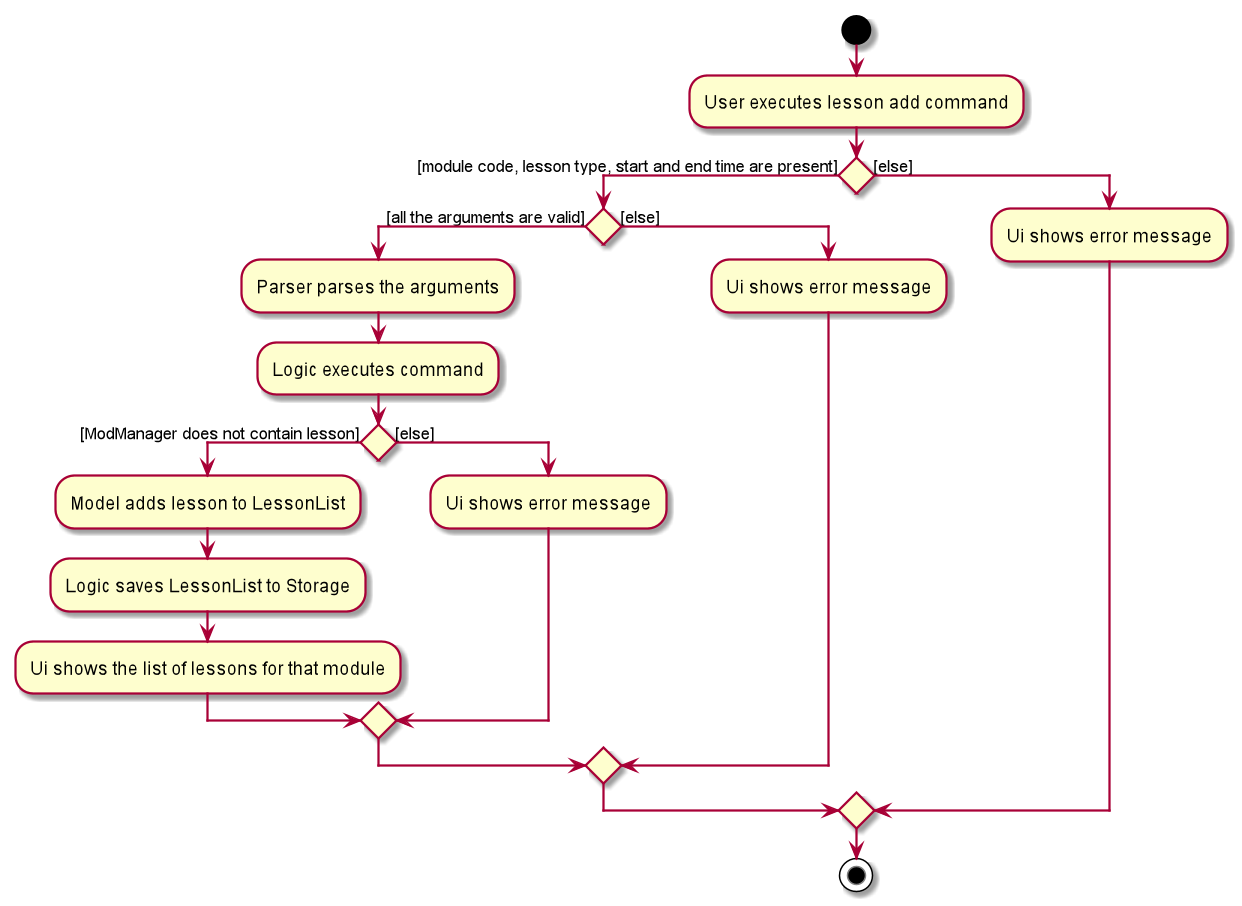
class add CommandFinding a class (Heidi)
The find class command allows user to find a class to Mod Manager. This feature is facilitated by LessonCommandParser, LessonFindCommandParser and LessonFindCommand. The operation is exposed in the Model interface as Model#findNextLesson() and Model#findLessonByDay.
Given below is an example usage scenario and how the lesson find mechanism behaves at each step.
-
The user executes the lesson find command with the
nextprefix. -
LessonFindCommandParsercreates a newLessonFindCommand. -
LogicManagerexecutes theLessonFindCommand.
The following sequence diagram shows how the lesson find command works:
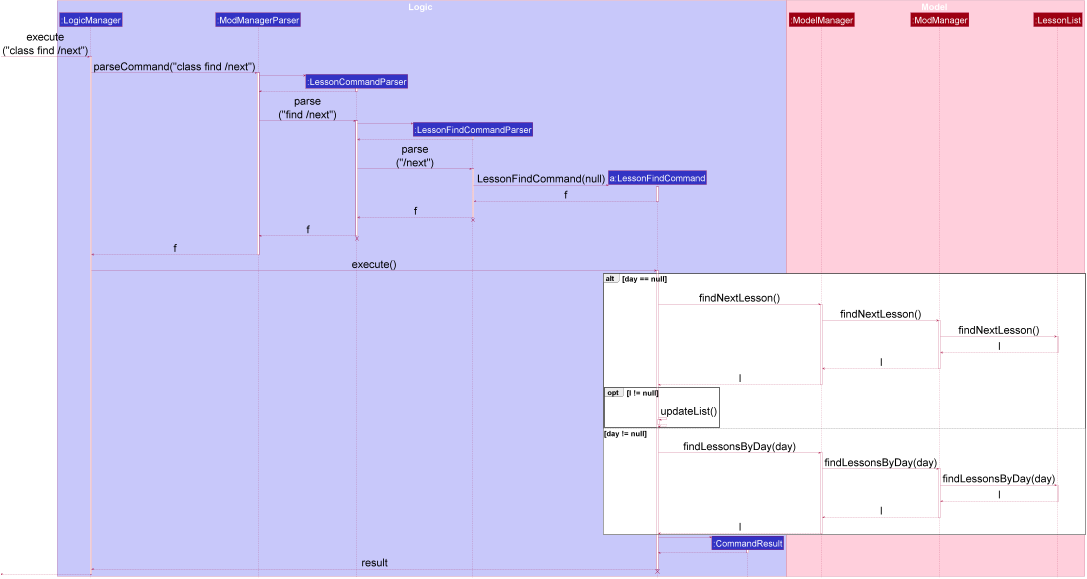
class find Command
The lifeline for LessonCommandParser, LessonFindCommandParser, LessonFindCommand should end at the destroy marker (X) but due to a limitation of PlantUML, the lifeline reaches the end of the diagram.
|
The following activity diagram summarizes what happens when a user executes a lesson find command:
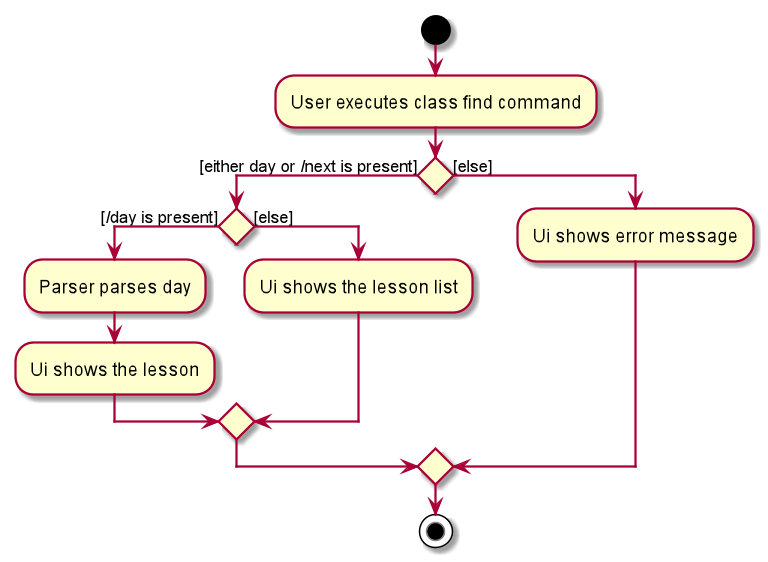
class find CommandEditing a class (Heidi)
The edit class command allows user to edit a class to Mod Manager. This feature is facilitated by LessonCommandParser, LessonEditCommandParser and LessonEditCommand. The operation is exposed in the Model interface as Model#setLesson().
Given below is an example usage scenario and how the lesson edit mechanism behaves at each step.
-
The user executes the lesson edit command and provides the index of the lesson to be edited, the module code of the lesson and the fields to be edited.
-
LessonEditCommandParsercreates a newEditLessonDescriptorwith the fields to be edited. -
LessonEditCommandParsercreates a newLessonEditCommandbased on the index and module code, andEditLessonDescriptor. -
LogicManagerexecutes theLessonEditCommand. -
LessonEditCommandretrieves thelessonto be edited. -
LessonEditCommandcreates a newLesson. -
ModManagersets the existinglessonto the newlessonin theLessonList.
The following sequence diagram shows how the lesson edit command works:
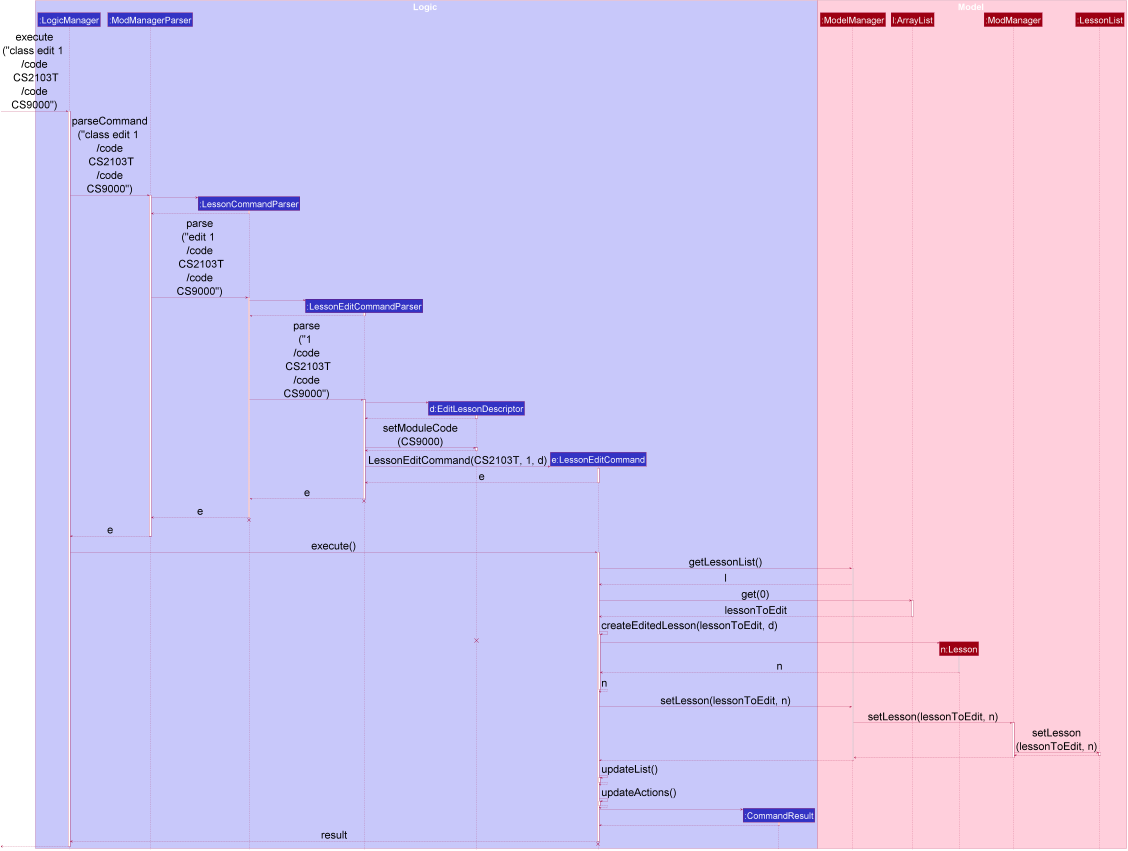
class edit Command
The lifeline for LessonCommandParser, LessonEditCommandParser, EditLessonDescriptor and LessonEditCommand should end at the destroy marker (X) but due to a limitation of PlantUML, the lifeline reaches the end of diagram.
|
The following activity diagram summarizes what happens when a user executes a lesson edit command:
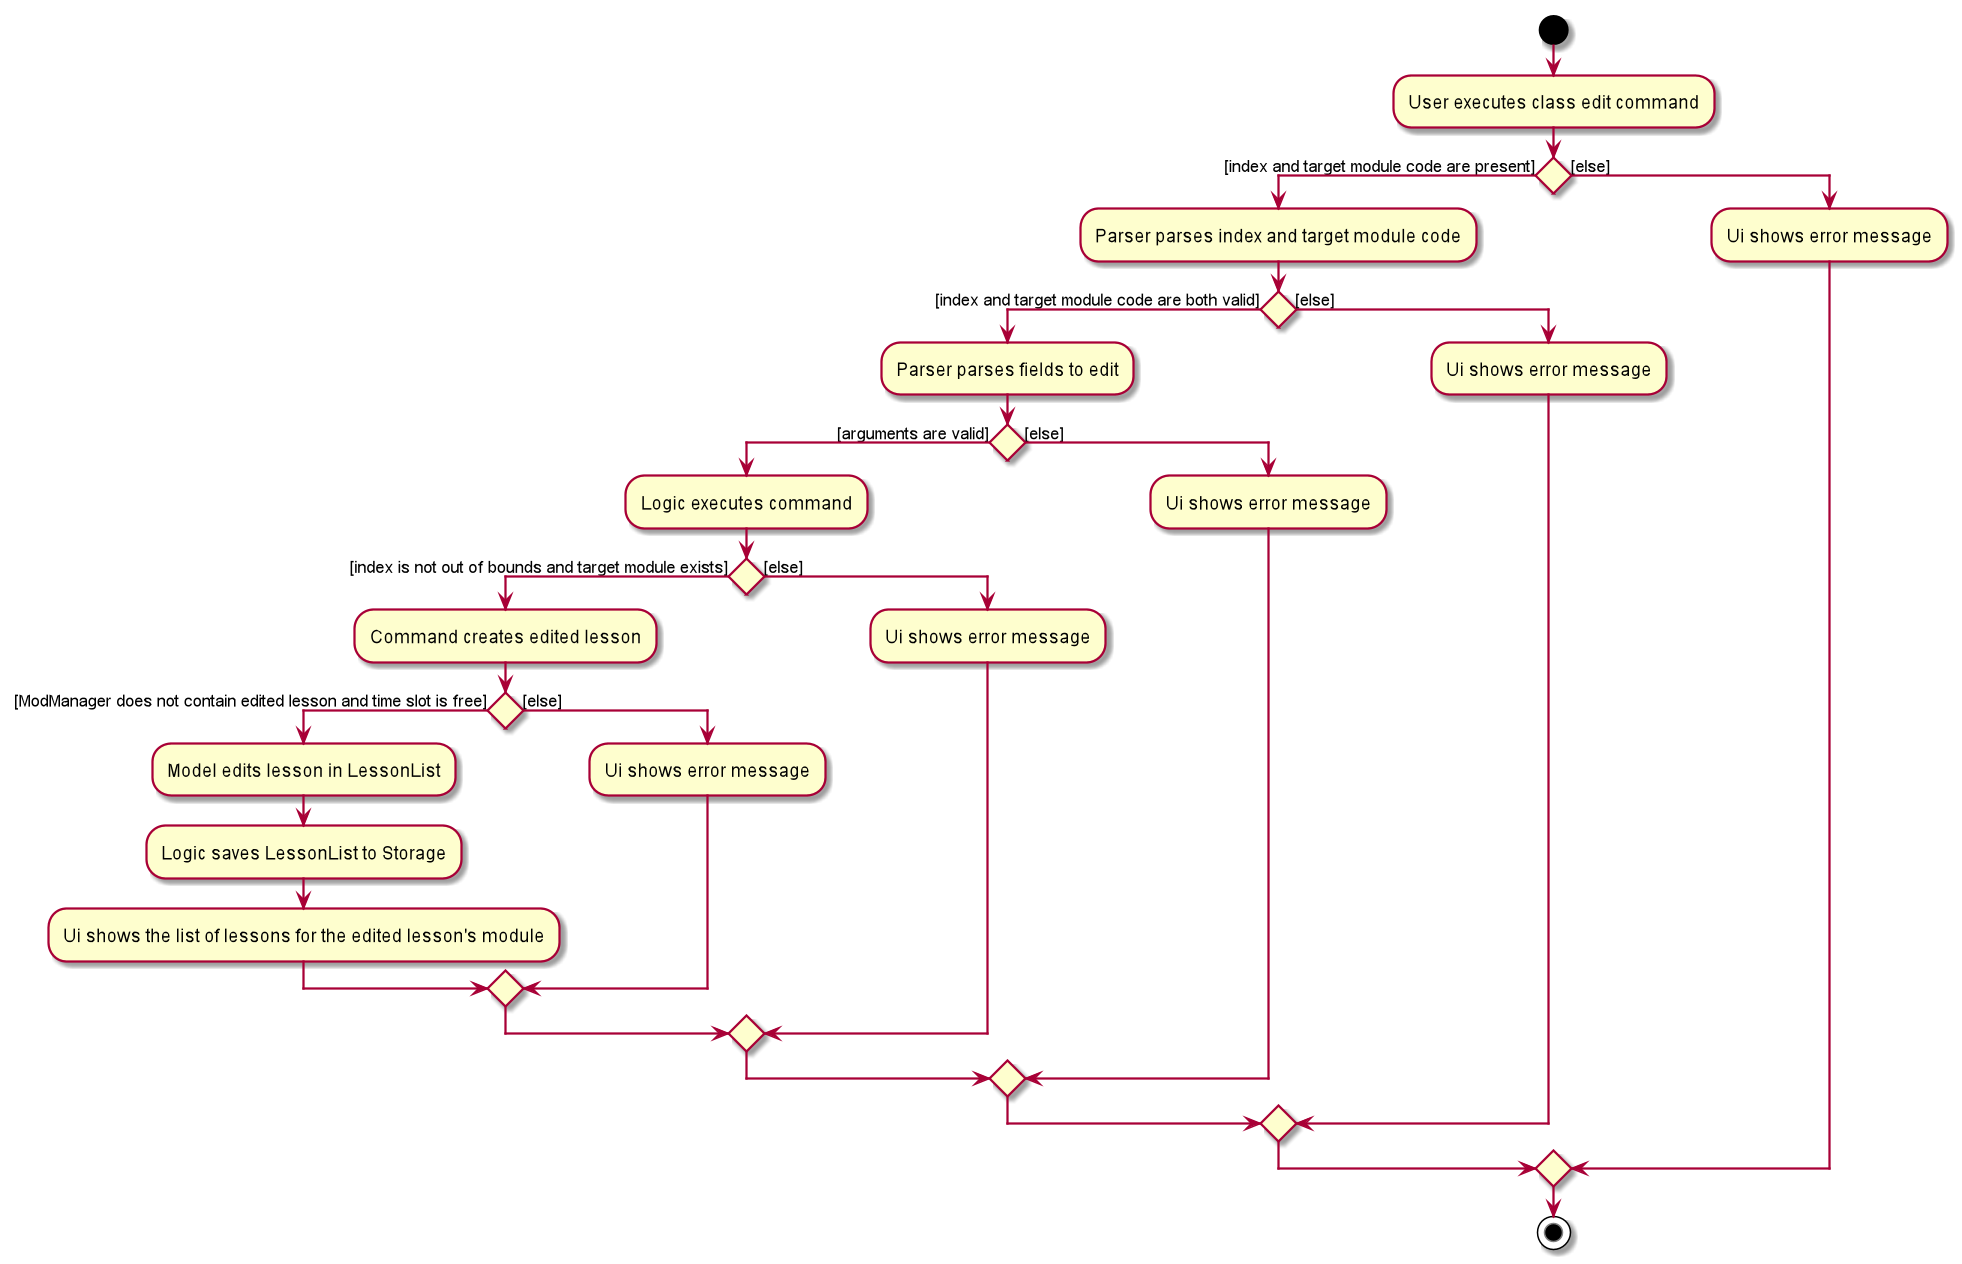
class edit CommandDeleting a class (Heidi)
The delete class command allows user to add a class to Mod Manager. This feature is facilitated by LessonCommandParser, LessonDeleteCommandParser and LessonDeleteCommand. The operation is exposed in the Model interface as Model#removeLesson().
Given below is an example usage scenario and how the lesson delete mechanism behaves at each step.
-
The user executes the lesson delete command and provides the index of the lesson to be deleted.
-
LessonDeleteCommandParsercreates a newLessonDeleteCommand. -
LogicManagerexecutes theLessonDeleteCommand. -
LessonDeleteCommandretrieves thelessonto be deleted. -
ModManagerdeletes theLessonfromLessonList.
The following sequence diagram shows how the lesson delete command works:
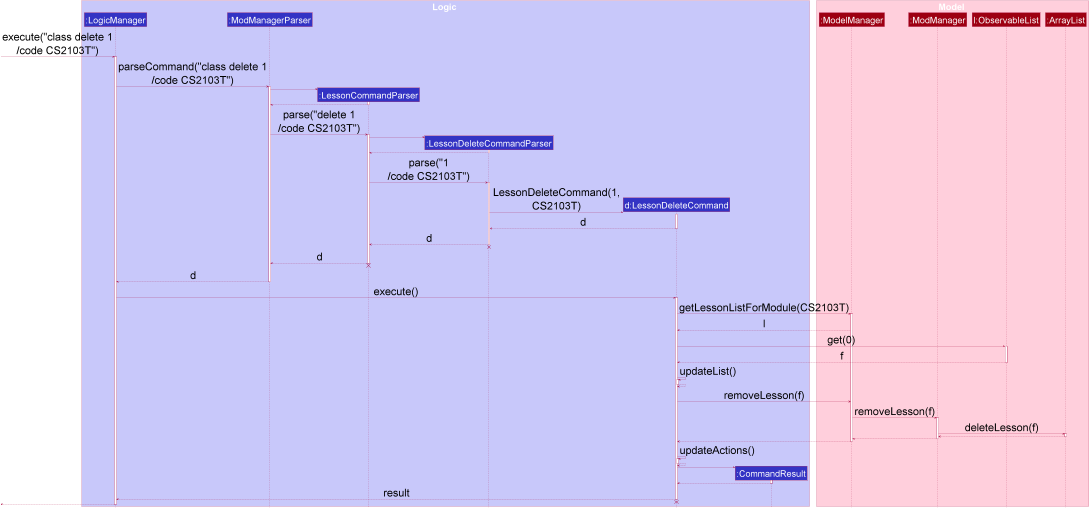
class delete Command
The lifeline for LessonCommandParser, LessonDeleteCommandParser and LessonDeleteCommand should end at the destroy marker (X) but due to a limitation of PlantUML, the lifeline reaches the end of the diagram.
|
The following activity diagram summarizes what happens when a user executes a lesson delete command:
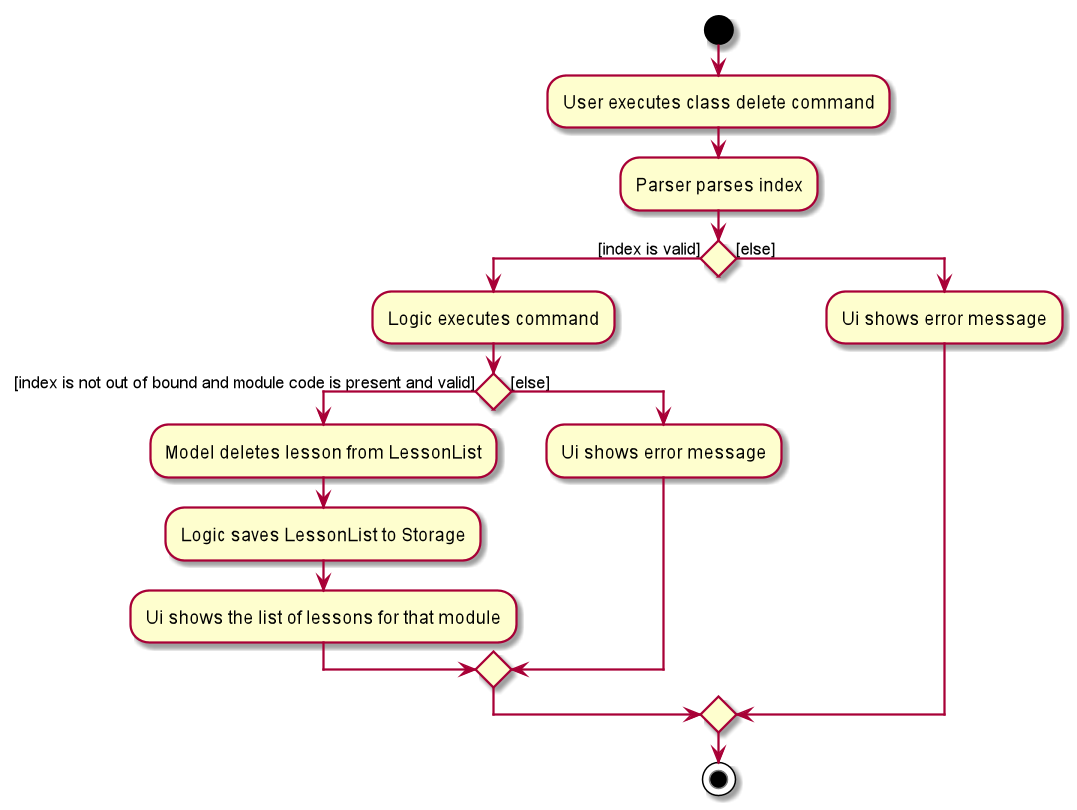
class delete Command4.3.2. Design Considerations (Heidi)
Aspect: Prefix of day and time
-
Alternative 1 (current choice): Have one prefix for all three
day,startTimeandendTimefields.-
Pros: User types less.
-
Cons: When user wants to edit one field only, user have to key in other unnecessary details.
-
-
Alternative 2: Have one prefix each for
day,startTimeandendTimefields.-
Pros: Easier to parse and less invalid inputs to take note of. User can also edit any field.
-
Cons: More prefixes to remember and command will be very lengthy.
-
4.4. Task Management Feature
The task management feature manages the tasks in Mod Manager and is represented by the Task abstract class with implementing class
ScheduledTask for a Task with a time and NonScheduledTask for a Task with no specified time.
A task has a Description, an optional TaskDateTime, and exactly one ModuleCode.
A Module with that ModuleCode of the task should exist in Mod Manager.
A Task object also has a unique ID number specified by its ModuleCode and a 3-digit number ranging from
100 to 999. Since part of the ID is the ModuleCode, a Task object only needs to store an extra taskNum.
Generating task number is done through static calls to methods of TaskNumManager.
It supports the following operations:
-
add- Adds a task to aModulein Mod Manager. -
edit- Edits the information of a task in Mod Manager. -
delete- Deletes a task from theModuleand Mod Manager. -
done- Marks a task as done in Mod Manager. -
list- Shows a list of all tasks across allModules in Mod Manager. -
module- Shows a list of all tasks for a specifiedModulein Mod Manager. -
undone- Shows a list of all undone tasks in Mod Manager. -
find- Finds tasks in Mod Manager by its description. -
search- Searches for tasks that occur on the specified date, month, or year in Mod Manager. -
upcoming- Finds upcoming tasks (for tasks with a specified time) in Mod Manager.[coming in v2.0]
4.4.1. Implementation Details
Adding a task (Nhat, Bao)
The add task feature allows users to add a task to Mod Manager.
This feature is facilitated by TaskCommandParser, TaskAddCommandParser and `
TaskAddCommand`.
The operation is exposed in the Model interface as Model#addTask().
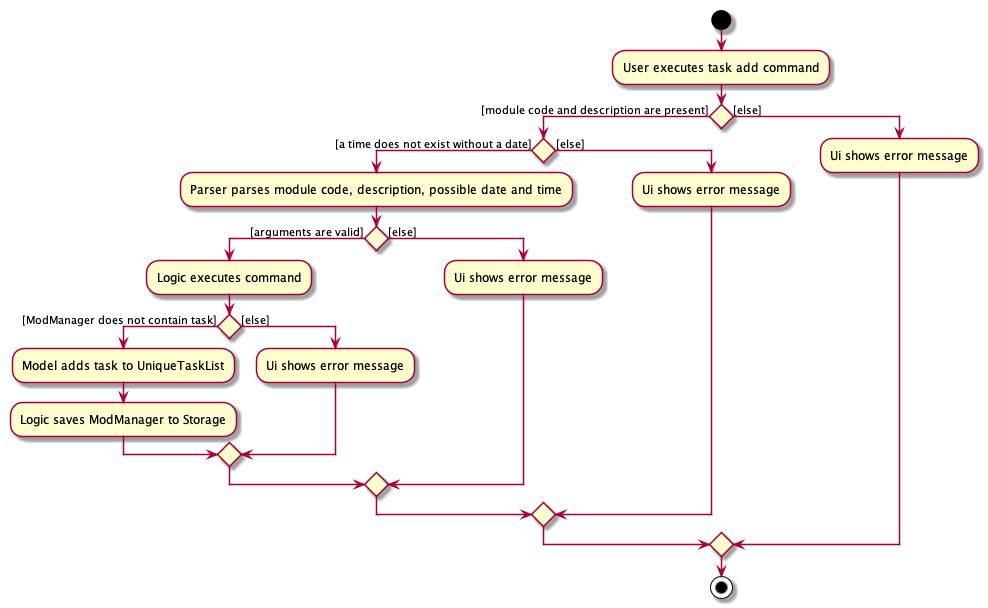
Given below is an example usage scenario and how the task add mechanism behaves at each step:
-
The user executes the
task addcommand and provides the module code, the description of the task (both compulsory), and a time (optional), which consists of a date (for example,15/04/2020) or a date and time (15/04/2020and23:59) of the task to be added. -
TaskAddCommandParsercreates a newTaskbased on the module code, description, and time (if provided). -
TaskAddCommandParsercreates a newTaskAddCommandbased on the task. -
LogicManagerexecutes theTaskAddCommand. -
ModManageradds the task to theUniqueTaskList. -
ModelManagerupdates thefilteredTasksinModelManager.
The following sequence diagram shows how the task add command works:
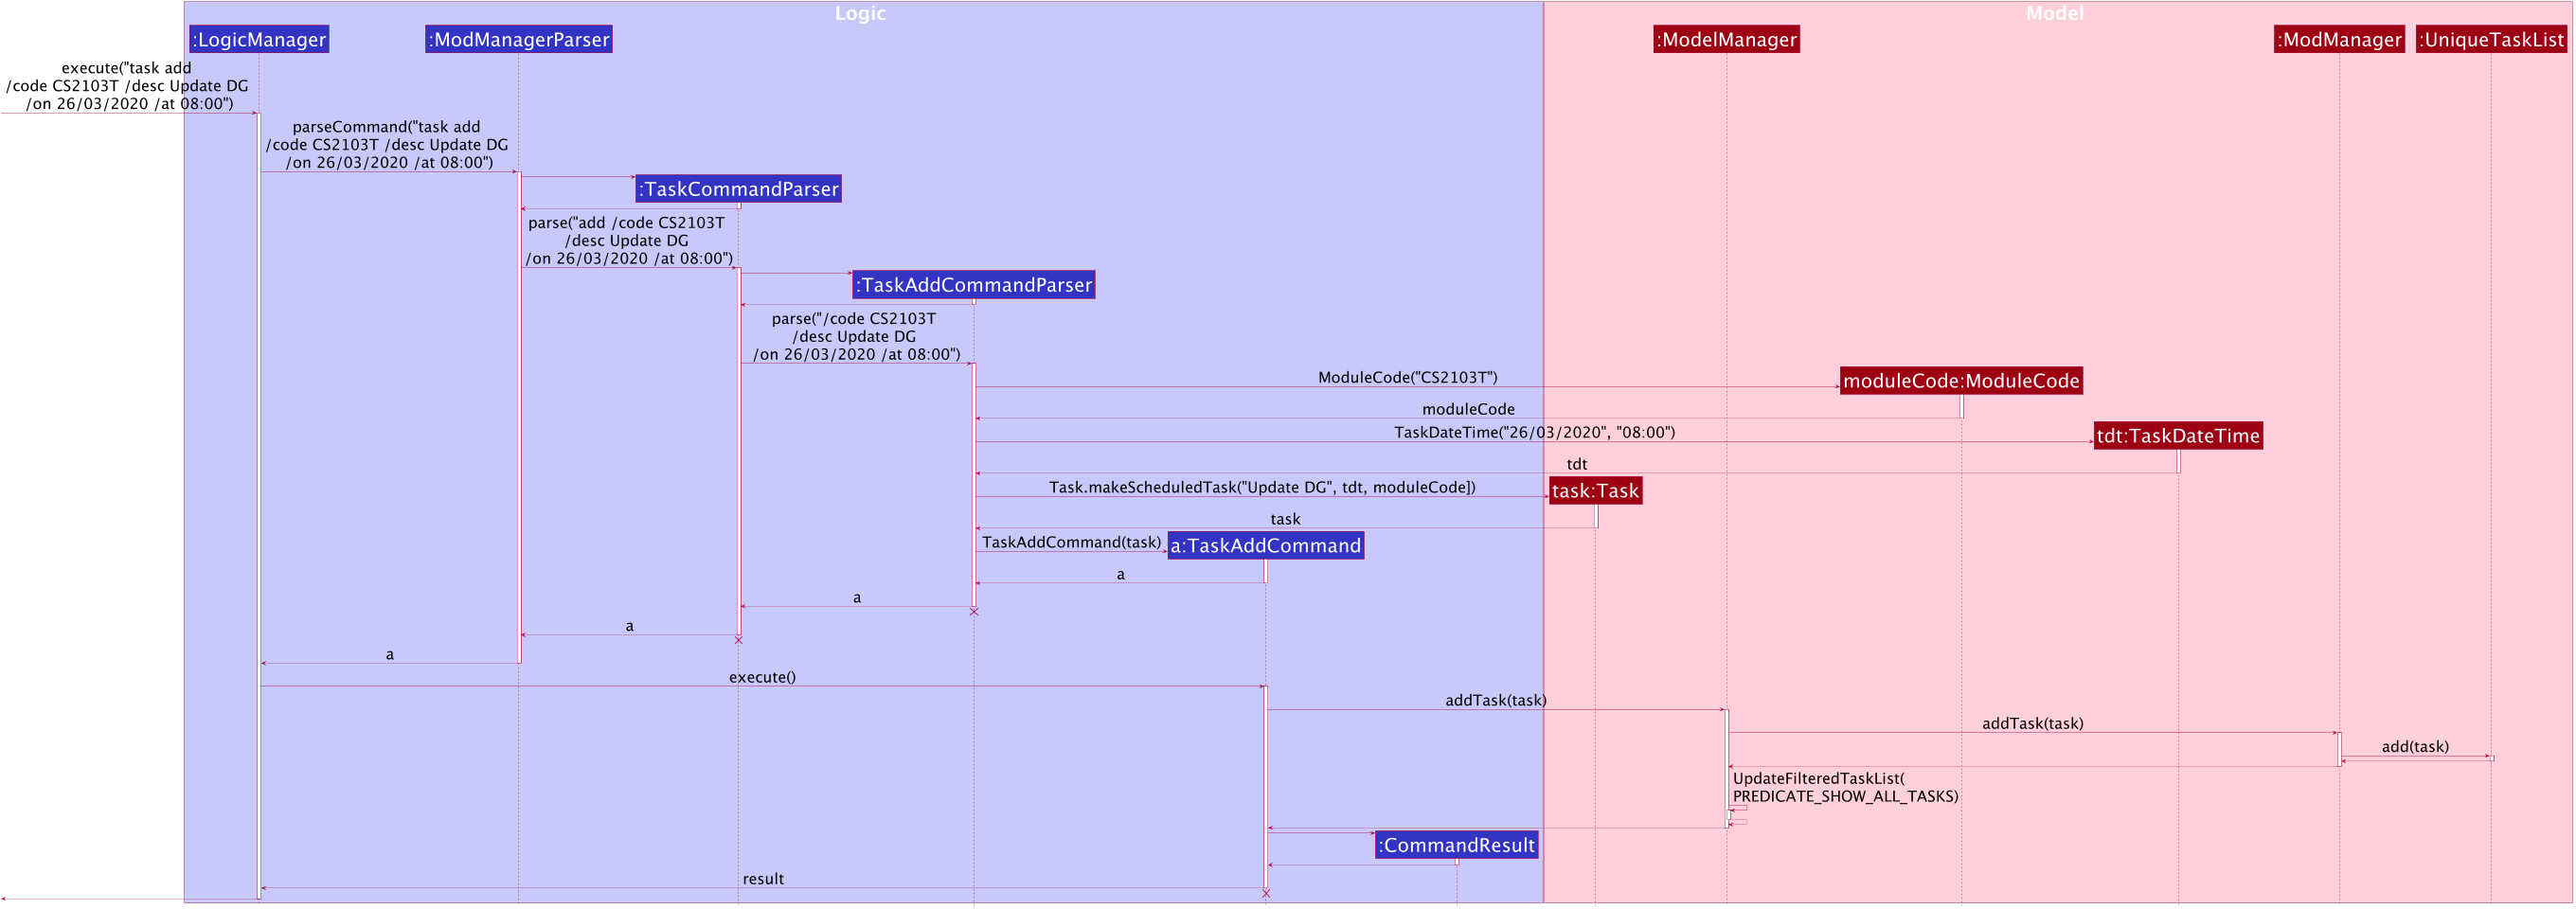
task add Command
The lifeline for TaskCommandParser, TaskAddCommandParser and TaskAddCommand should end at
the destroy marker (X) but due to a limitation of PlantUML, the lifeline reaches the end of diagram.
|
The following activity diagram summarizes what happens when a user executes a task add command:
task add CommandEditing a task (Nhat)
The task edit command allows user to edit a task in Mod Manager.
The fields that can be edited are: description, and task date and time.
This feature is facilitated by TaskCommandParser, TaskEditCommandParser and TaskEditCommand.
The operation is exposed in the Model interface as Model#setTask().
Given below is an example usage scenario and how the task edit mechanism behaves at each step.
-
The user executes the task edit command and provides the
moduleCodeand thetaskNumof the task to edit, and the fields to be edited. -
TaskEditCommandParsercreates a newEditTaskDescriptorwith the fields to be edited. -
TaskEditCommandParsercreates a newTaskEditCommandbased on themoduleCodeandtaskNum, andEditTaskDescriptor. -
LogicManagerexecutes theTaskEditCommand. -
TaskEditCommandretrieves themoduleCodeandtaskNumof thetaskto be edited, and then retrieves the actualtaskfromModManager. -
TaskEditCommandcreates a newTask. Since the user can usetask editto remove a task’s date/time, a specialTaskDateTimehas been set to01/01/1970to help with theeditcommand. Essentially, if theEditTaskDescriptioncarries such date, the newly createdTaskwill not have aTaskDateTimeand be of typeNonScheduledTask. An assumption about user inputs is made here: no one will actually input01/01/1970as a date. -
ModManagersets the existingtaskto the newtaskin theUniqueTaskList. -
The
editaction is recorded inModelManager.
The following sequence diagram shows how a TaskEditCommand is created after the parsing steps:
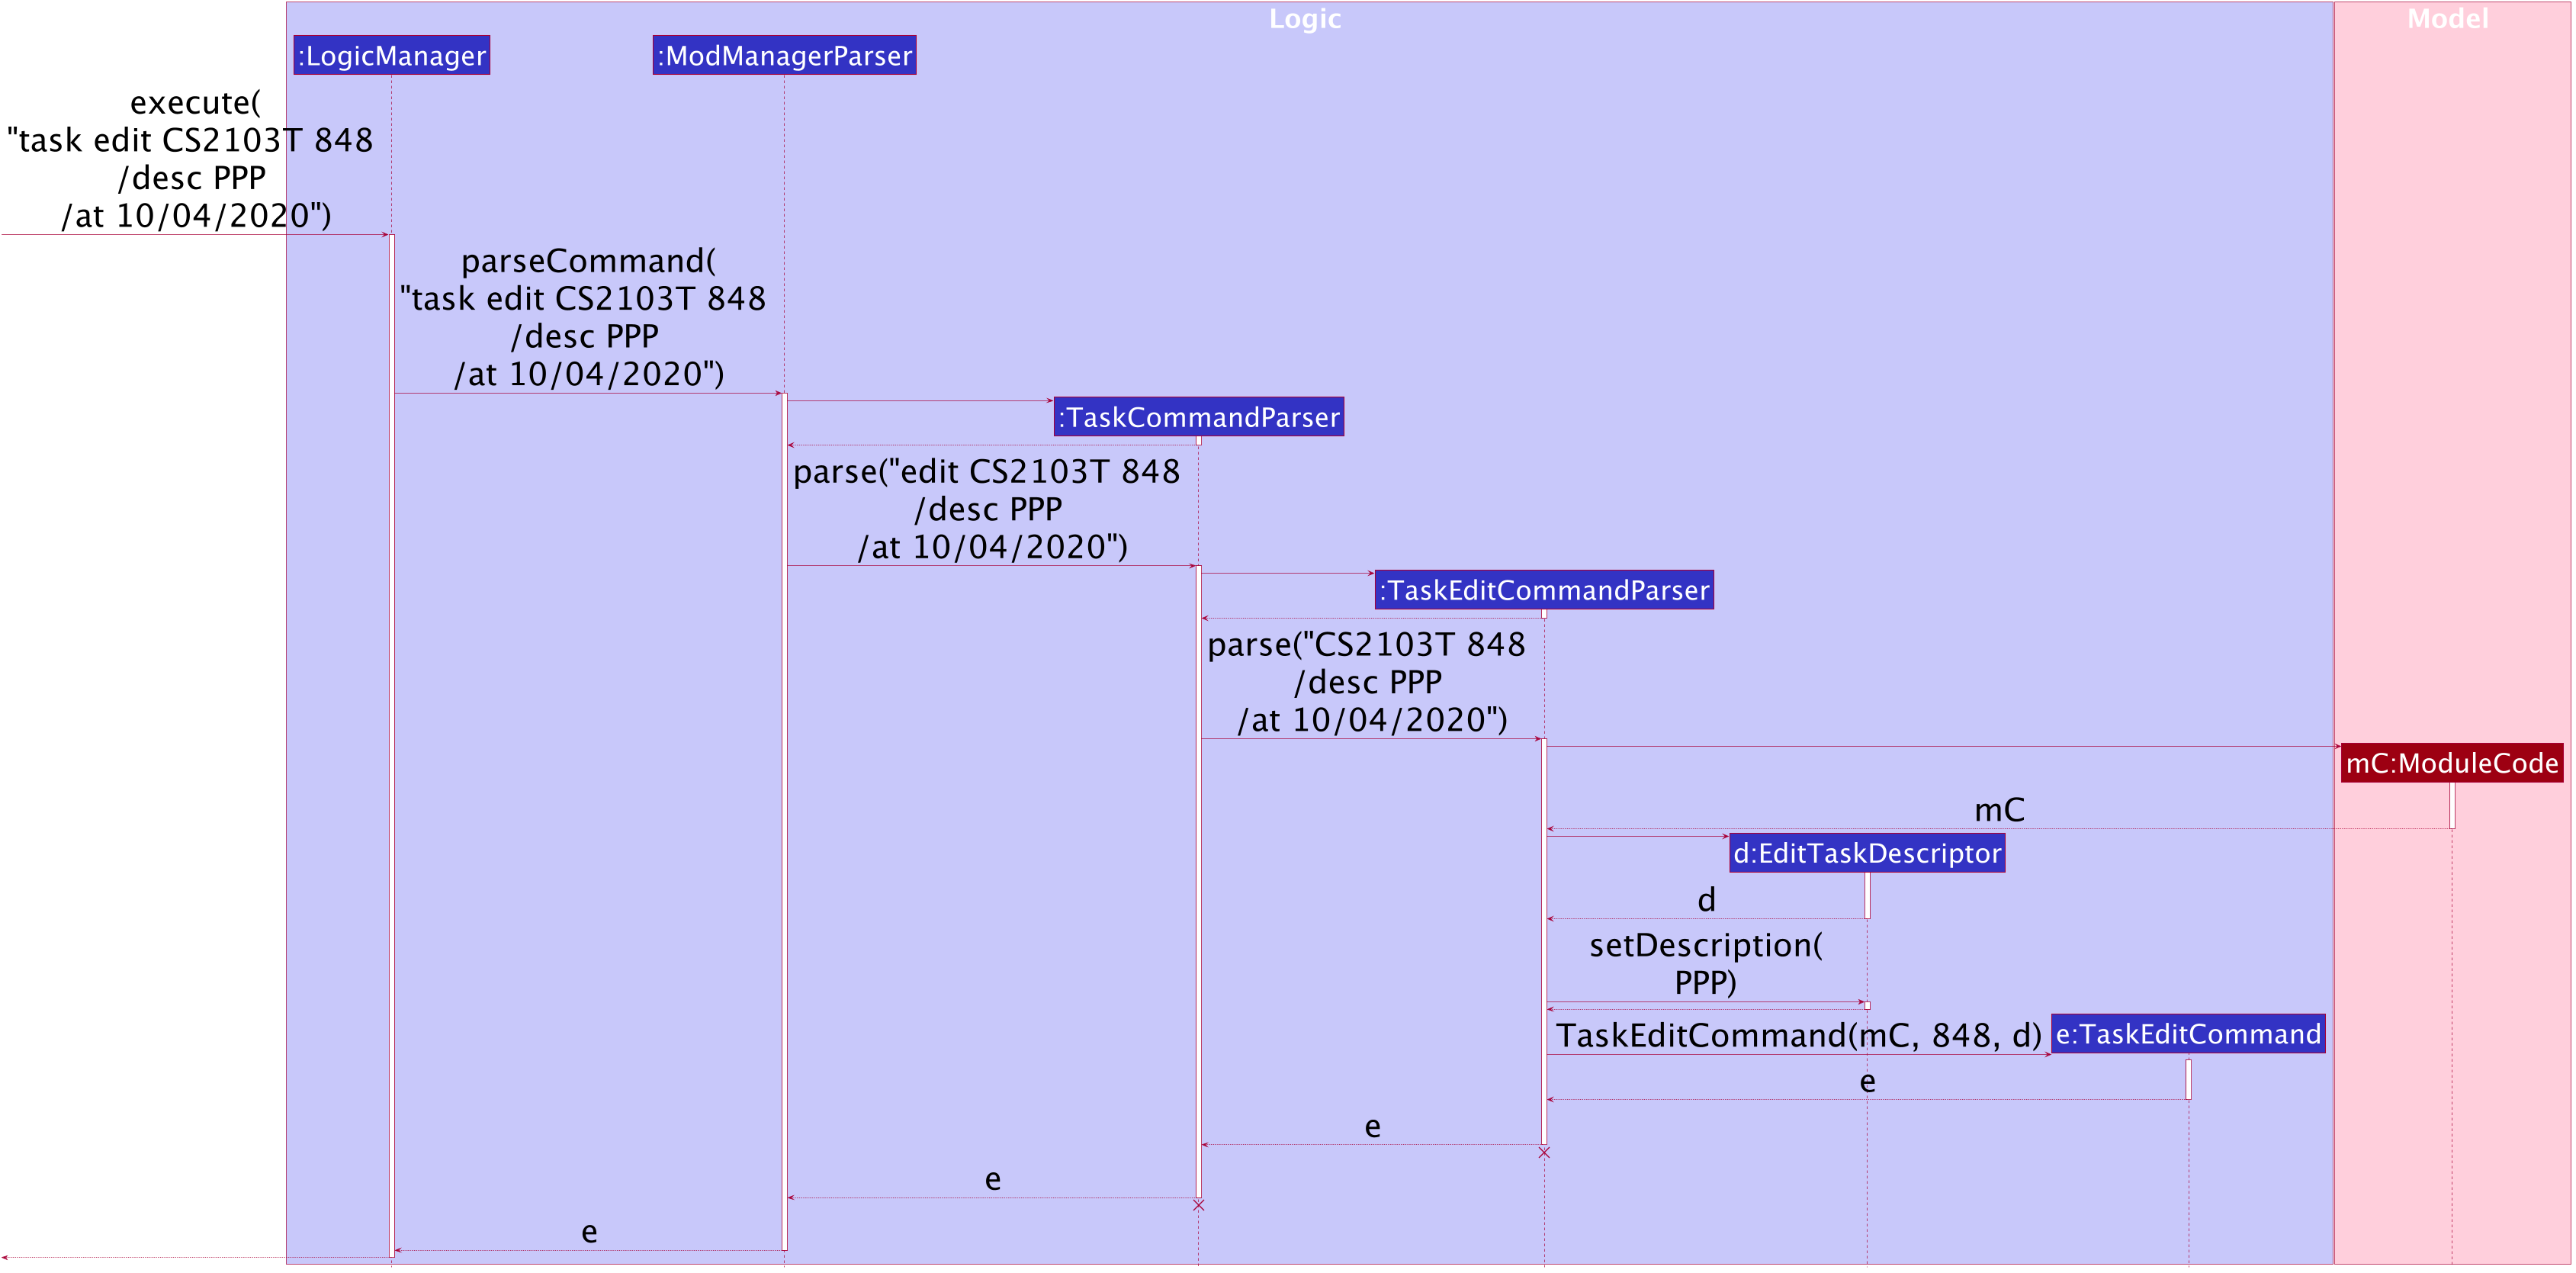
TaskEditCommand Creation Steps
The lifeline for TaskCommandParser and TaskEditCommandParser should end at
the destroy marker (X) but due to a limitation of PlantUML, the lifeline reaches the end of diagram.
|
The execution of a TaskEditCommand is described below.
-
List<Task> currentis retrieved by callingmodel.getFilteredTaskList. -
The correct
taskToEditis retrieved fromcurrentby turning it into astreamand use thereducemethod. -
The
editedTaskis created using methodcreateEditedTask. -
modelsetstaskToEdittoeditedTaskin theUniqueTaskListvia calls toModManager. -
An
editTaskActionis created and added tomodel. -
A
CommandResultis returned.
Deleting a task (Nhat)
The delete task feature allows user to delete a task from Mod Manager.
This feature is facilitated by TaskCommandParser, TaskDeleteCommandParser and TaskDeleteCommand.
The operation is exposed in the Model interface as Model#deleteTask().
Given below is an example usage scenario and how the task delete mechanism behaves at each step:
-
The user executes the task delete command and provides the
moduleCodeandtaskNumof the task to be deleted. -
TaskDeleteCommandParsercreates a newTaskDeleteCommandbased on themoduleCodeandtaskNum. -
LogicManagerexecutes theTaskDeleteCommand. -
TaskDeleteCommandretrieves the task to be deleted. -
ModManagerdeletes the task from theUniqueTaskList.
The following sequence diagram shows how a TaskDeleteCommand is created after the parsing steps:
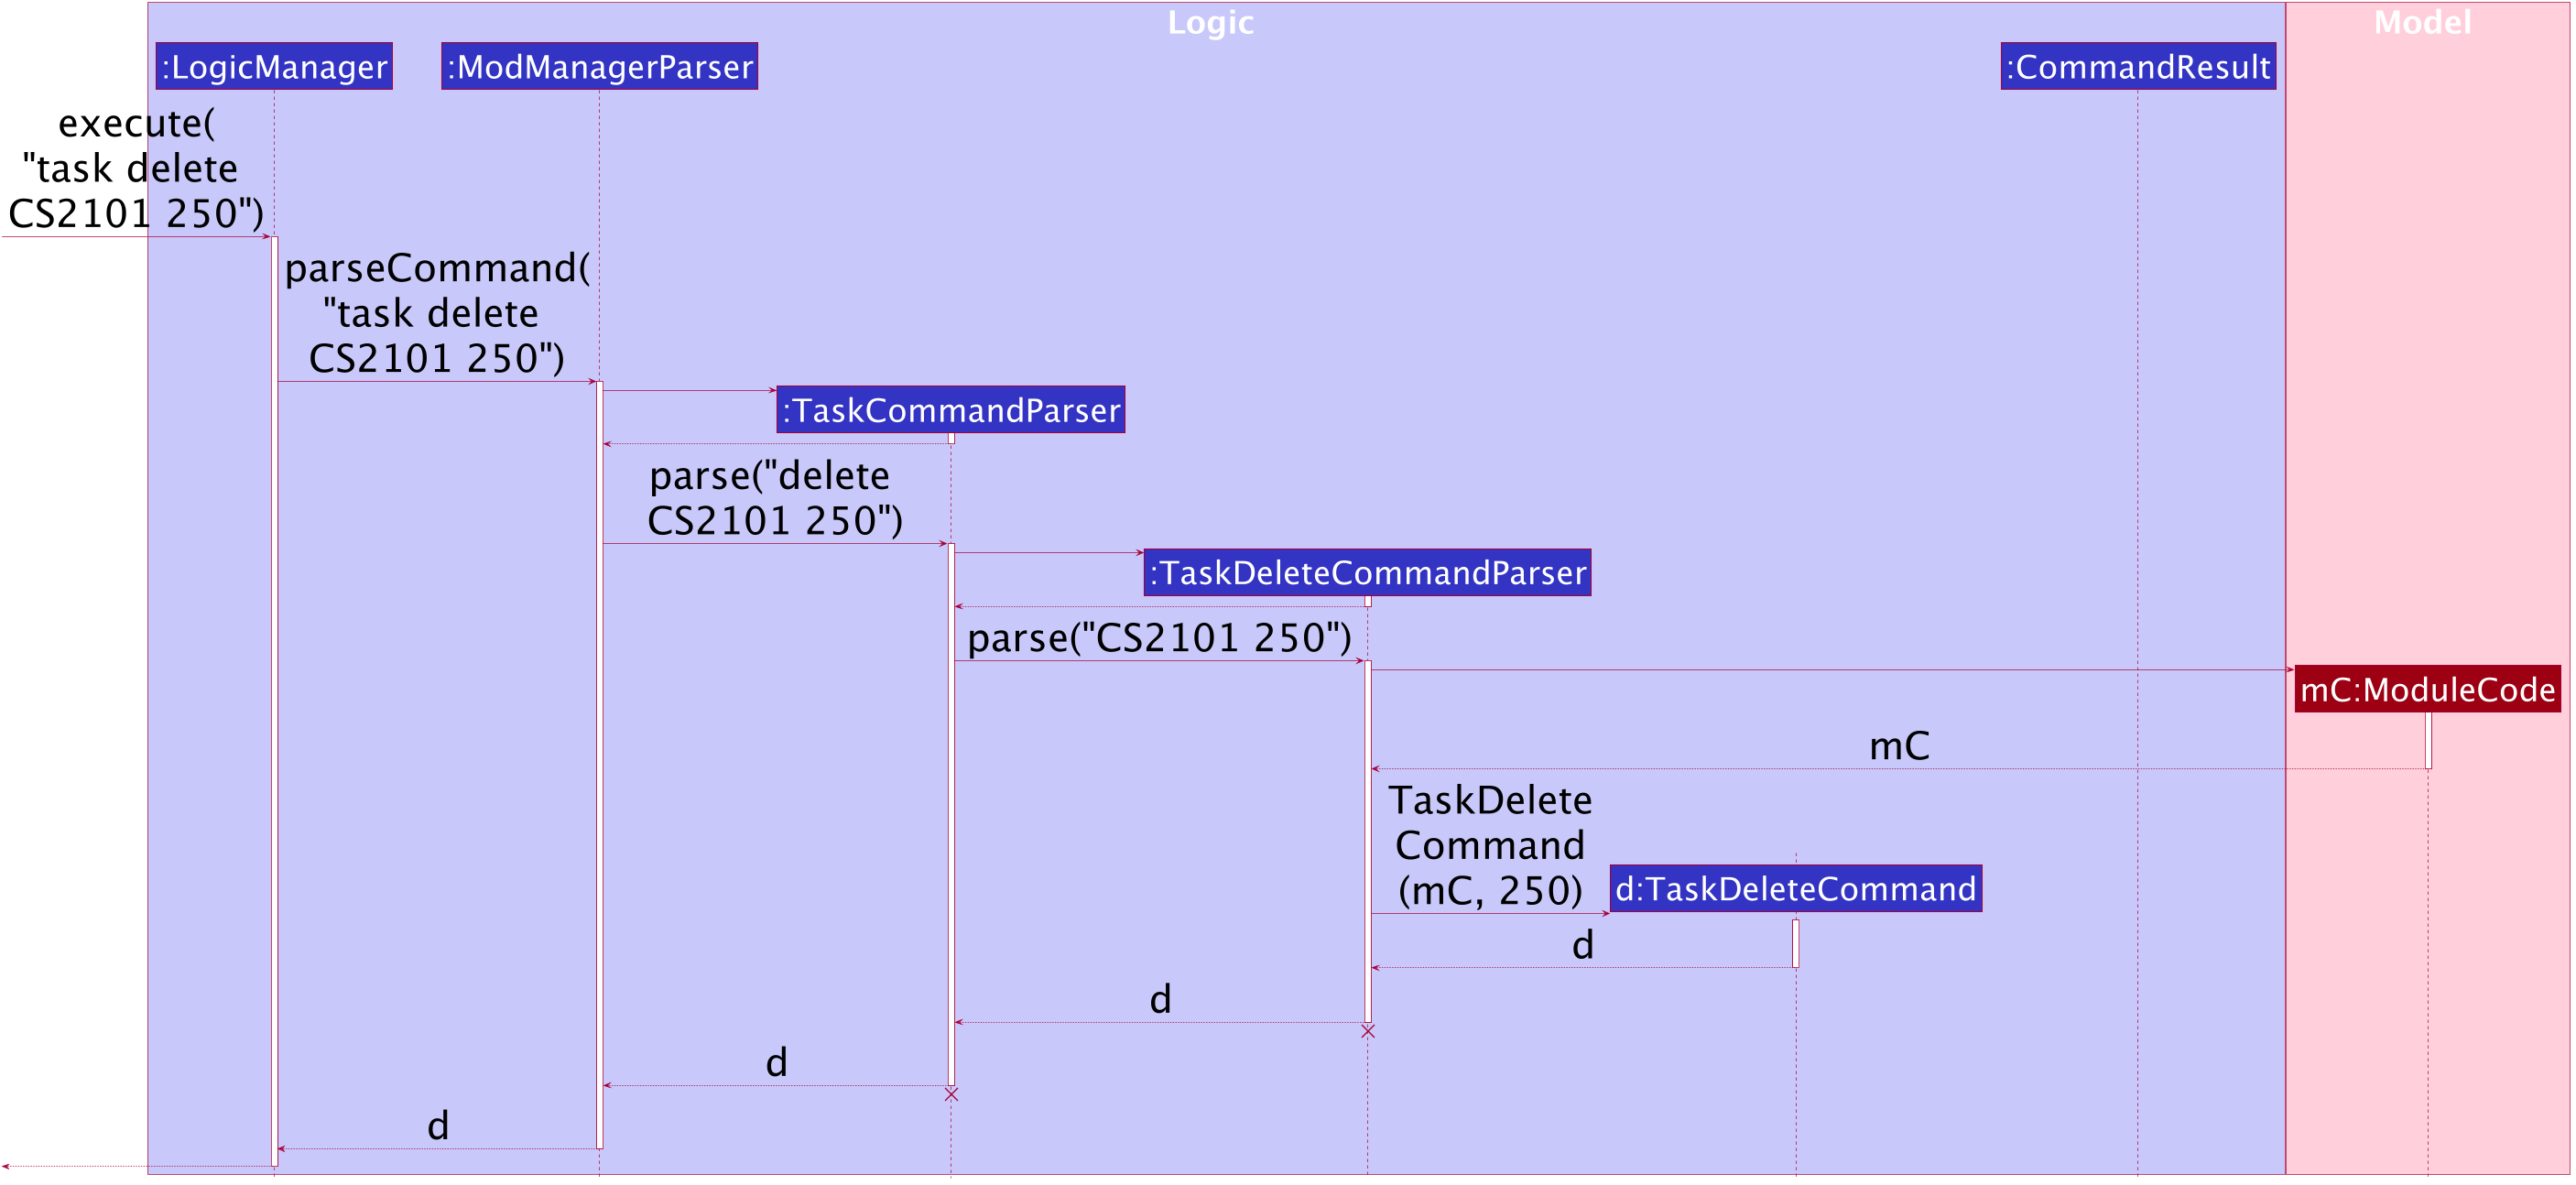
TaskDeleteCommand Creation Steps
The lifeline for TaskCommandParser and TaskDeleteCommandParser should end at
the destroy marker (X) but due to a limitation of PlantUML, the lifeline reaches the end of diagram.
|
The execution of a TaskDeleteCommand is described below.
-
List<Task> currentis retrieved by callingmodel.getFilteredTaskList. -
The correct
taskToDeleteis retrieved fromcurrentby turning it into astreamand use thereducemethod. -
The
taskNumoftaskToDeleteis removed from the system viaTaskNumManager. -
modeldeletestaskToDeletein theUniqueTaskListvia calls toModManager. -
A
deleteTaskActionis created and added tomodel. -
A
CommandResultis returned.
Marking a task as done (Bao)
The marking a task as done command allows users to mark a certain Task in a Module as done,
based on its task ID called taskNum.
This feature is facilitated by TaskCommandParser, TaskMarkAsDoneCommandParser and TaskMarkAsDoneCommand.
The operation is exposed in the Model interface as Model#setTask().
Given below is an example usage scenario and how the marking task as done mechanism behaves at each step.
-
The user executes the task mark as done command and provides the
moduleCodeand thetaskNumof the task to be marked as done. -
TaskMarkAsDoneCommandParsercreates a newTaskMarkAsDoneCommandbased on themoduleCodeandtaskNum. -
LogicManagerexecutes theTaskMarkAsDoneCommand. -
TaskMarkAsDoneCommandretrieves themoduleCodeandtaskNumof the task to be marked as done, and then retrieves the currently existingTaskfromModManager. -
TaskMarkAsDoneCommandcreates a clone of the retrievedTask, then mark this newTaskas done. -
ModManagersets the existing task to the new task, marked as done in theUniqueTaskList. -
ModelManagerupdates thefilteredTasksinModelManager.
The following sequence diagram shows how the task mark as done command works:
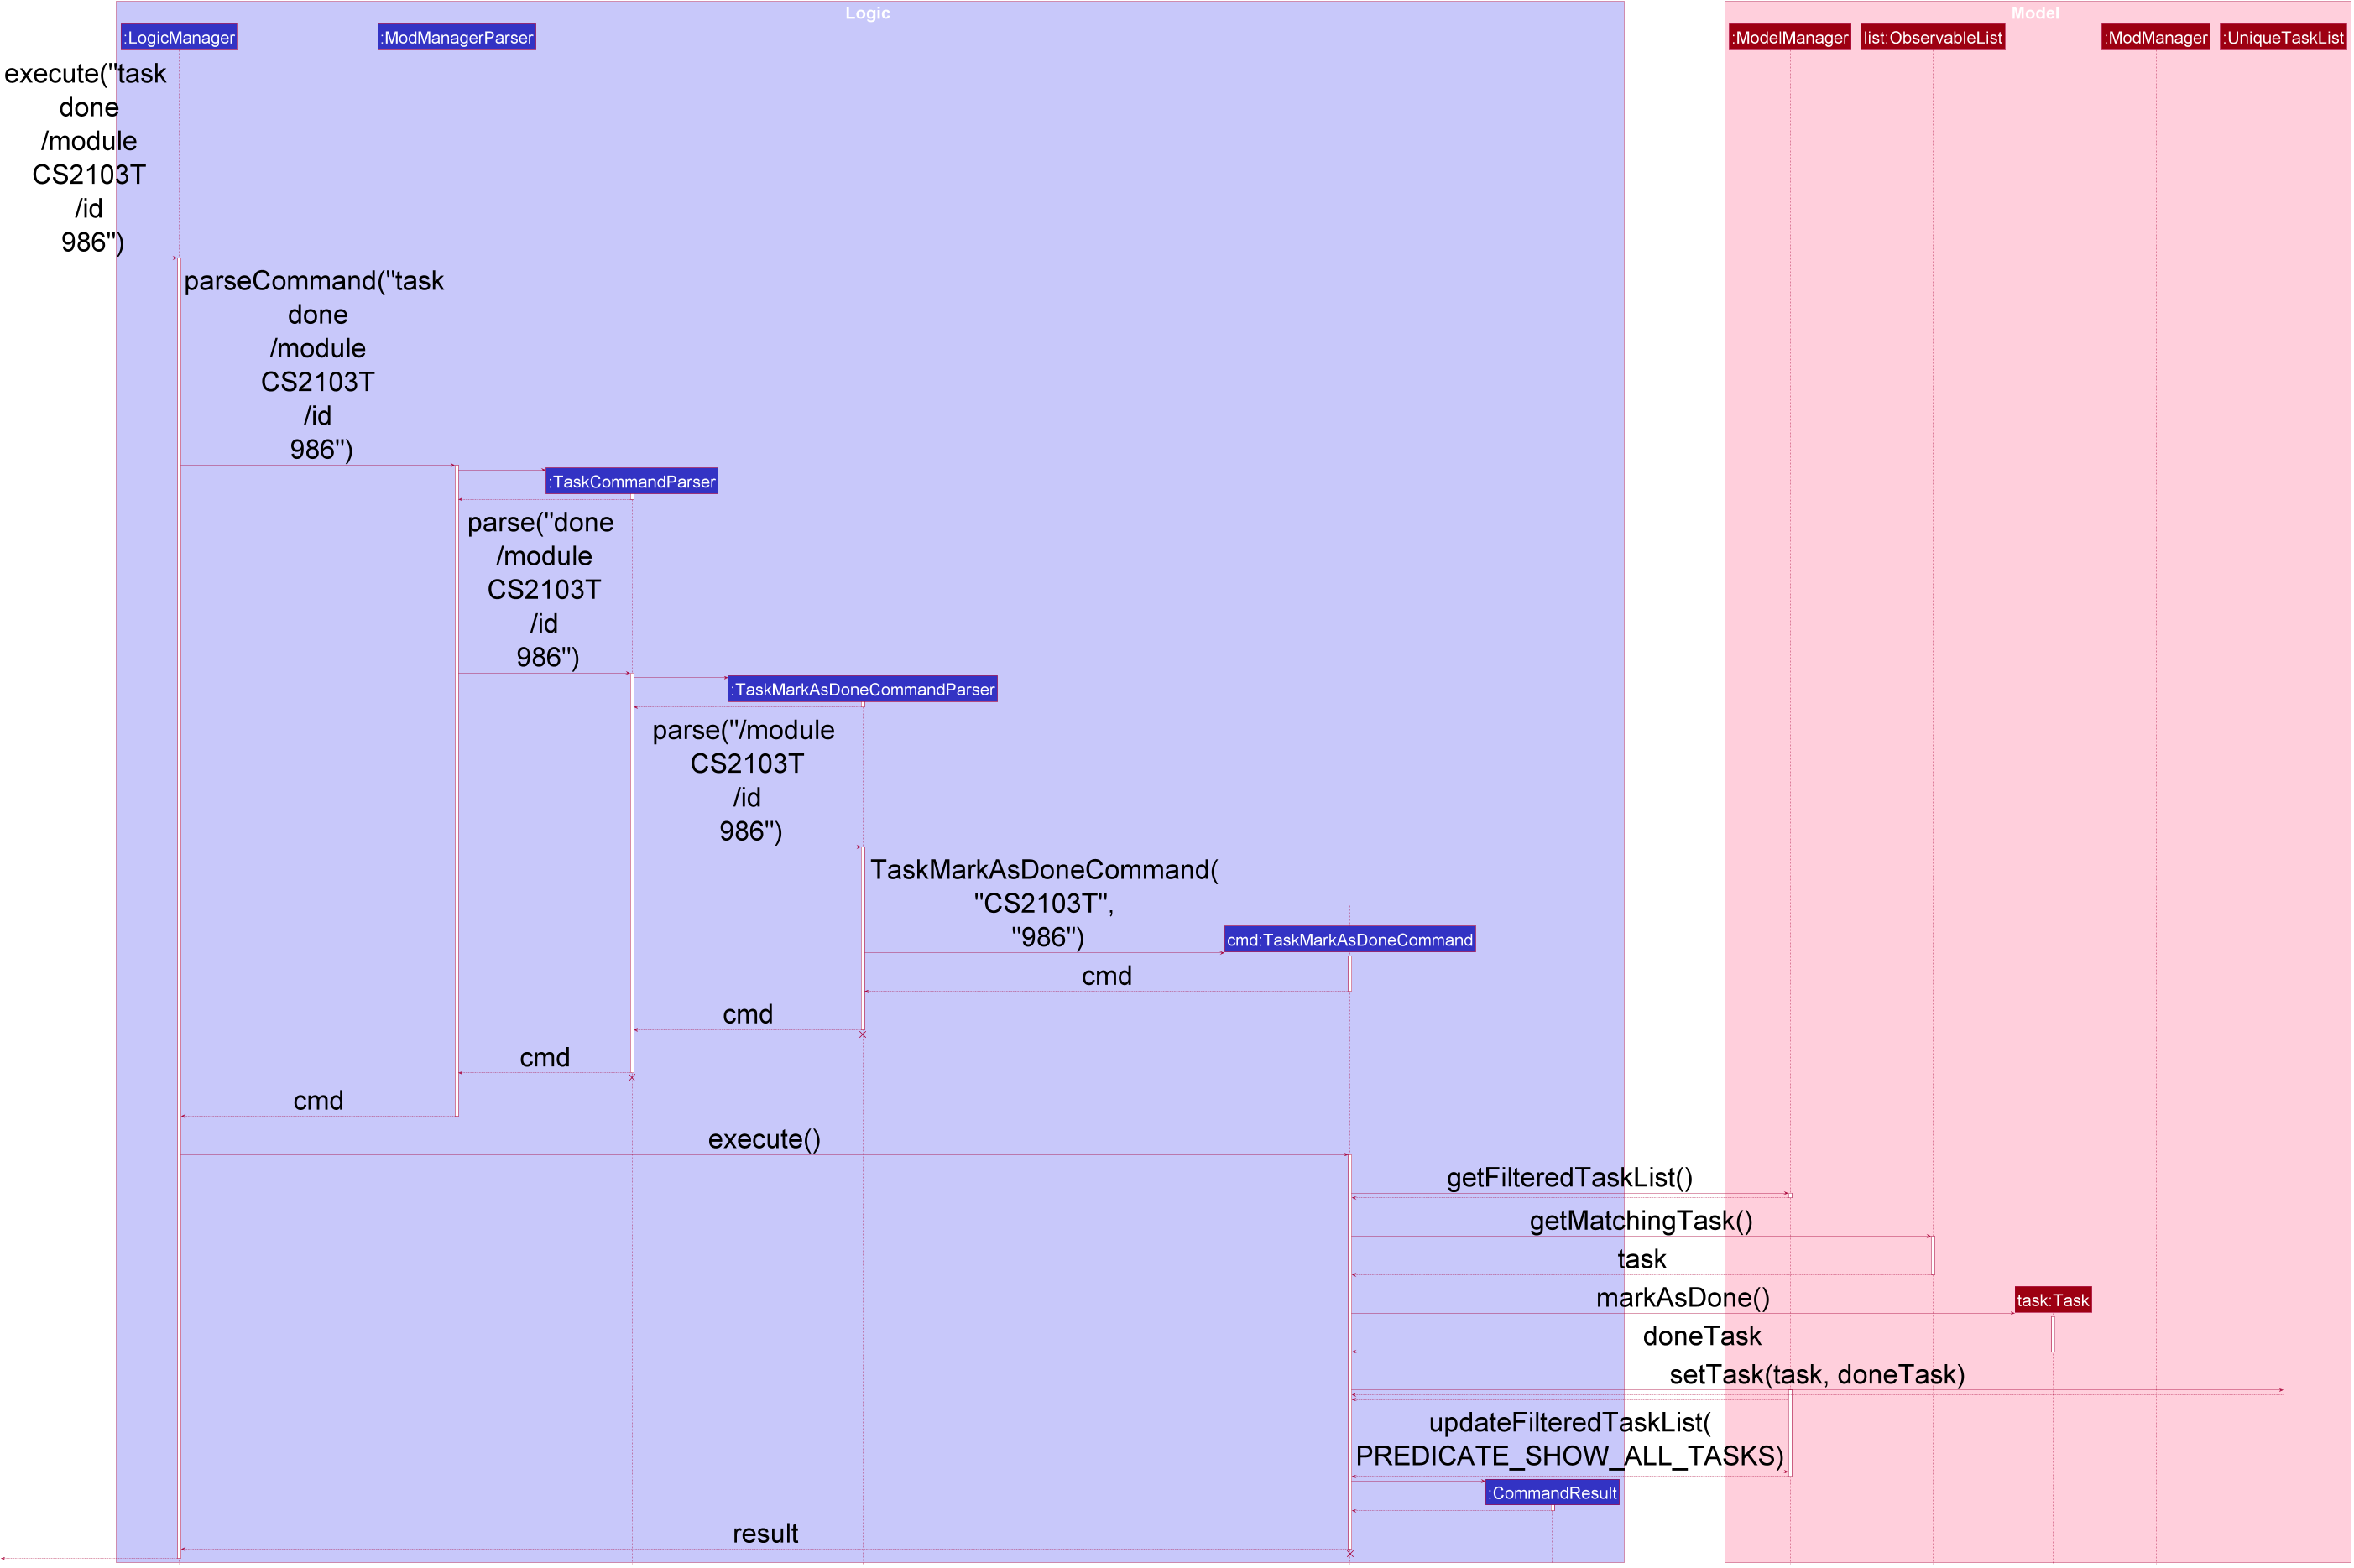
task done /code CS2103T /id 986 Command
The lifeline for TaskCommandParser, TaskMarkAsDoneCommandParser, and TaskMarkAsDoneCommand should end at
the destroy marker (X) but due to a limitation of PlantUML, the lifeline reaches the end of the diagram.
|
The following activity diagram summarizes what happens when a user executes the task mark as done command:
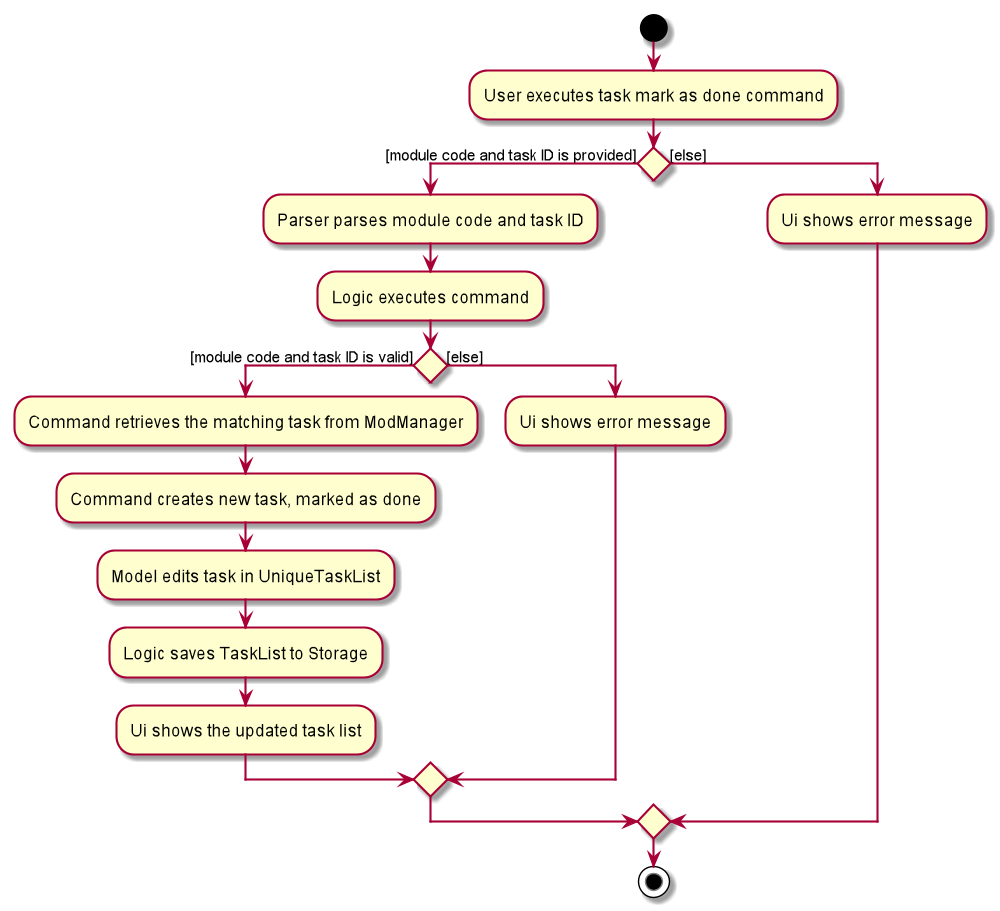
task done CommandViewing all tasks across modules in Mod Manager (Bao)
The list task feature allows users to list all tasks across all modules in Mod Manager.
This feature is facilitated by TaskCommandParser and TaskListCommand.
The operation is exposed in the Model interface as Model#updateFilteredTaskList().
Given below is an example usage scenario and how the task list mechanism behaves at each step:
-
The user executes the task list command.
-
TaskCommandParsercreates a newTaskListCommand. -
LogicManagerexecutes theTaskListCommand. -
ModelManagerupdates thefilteredTasksinModelManager.
The following sequence diagram shows how the task list command works:
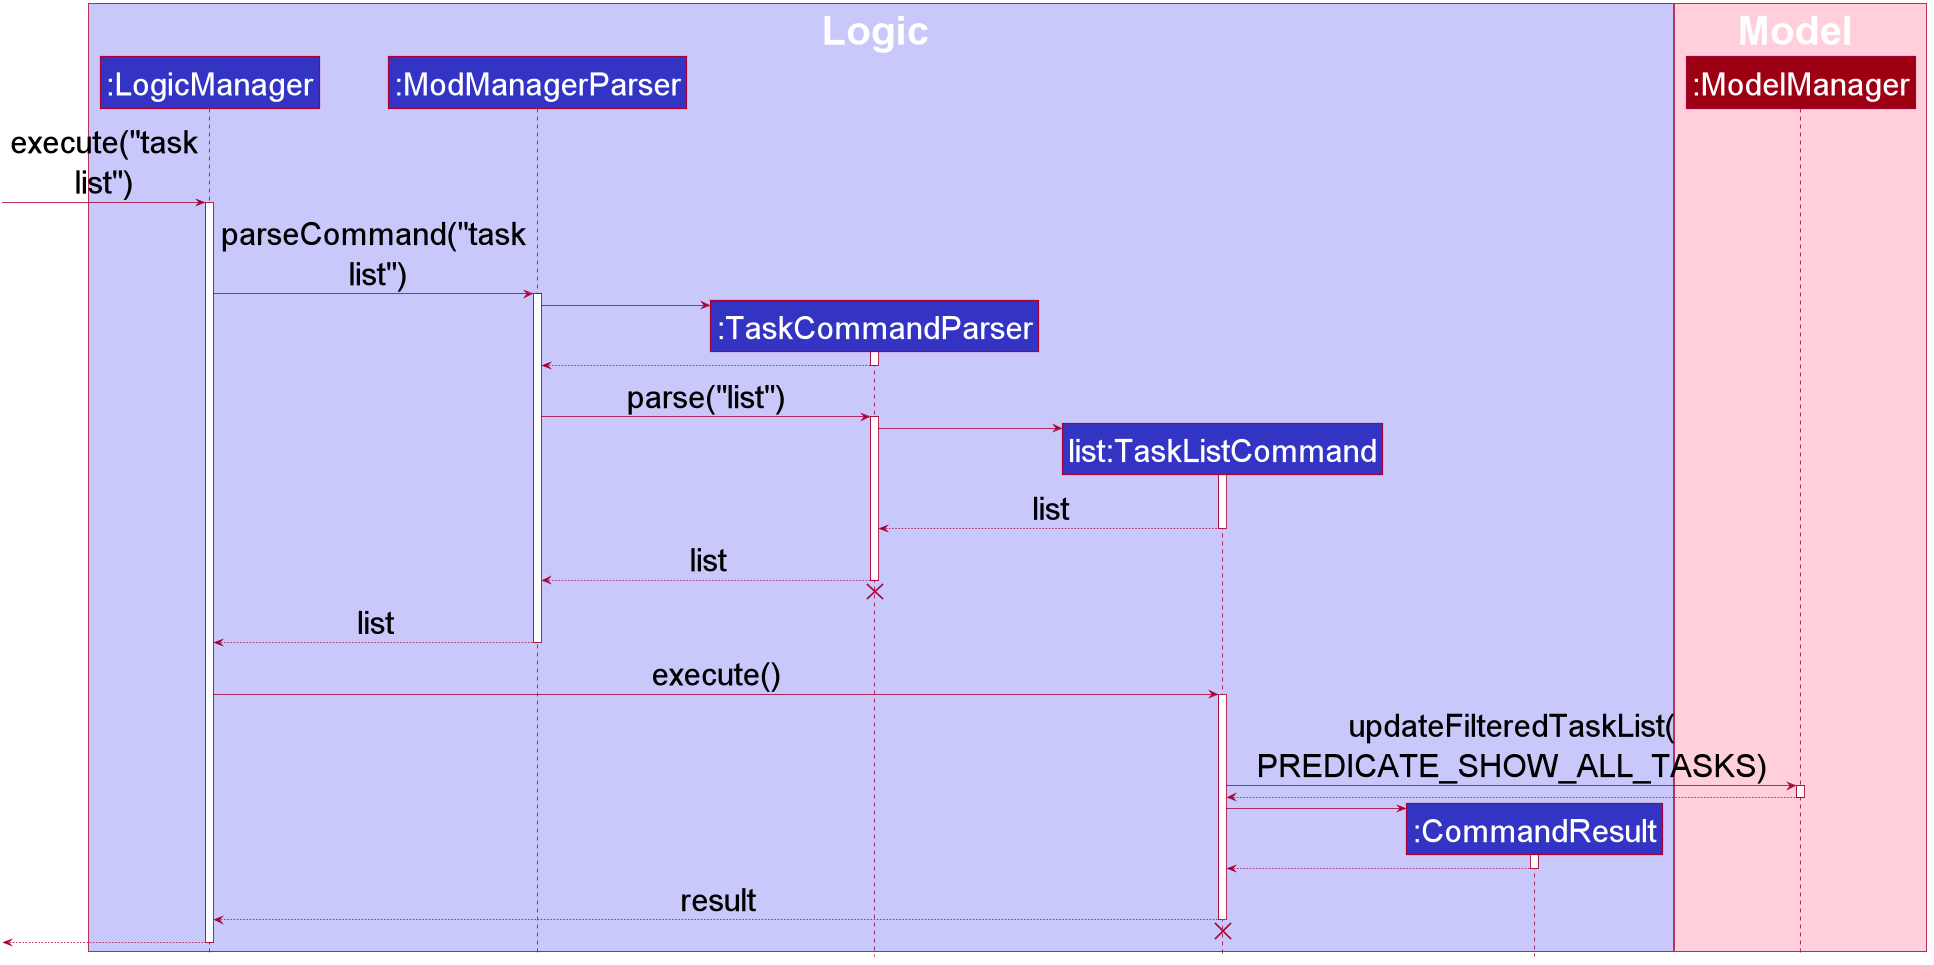
task list Command
The lifeline for TaskCommandParser and TaskListCommand should end at
the destroy marker (X) but due to a limitation of PlantUML, the lifeline reaches the end of the diagram.
|
The following activity diagram summarizes what happens when a user executes a task list command:

task list CommandViewing tasks for a specific module (Bao)
The viewing task by module feature allows users to find all tasks belonging to a specific module in Mod Manager.
This feature is facilitated by TaskCommandParser, TaskForOneModuleCommandParser and TaskForOneModuleCommand.
The operation is exposed in the Model interface as Model#updateFilteredTaskList().
Given below is an example usage scenario and how the task search mechanism behaves at each step:
-
The user executes the find tasks by module command and provides the module code of the module that they want to search for.
-
TaskForOneModuleCommandParsercreates a newTaskForOneModuleCommandbased on the module code. -
LogicManagerexecutes theTaskForOneModuleCommand. -
ModelManagerupdates thefilteredTasksinModelManager.
The following sequence diagram shows how the search tasks for a specific module command works:
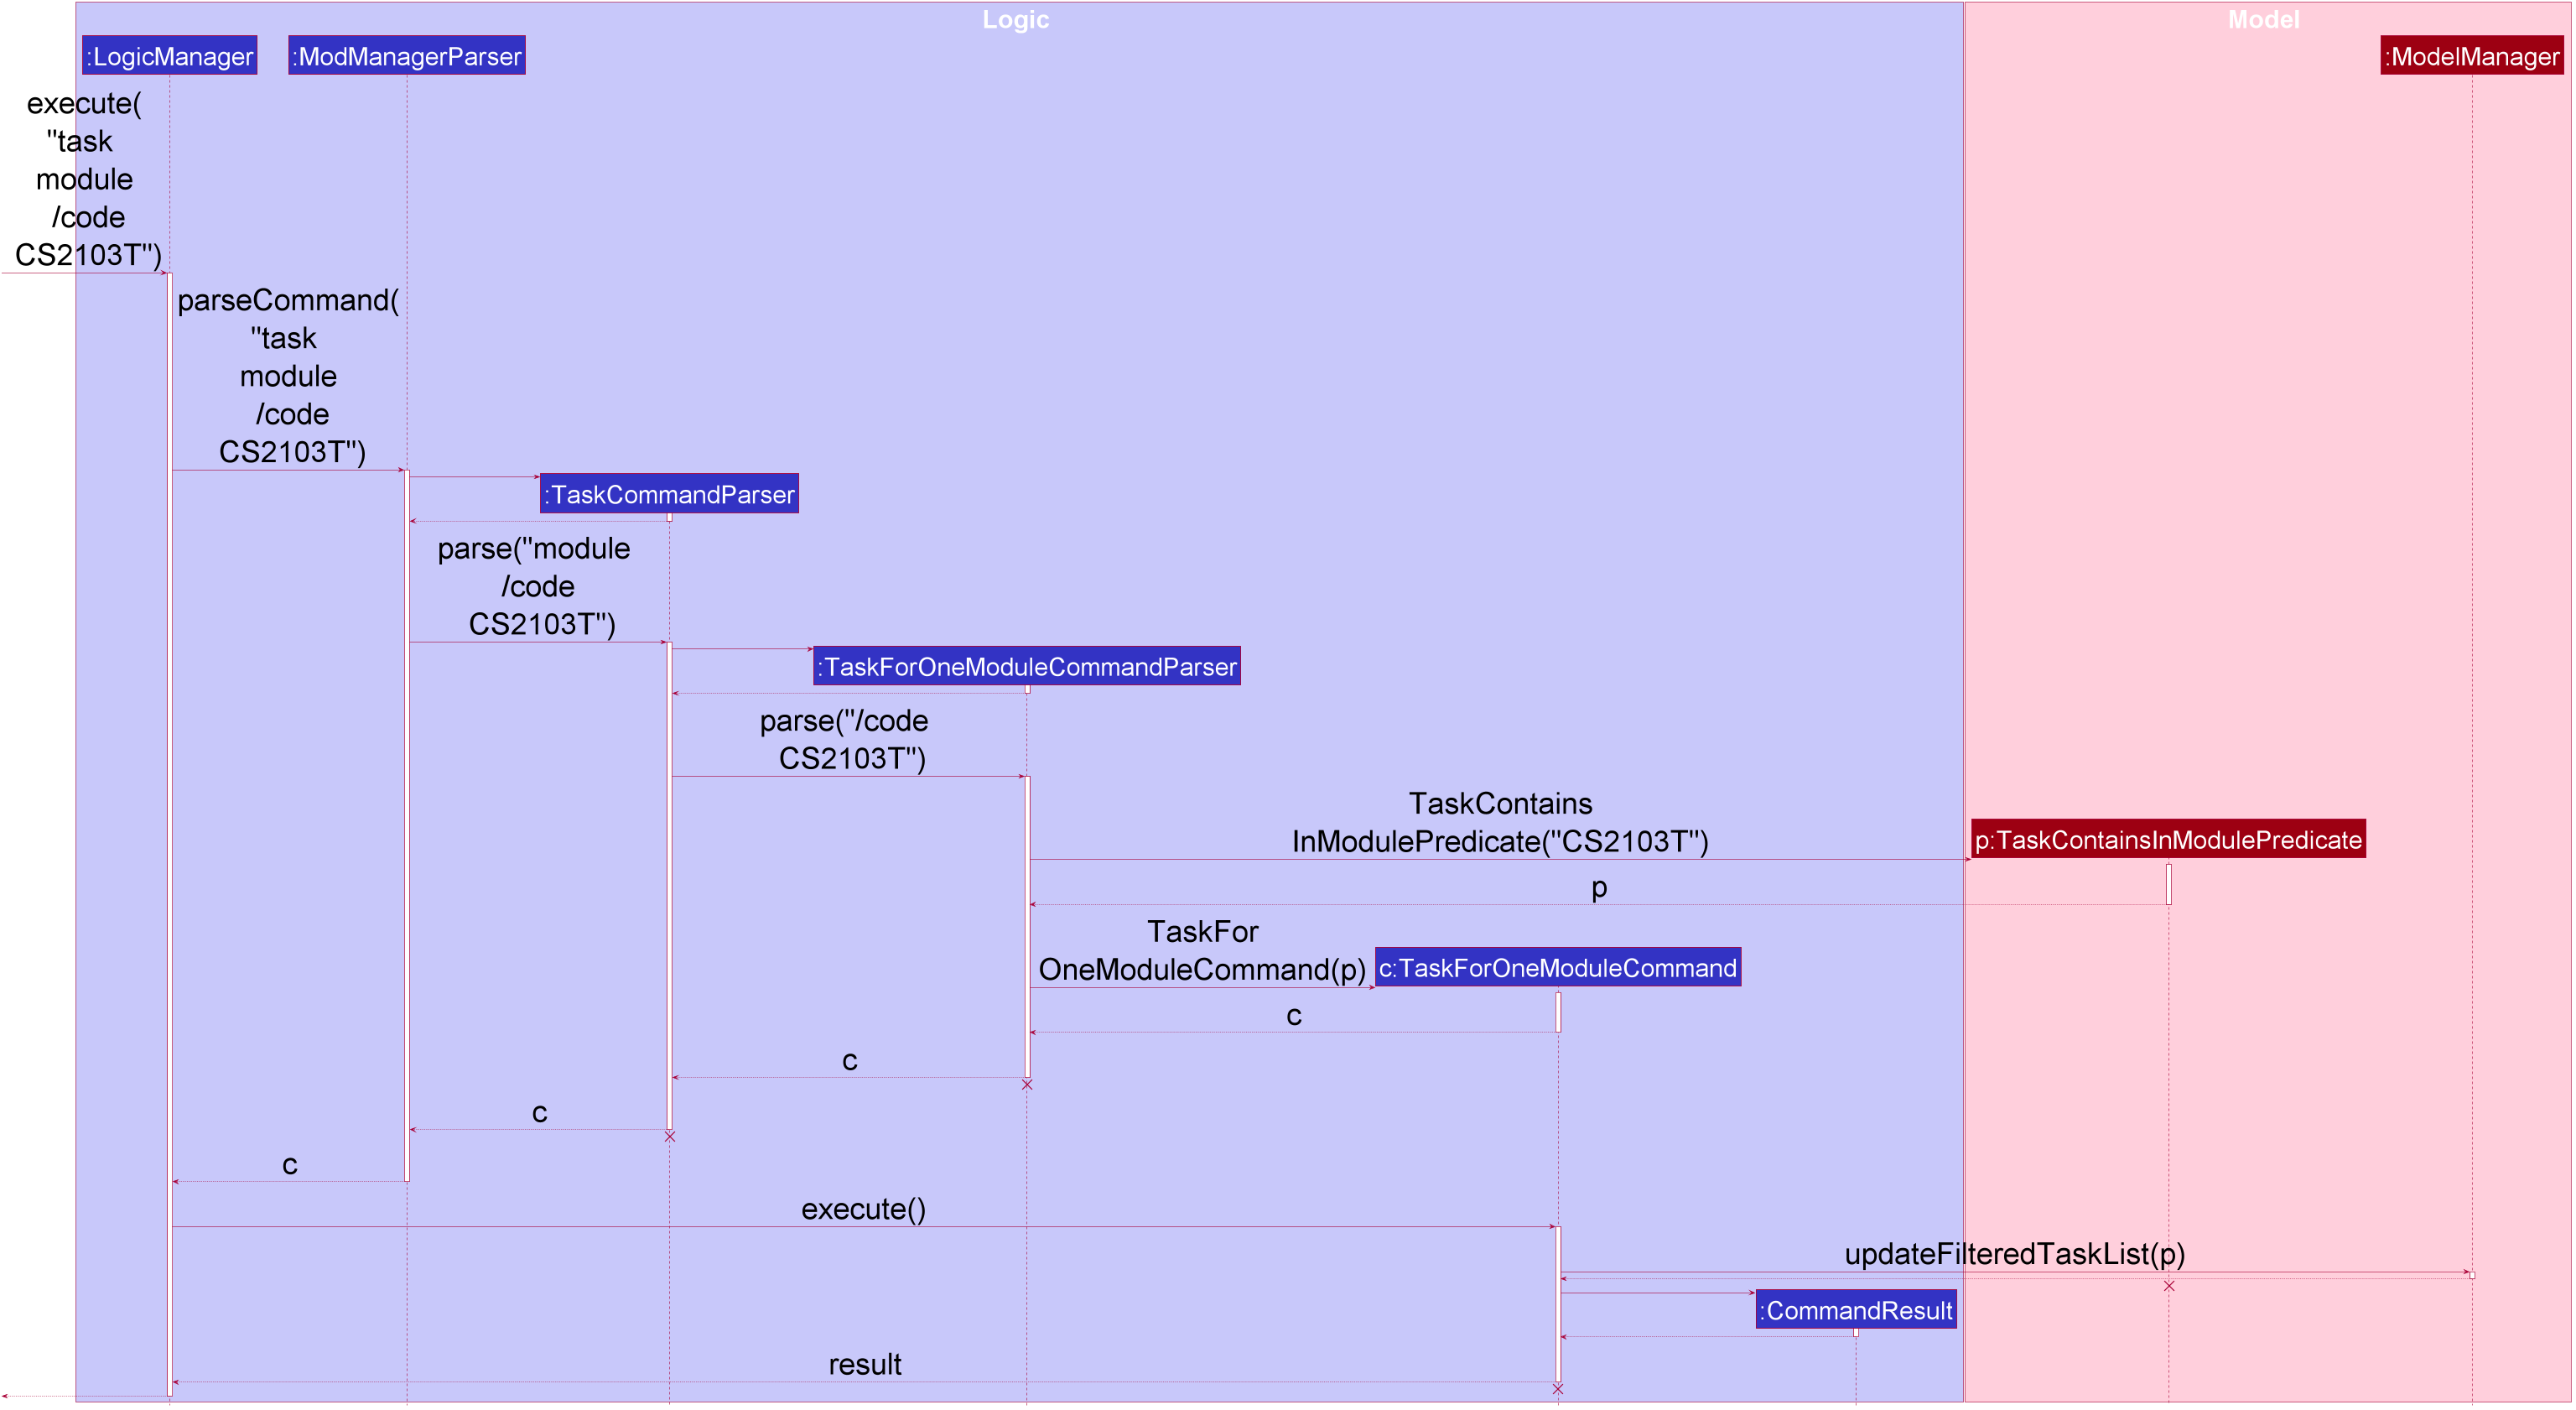
task module /code CS2103T Command
The lifeline for TaskCommandParser, TaskForOneModuleCommandParser, TaskForOneModuleCommand should end at
the destroy marker (X) but due to a limitation of PlantUML, the lifeline reaches the end of the diagram.
|
The following activity diagram summarizes what happens when a user executes a search tasks for a specific module command:

task module CommandViewing undone tasks (Bao)
The viewing undone tasks only feature allows users to view only tasks that are not completed in their Tasks tab.
This feature is facilitated by TaskCommandParser, TaskListUndoneCommandParser and TaskListUndoneCommand.
The operation is exposed in the Model interface as Model#updateFilteredTaskList().
Given below is an example usage scenario and how the task view undone tasks mechanism behaves at each step:
-
The user executes the task view undone tasks command.
-
TaskListUndoneCommandParsercreates a newTaskListUndoneCommand. -
LogicManagerexecutes theTaskListUndoneCommand. -
ModelManagerupdates thefilteredTasksinModelManager.
The following sequence diagram shows how the task view undone tasks command works:
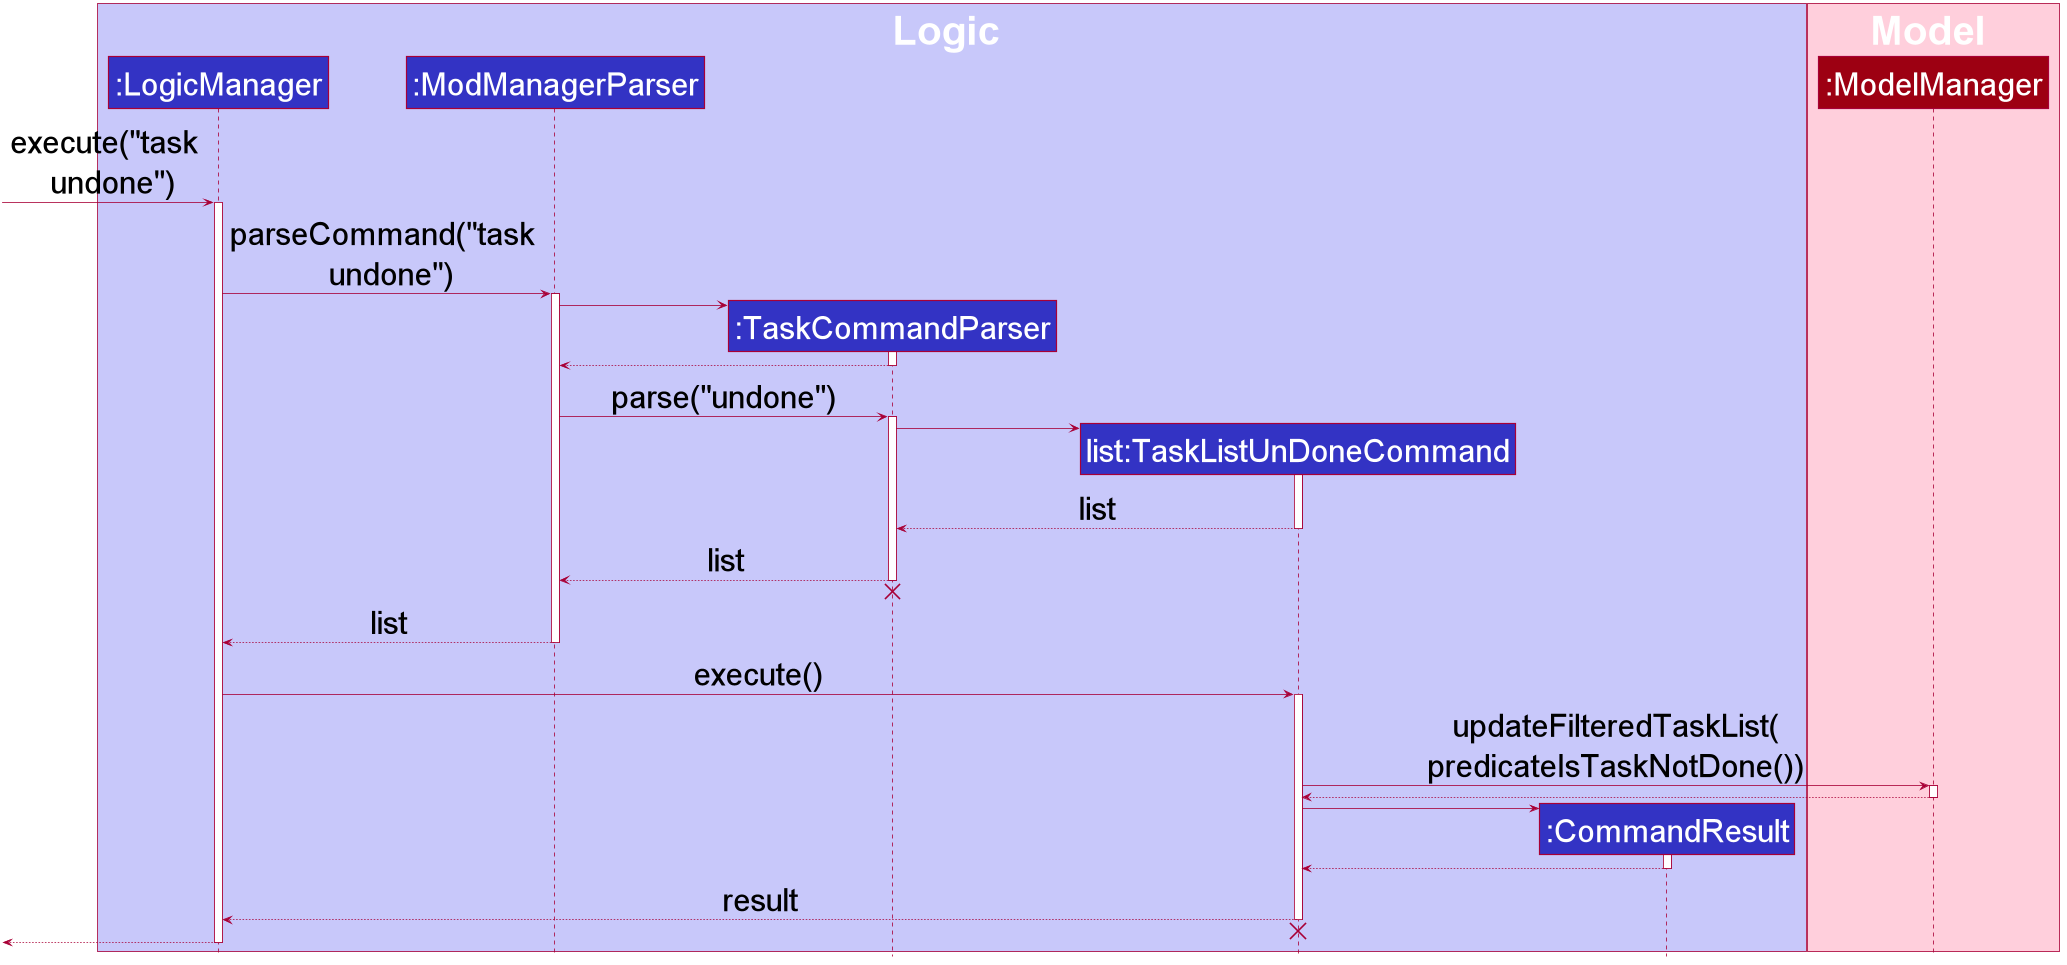
task undone Command
The lifeline for TaskCommandParser, TaskListUndoneCommandParser, TaskListUndoneCommand should end at
the destroy marker (X) but due to a limitation of PlantUML, the lifeline reaches the end of the diagram.
|
The following activity diagram summarizes what happens when a user executes a view undone tasks command:
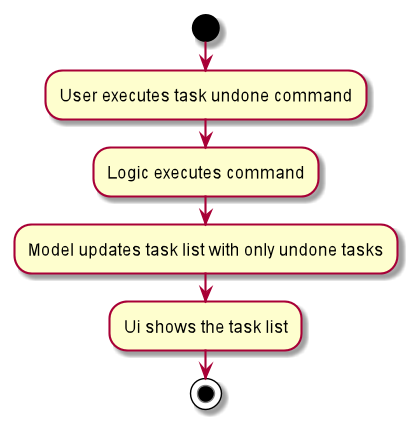
task undone CommandFinding tasks by description (Bao)
The find task feature allows users to find a task by its description in Mod Manager.
This feature is facilitated by TaskCommandParser, TaskFindCommandParser and TaskFindCommand.
The operation is exposed in the Model interface as Model#updateFilteredTaskList().
Given below is an example usage scenario and how the task find mechanism behaves at each step:
-
The user executes the task find command and provides the descriptions of the tasks to search for.
-
TaskFindCommandParsercreates a newTaskFindCommandbased on the descriptions. -
LogicManagerexecutes theTaskFindCommand. -
ModelManagerupdates thefilteredTasksinModelManager.
The following sequence diagram shows how the task find command works:
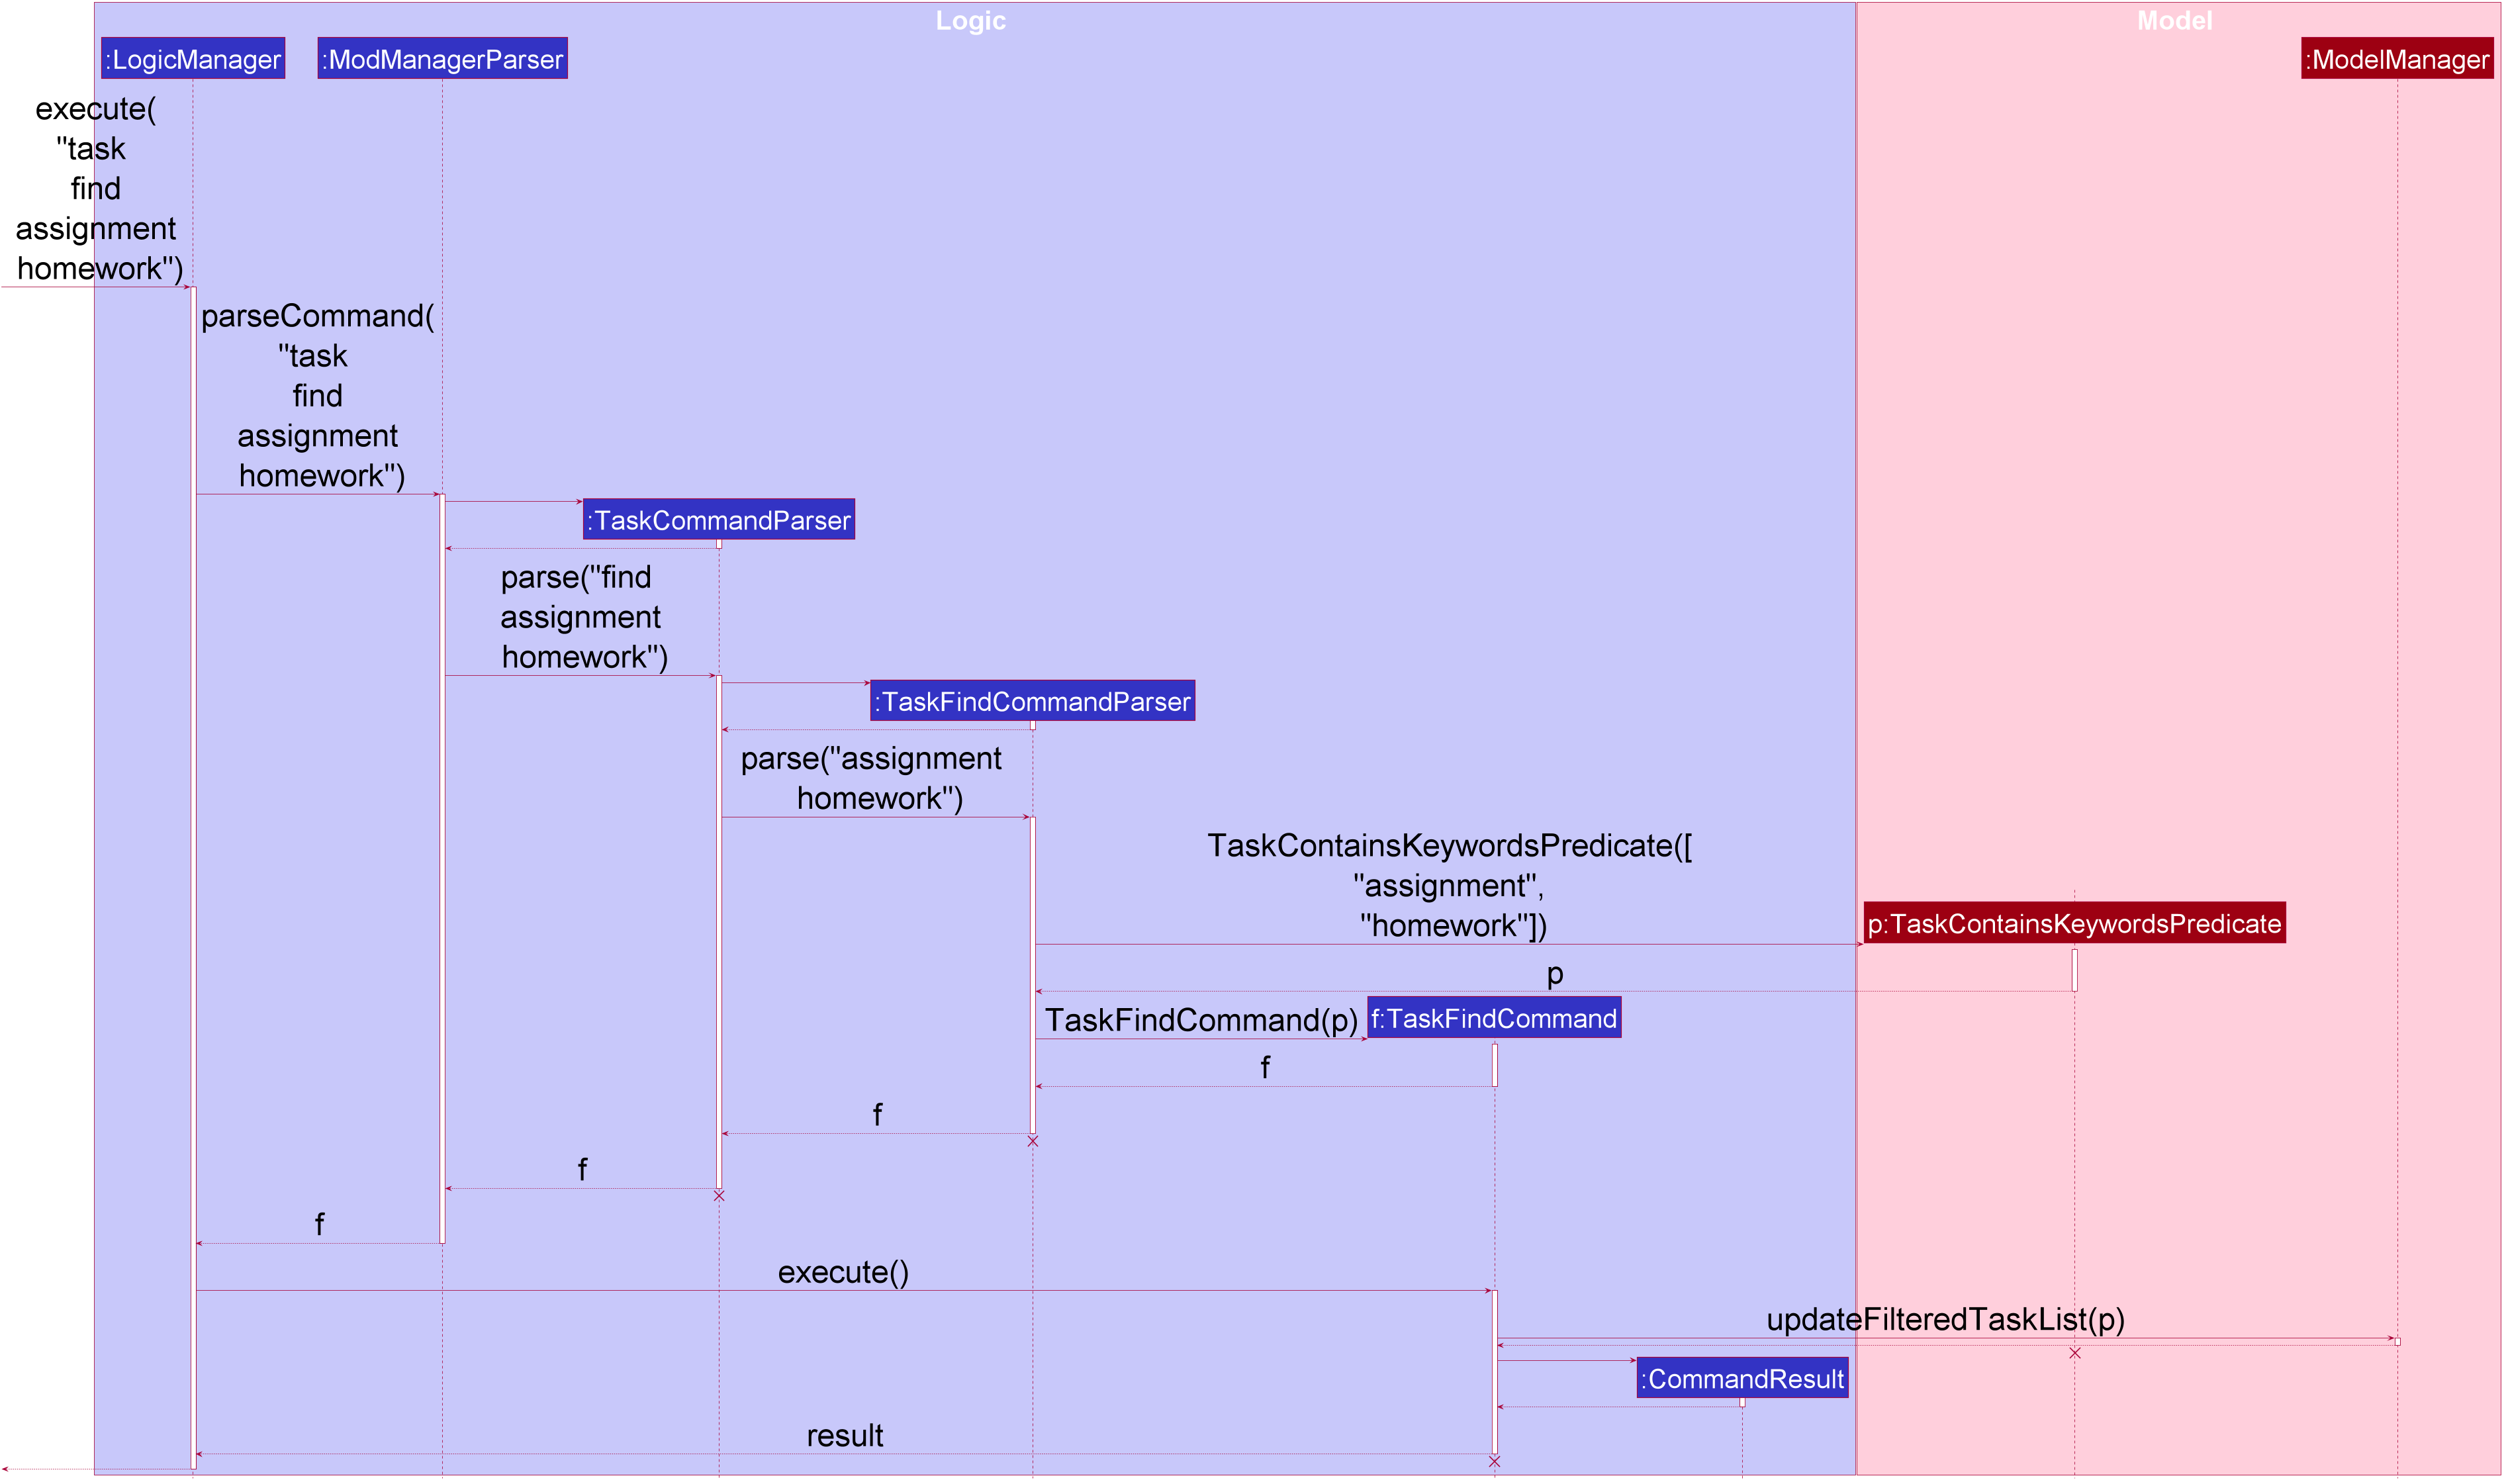
task find assignment homework Command
The lifeline for TaskCommandParser, TaskFindCommandParser, TaskFindCommand and TaskContainsKeywordsPredicate should end at
the destroy marker (X) but due to a limitation of PlantUML, the lifeline reaches the end of the diagram.
|
The following activity diagram summarizes what happens when a user executes a task find command:
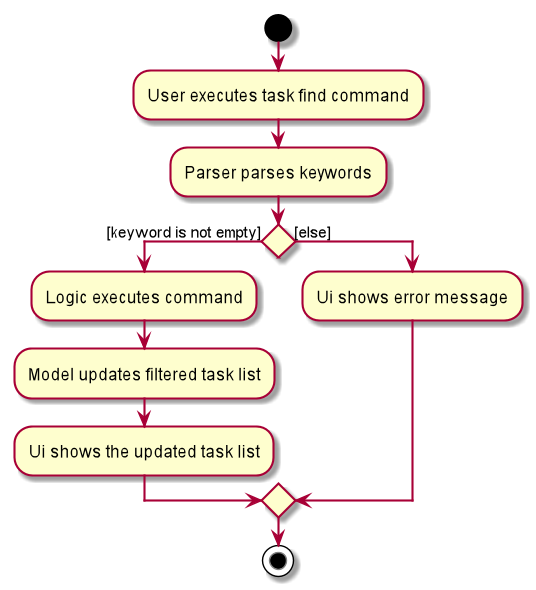
task find CommandSearching tasks by date (Bao)
The search task feature allows users to search for all tasks that occur on the specified date, month, or year.
This feature is facilitated by TaskCommandParser, TaskSearchCommandParser and TaskSearchCommand.
The operation is exposed in the Model interface as Model#updateFilteredTaskList().
Given below is an example usage scenario and how the task search mechanism behaves at each step:
-
The user executes the task search command and provides the date, month, or year, or any combination of which they want to search for.
-
TaskSearchCommandParsercreates a newTaskSearchCommandbased on the date, month and year. -
LogicManagerexecutes theTaskSearchCommand. -
ModelManagerupdates thefilteredTasksinModelManager.
The following sequence diagram shows how the task search command works:
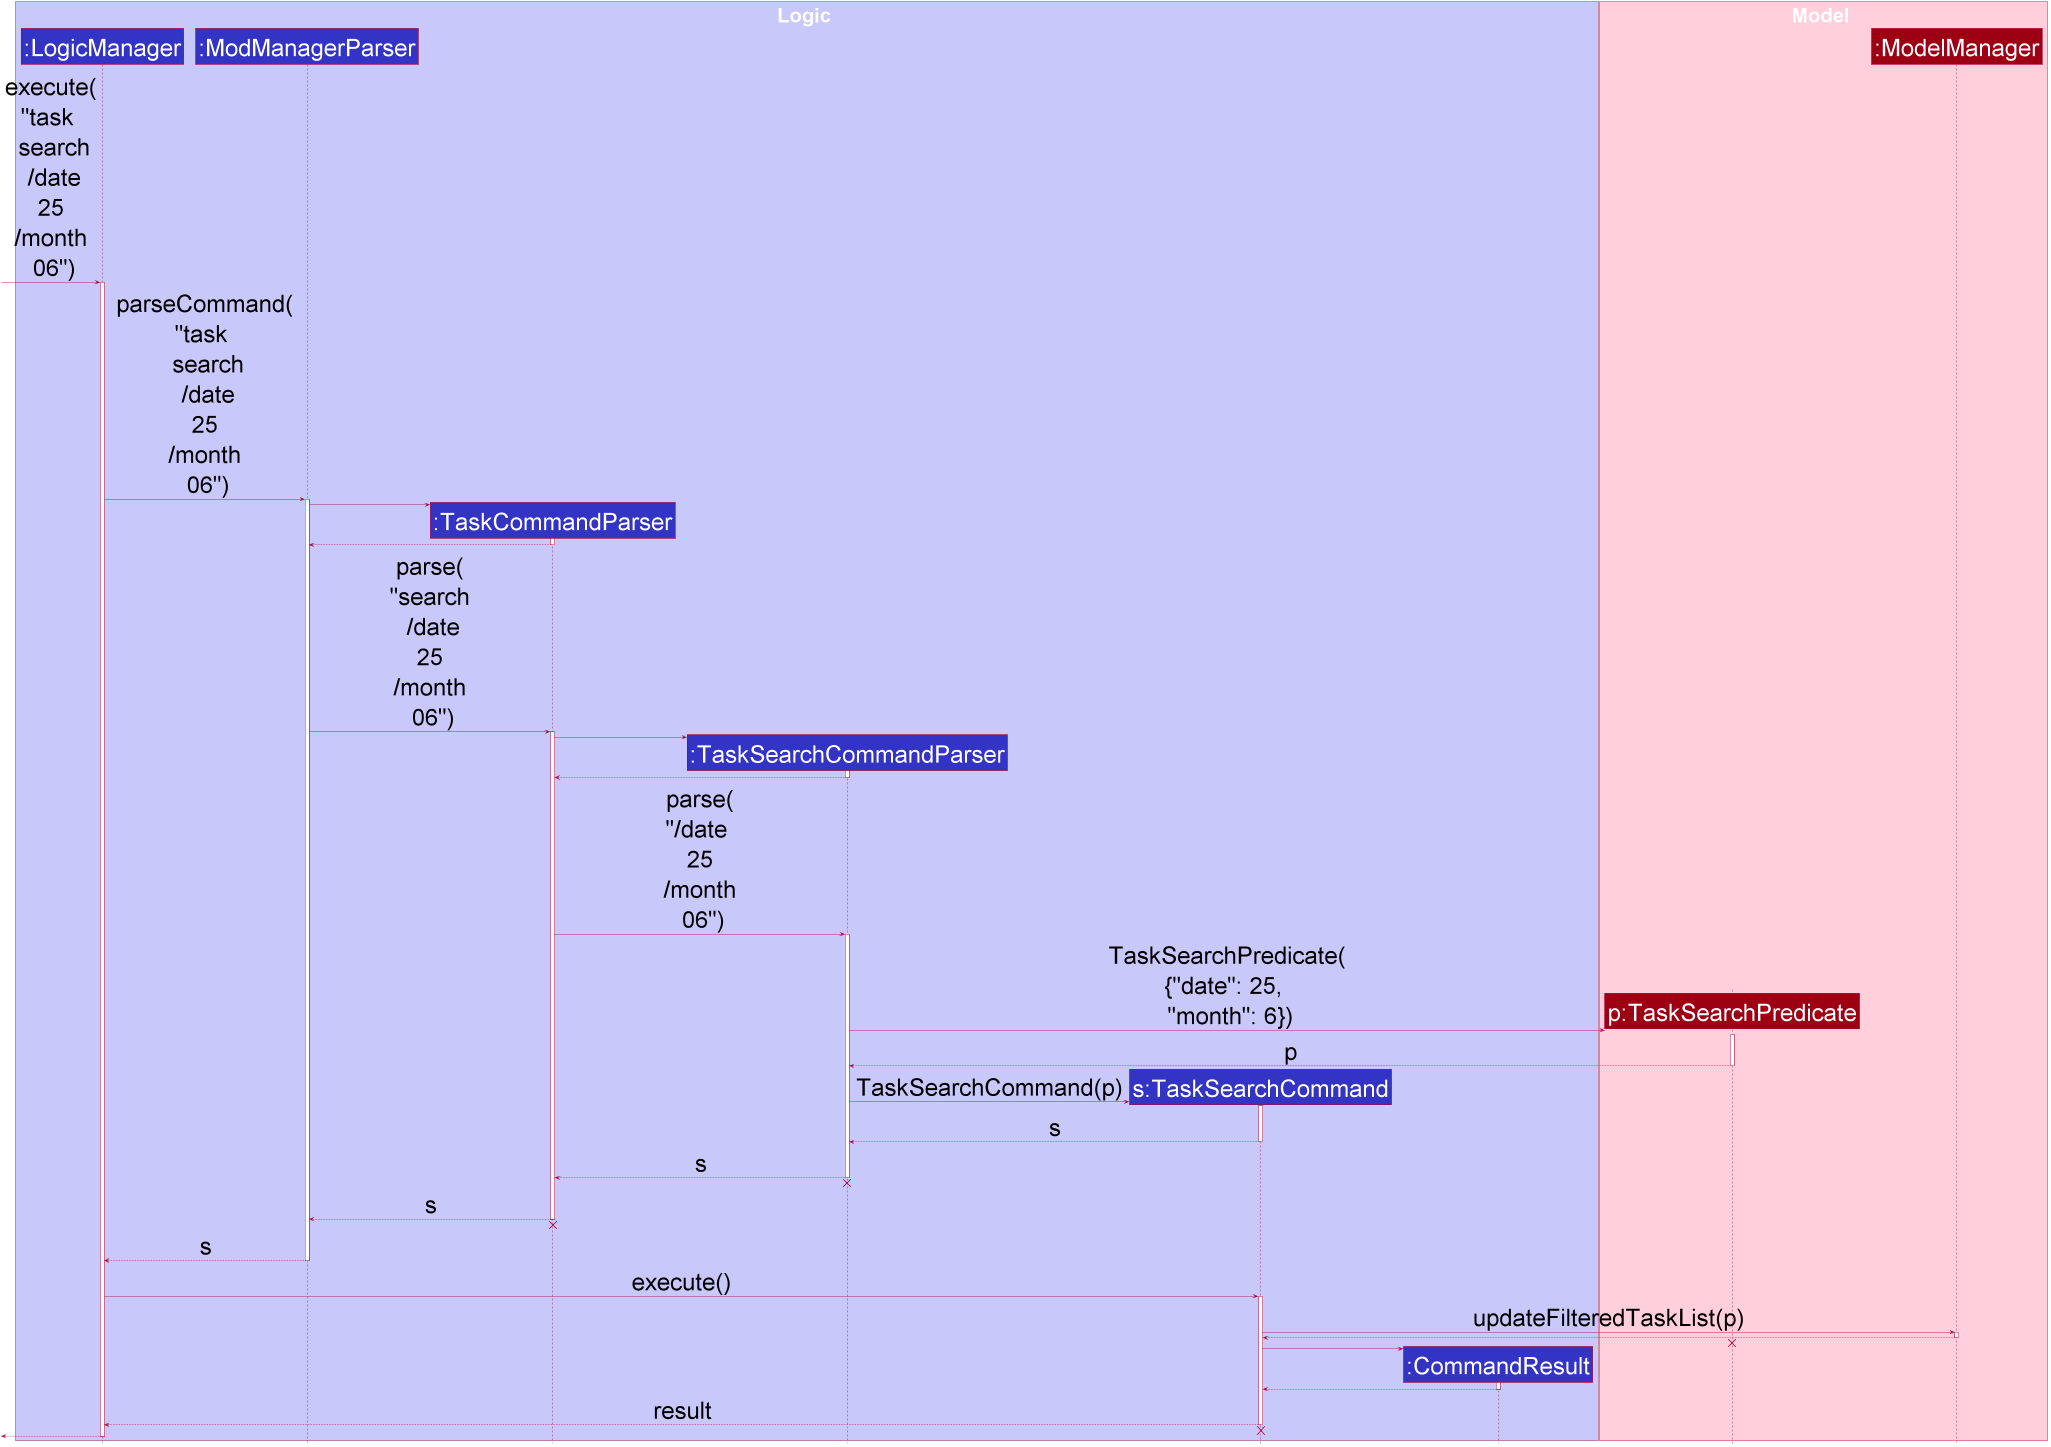
task search /date 25 /month 6 Command
The lifeline for TaskCommandParser, TaskSearchCommandParser, TaskSearchCommand and TaskSearchPredicate should end at
the destroy marker (X) but due to a limitation of PlantUML, the lifeline reaches the end of the diagram.
|
The following activity diagram summarizes what happens when a user executes a task search command:
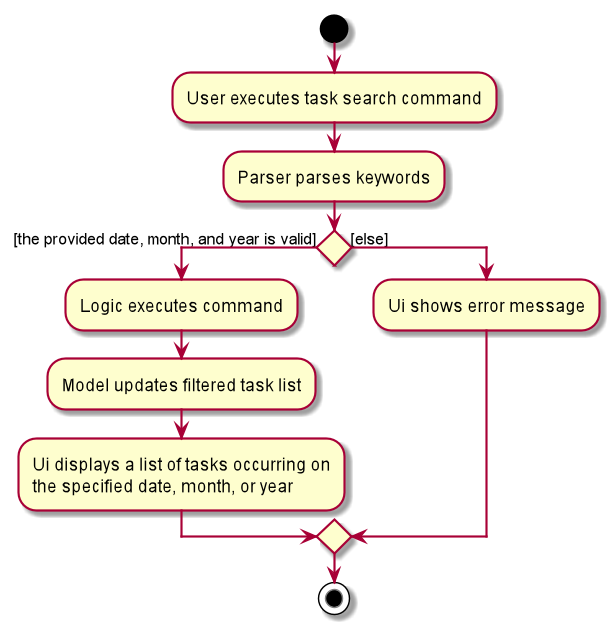
task search Command4.4.2. Design Considerations (Bao)
Aspect: The association between Module and Task
-
Alternative 1 (current choice):
Each Task can have a unique ModuleCode tag,
which uniquely identifies the Module it belongs to. This is an aggregation relationship,
which is weaker than composition in our second alternative.
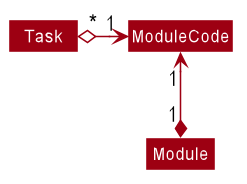
Task acts as a container for the ModuleCode object of a Module. ModuleCode objects can survive without a Task object.Pros: Low coupling with the Module class. The Module does not need to know that there is a list of Task s for it.
Cons: It requires that the ModuleCode must uniquely identify the Module, which requires
more time to implement from the Module side. The association between Module and Task
is weak.
-
Alternative 2:
Each Module consists of a list of Task s corresponding to it.

Module consists of Task objects.Pros: This design better simulates the real-life interactions between Module and Task.
For each NUS Module, we have the list of all the Task s for it,
such as assignments, homework, term tests, and exams.
Cons: Strong data coupling with the Module class, as the Task data
must be shared with the Modules.
Alternative 1 is chosen for more straightforward implementation, and to reduce coupling
between Task and Module.
Aspect: A Task may have a specified time, or no time. How do we implement this feature?
-
Alternative 1 (current choice):
Task is implemented as an abstract class. A task with a specified time will be created as a ScheduledTask, while a task with no
time will be created as a NonScheduledTask. ScheduledTask and
NonScheduledTask are concrete subclasses of Task.
Pros: Utilises Object-Oriented Programming. Commands such as task search
(searching for tasks that occur on a specified date, month, or year)
and task upcoming ([coming in v2.0], finding the upcoming tasks in our schedule)
are easier to implement. We just need to filter out the ScheduledTask instances and
perform operations on them.
Cons: More difficulty in implementation due to time constraints. For example, command
task edit allows us to add a time to a class. In this case, our Task is
initially a NonScheduledTask, so we have to re-create a new ScheduledTask
with the same description, and the specified time.
-
Alternative 2:
Task is implemented as a concrete class. Task s without a specified time
will have taskDateTime set to null, while Task s with a given time will be assign
a valid taskDateTime
Pros: Much more simple, as we only need to create one class Task.
Cons: It’s troublesome to implement task search and task upcoming command
as above, as we have to avoid null cases of taskDateTime. Just imagine
comparing a task with a valid time, such as 13/4/2020 23:59, to a task with time null.
It’s hard to implement this comparison.
Alternative 1 is chosen because it works well with all of our Task commands,
such as task search and task upcoming above.
4.5. Facilitator Management Feature
The facilitator feature manages the facilitators in Mod Manager and is represented by the Facilitator class.
A facilitator has a Name, an optional Phone, an optional Email, an optional Office and one or more ModuleCode.
A Module with the ModuleCode of the facilitator should exist in Mod Manager.
It supports the following operations:
-
add- Adds a facilitator to Mod Manager. -
list- Lists all facilitators in Mod Manager. -
find- Finds facilitators in Mod Manager by name. -
edit- Edits a facilitator in Mod Manager. -
delete- Deletes a facilitator in Mod Manager.
4.5.1. Implementation Details
Adding a facilitator (Zi Xin)
The add facilitator feature allows users to add a facilitator to Mod Manager.
This feature is facilitated by FacilCommandParser, FacilAddCommandParser and FacilAddCommand.
The operation is exposed in the Model interface as Model#addFacilitator().
Given below is an example usage scenario and how the facilitator add mechanism behaves at each step:
-
The user executes the facilitator add command and provides the name, phone, email, office and module code of the facilitator to be added.
-
FacilitatorAddCommandParsercreates a newFacilitatorbased on the name, phone, email, office and module code. -
FacilitatorAddCommandParsercreates a newFacilitatorAddCommandbased on the facilitator. -
LogicManagerexecutes theFacilitatorAddCommand. -
ModManageradds the facilitator to theUniqueFacilitatorList. -
ModelManagerupdates thefilteredFacilitatorsinModelManager. -
FacilAddCommandcreates a newFacilActionbased on the facilitator to be added. -
ModelManageradds theFacilActionto theDoableActionList.
The following sequence diagram shows how the facilitator add command works:
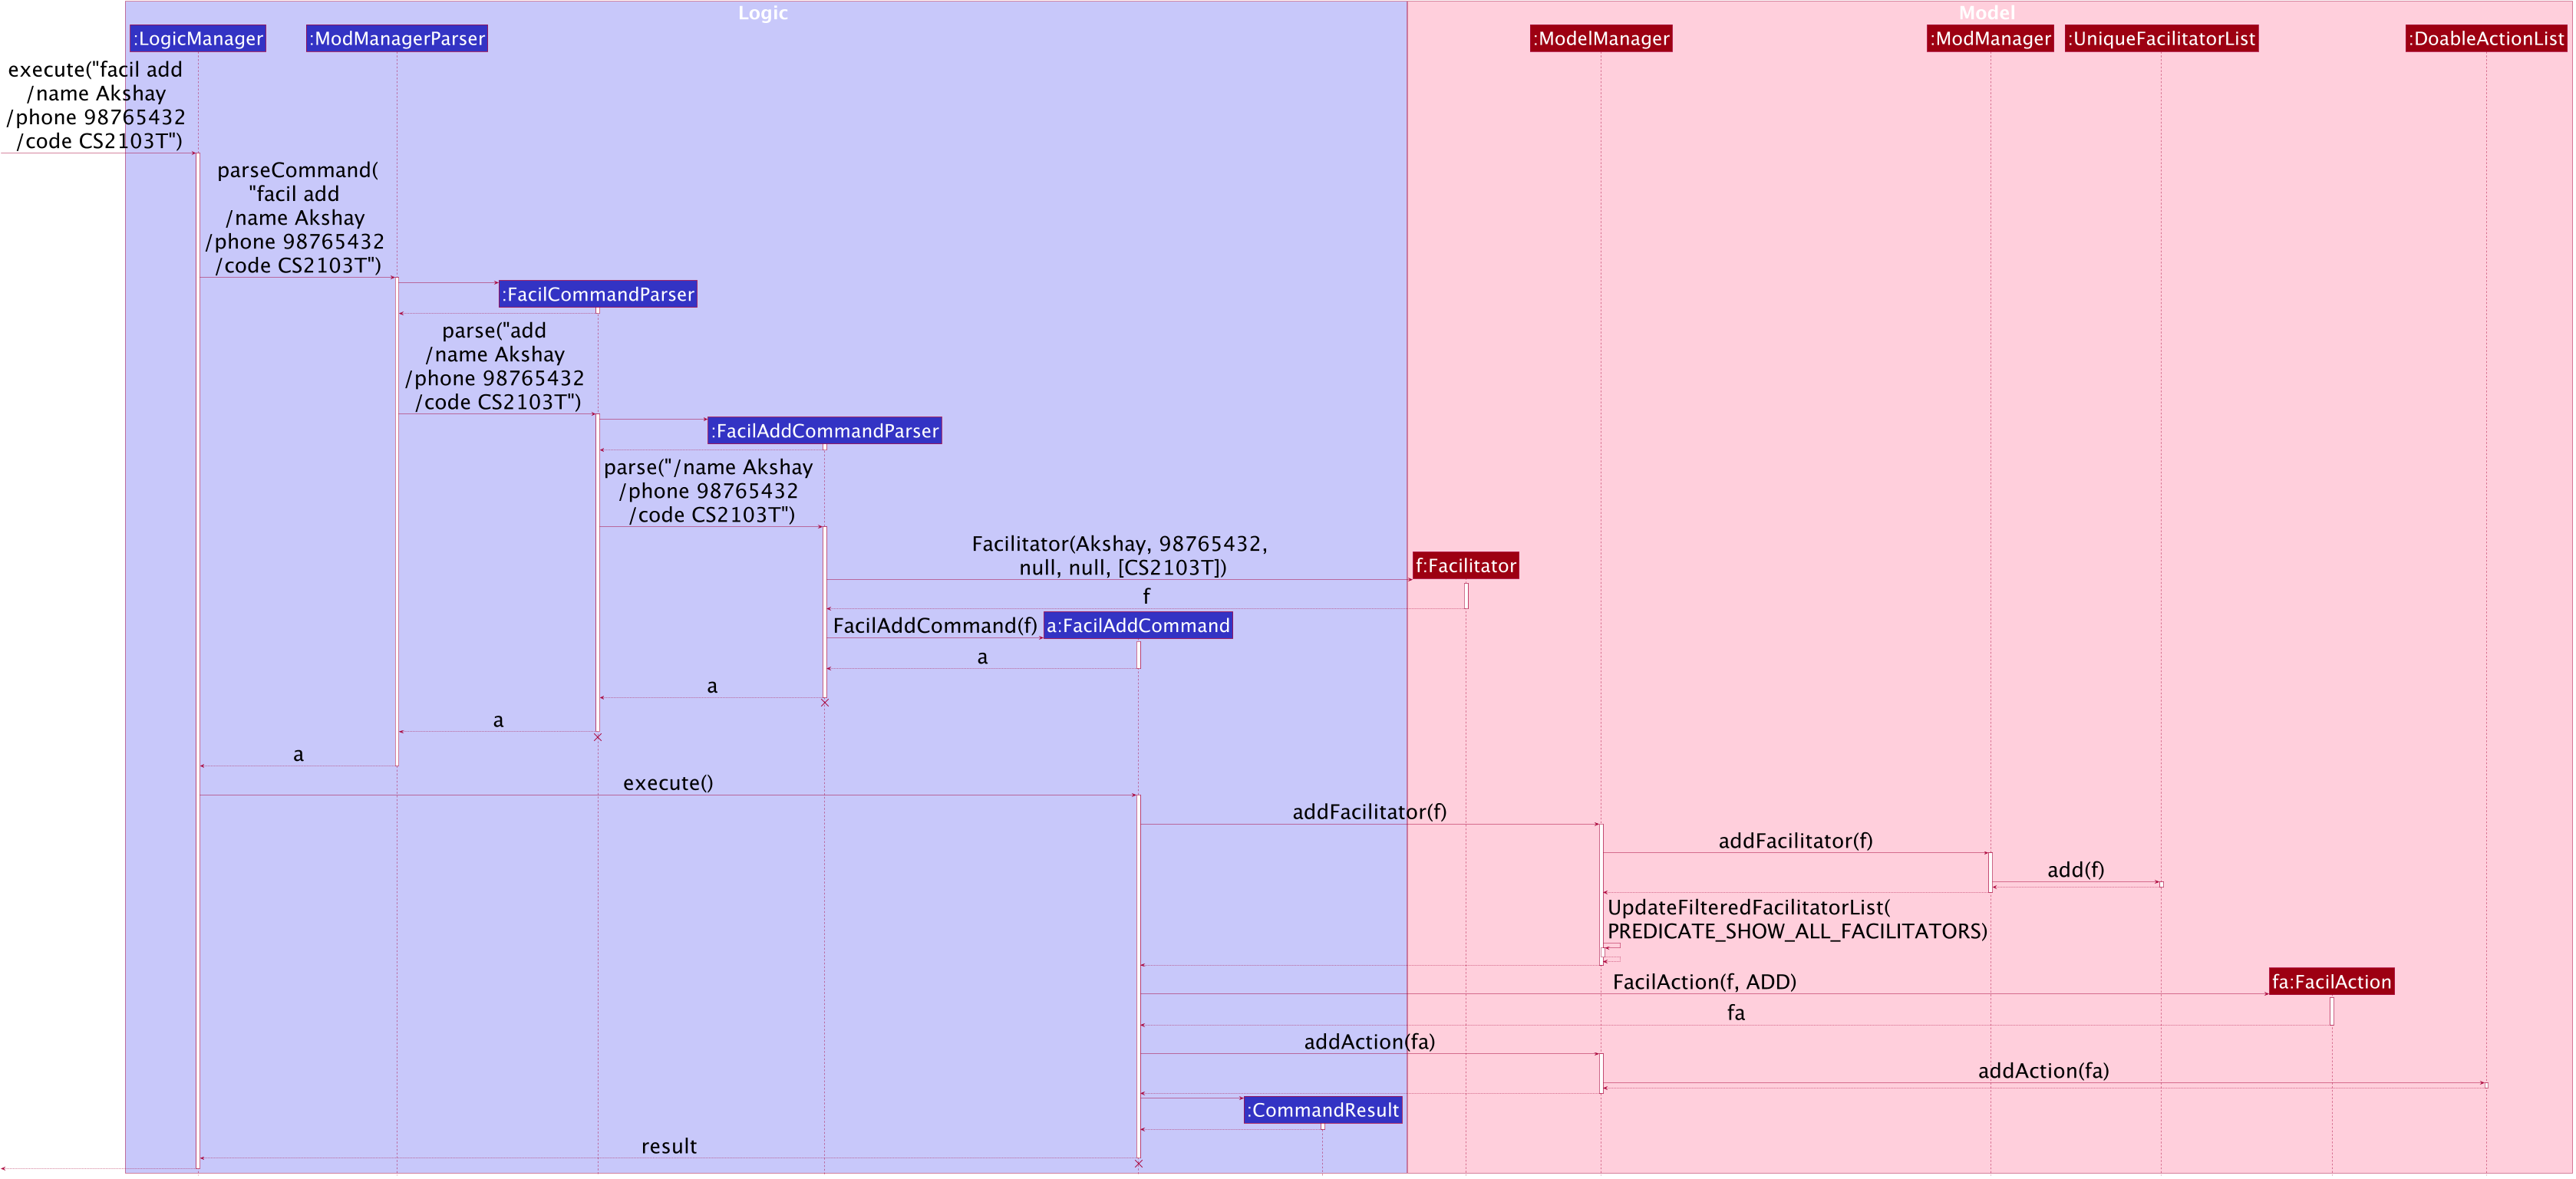
facil add Command
The lifeline for FacilitatorCommandParser, FacilitatorAddCommandParser and FacilitatorAddCommand should end at
the destroy marker (X) but due to a limitation of PlantUML, the lifeline reaches the end of diagram.
|
The following activity diagram summarizes what happens when a user executes a facilitator add command:
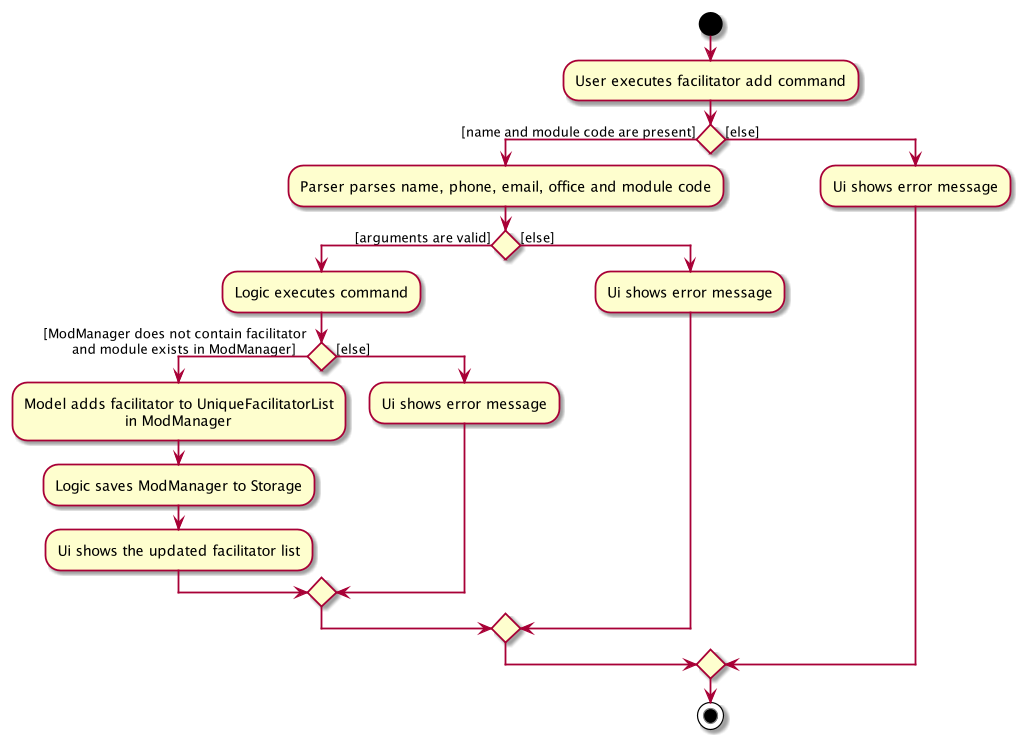
facil add CommandListing all facilitators (Zi Xin)
The list facilitator feature allows users to list all facilitators in Mod Manager.
This feature is facilitated by FacilCommandParser and FacilListCommand.
The operation is exposed in the Model interface as Model#updateFilteredFacilitatorList().
Given below is an example usage scenario and how the facilitator list mechanism behaves at each step:
-
The user executes the facilitator list command.
-
FacilCommandParsercreates a newFacilListCommand. -
LogicManagerexecutes theFacilListCommand. -
ModelManagerupdates thefilteredFacilitatorsinModelManager.
The following sequence diagram shows how the facilitator list command works:
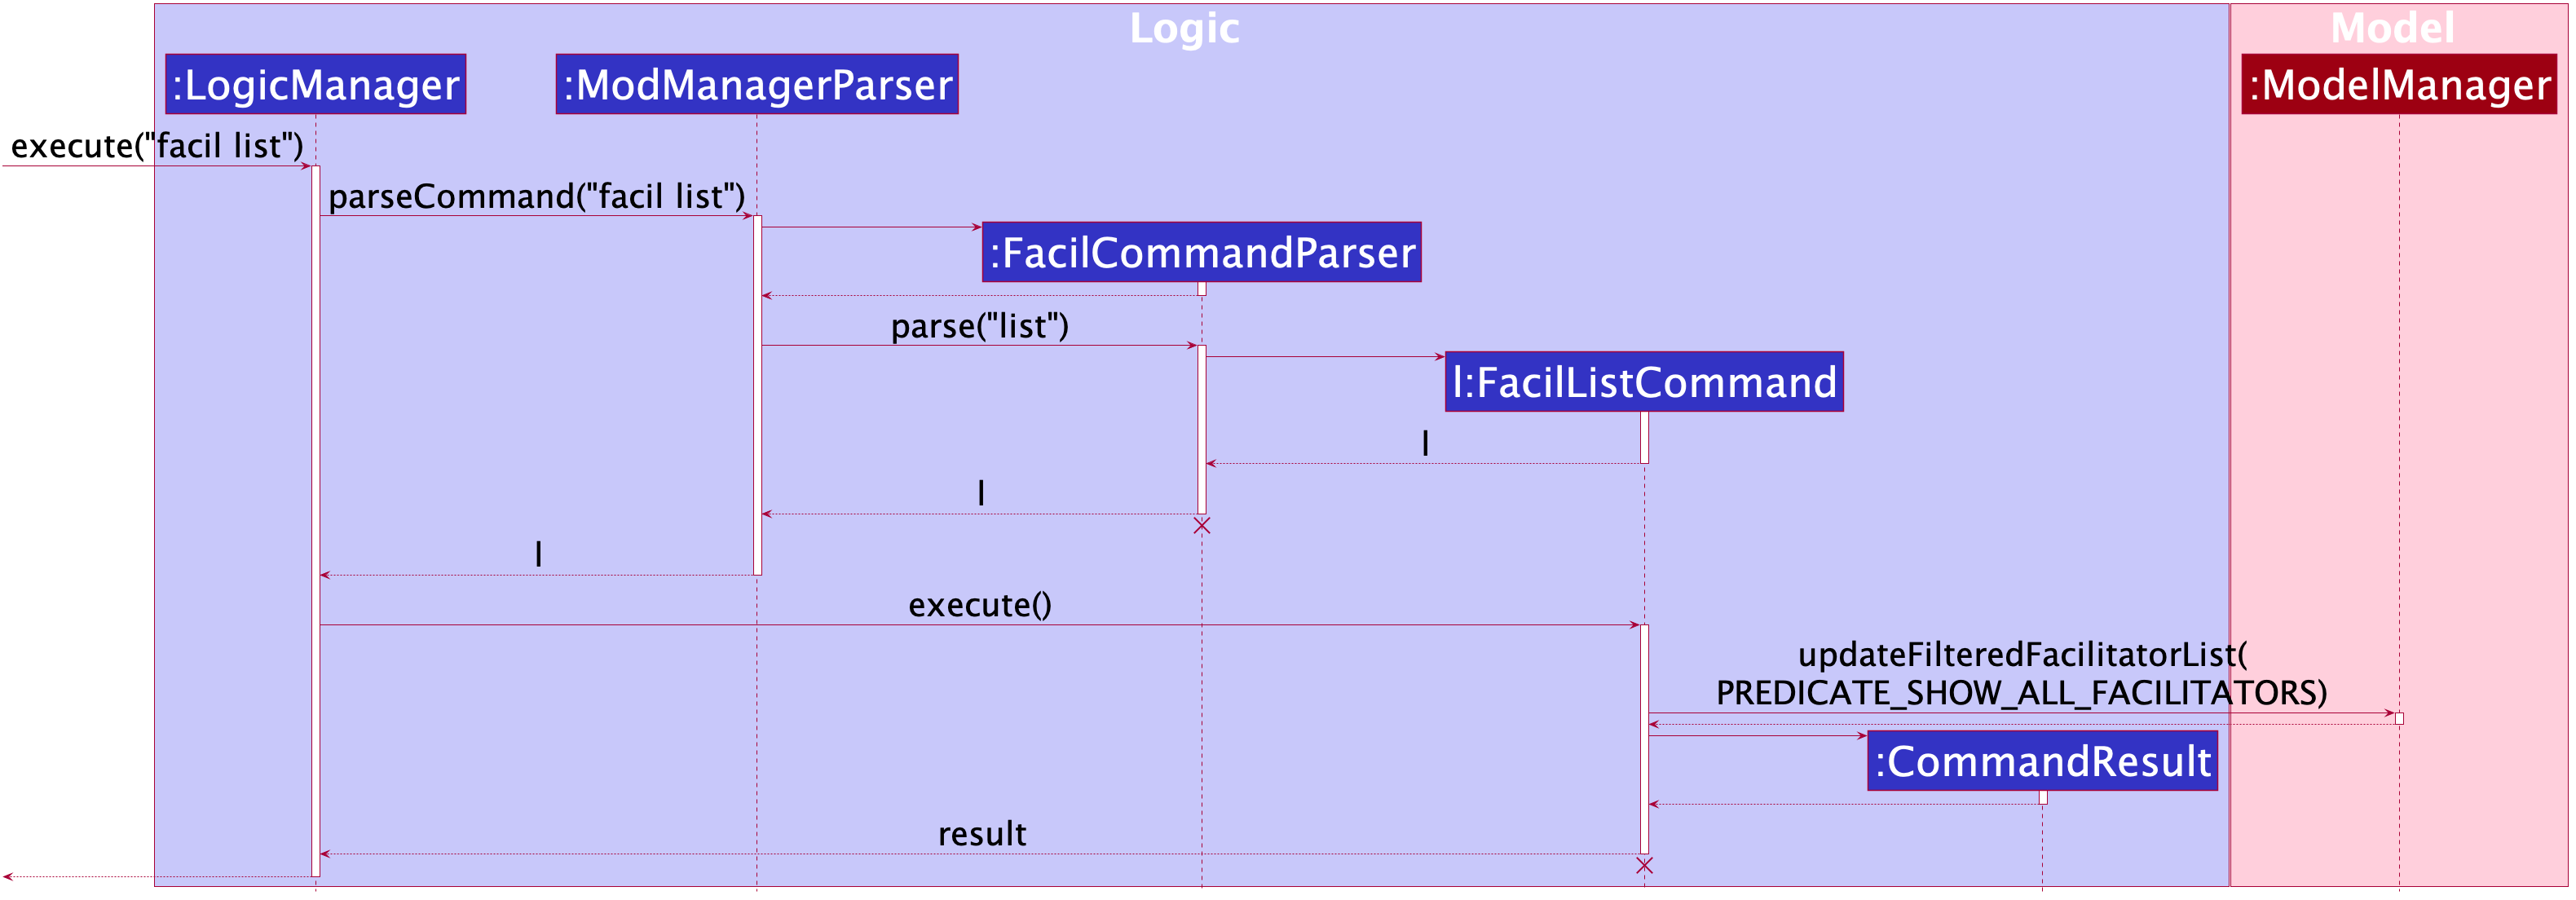
The lifeline for FacilCommandParser and FacilListCommand should end at
the destroy marker (X) but due to a limitation of PlantUML, the lifeline reaches the end of the diagram.
|
The following activity diagram summarizes what happens when a user executes a facilitator list command:
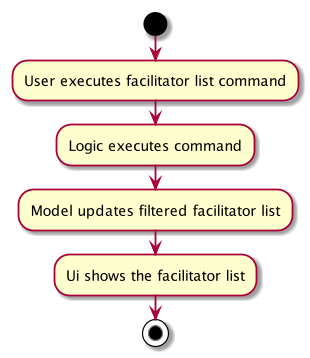
facil list CommandFinding facilitators (Zi Xin)
The find facilitator feature allows users to find a facilitator by name in Mod Manager.
This feature is facilitated by FacilCommandParser, FacilFindCommandParser and FacilFindCommand.
The operation is exposed in the Model interface as Model#updateFilteredFacilitatorList().
Given below is an example usage scenario and how the facilitator find mechanism behaves at each step:
-
The user executes the facilitator find command and provides the names of the facilitators to search for.
-
FacilFindCommandParsercreates a newFacilFindCommandbased on the names. -
LogicManagerexecutes theFacilFindCommand. -
ModelManagerupdates thefilteredFacilitatorsinModelManager.
The following sequence diagram shows how the facilitator find command works:
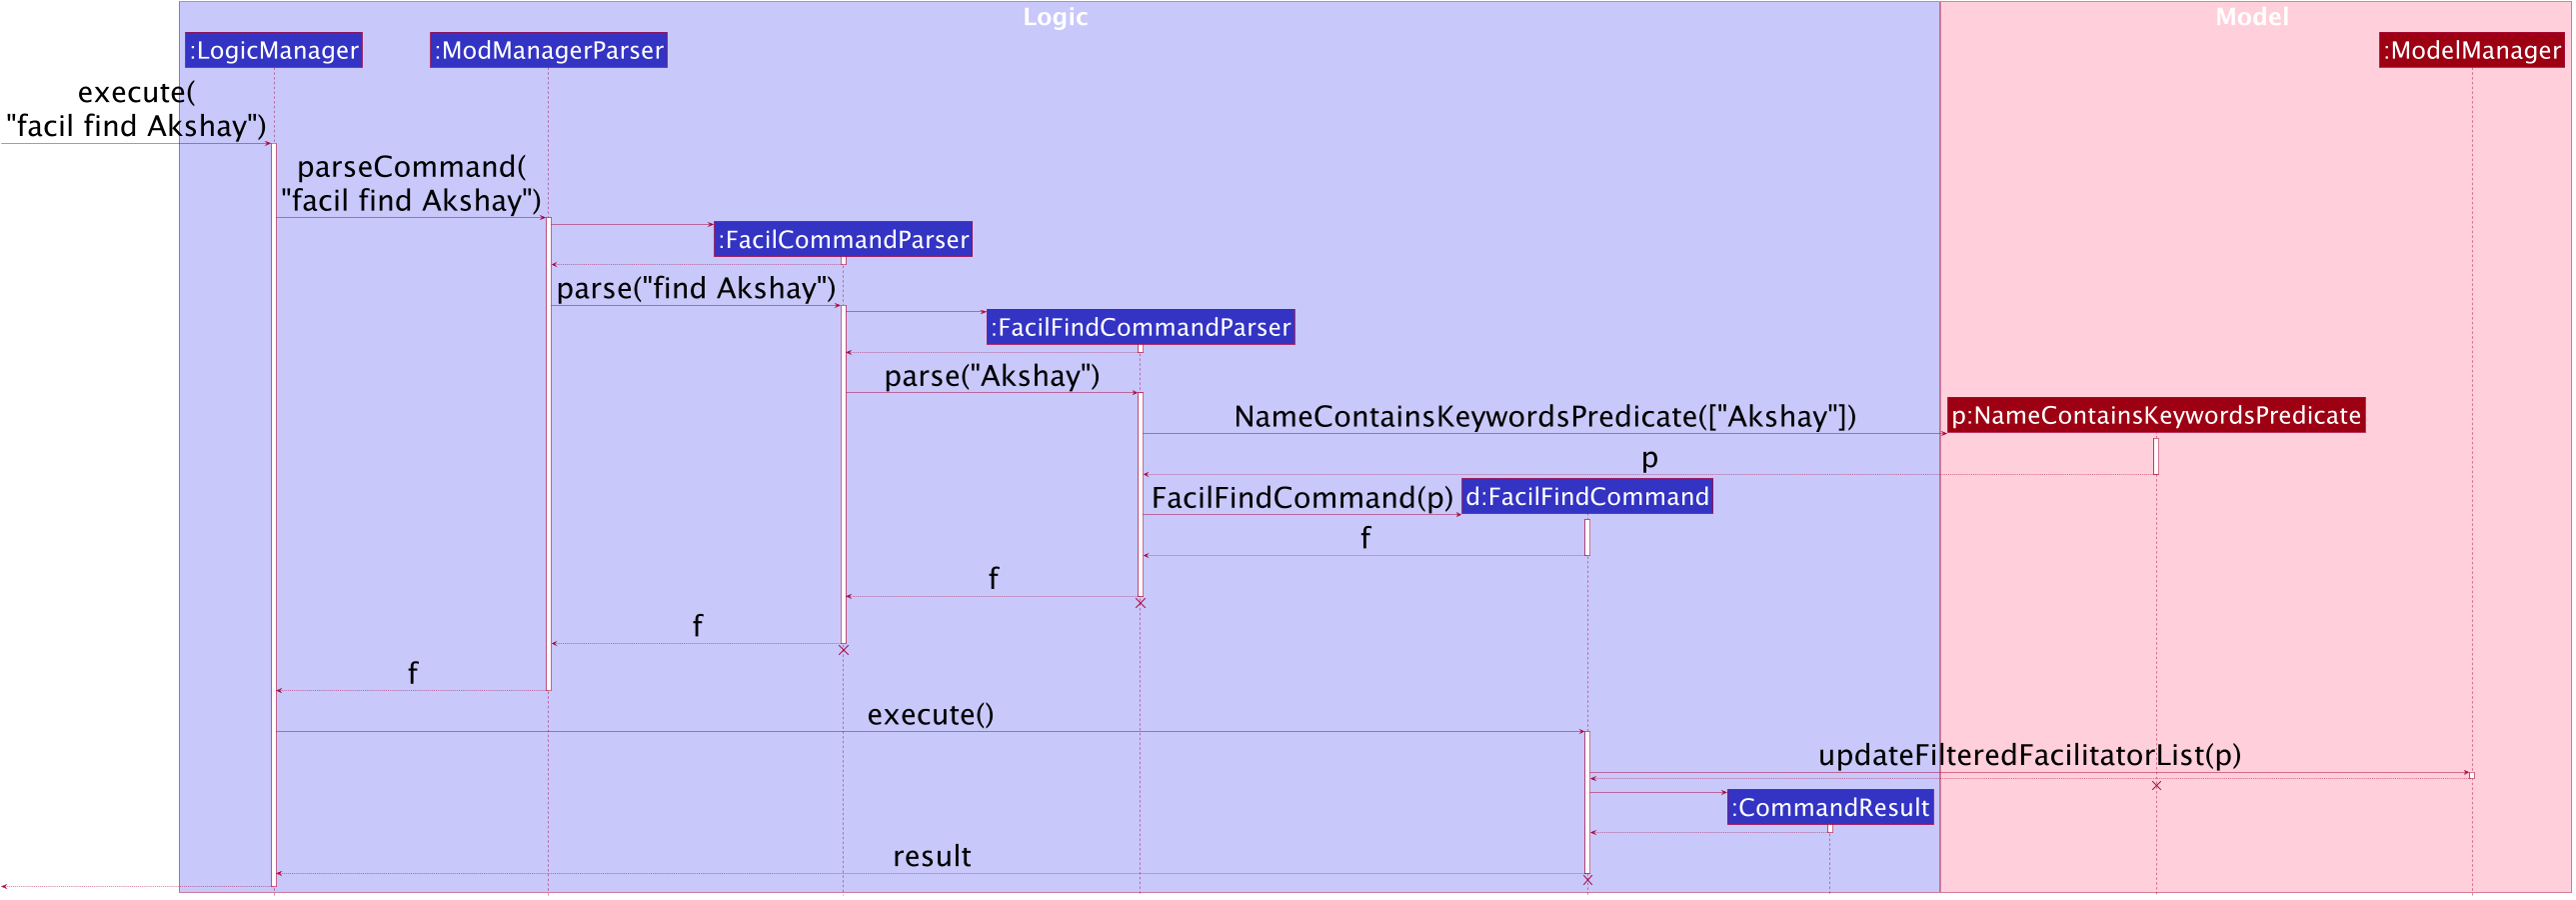
facil find Command
The lifeline for FacilCommandParser, FacilFindCommandParser, FacilFindCommand and NameContainsKeyword should end at
the destroy marker (X) but due to a limitation of PlantUML, the lifeline reaches the end of the diagram.
|
The following activity diagram summarizes what happens when a user executes a facilitator find command:
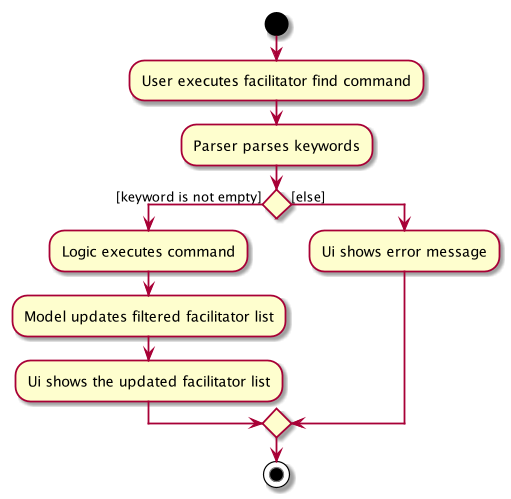
facil find CommandEditing a facilitator (Zi Xin)
The edit facilitator feature allows users to edit a facilitator from Mod Manager.
This feature is facilitated by FacilCommandParser, FacilEditCommandParser and FacilEditCommand.
The operation is exposed in the Model interface as Model#setFacilitator().
Given below is an example usage scenario and how the facilitator edit mechanism behaves at each step:
-
The user executes the facilitator edit command and provides the index or name of the facilitator to be edited and the fields to be edited.
-
FacilEditCommandParsercreates a newEditFacilitatorDescriptorwith the fields to be edited. -
FacilEditCommandParsercreates a newFacilEditCommandbased on the index or name andEditFacilitatorDescriptor. -
LogicManagerexecutes theFacilEditCommand. -
FacilEditCommandretrieves the facilitator to be edited. -
FacilEditCommandcreates a newFacilitator. -
ModManagersets the existing facilitator to the new facilitator in theUniqueFacilitatorList. -
ModelManagerupdates thefilteredFacilitatorsinModelManager. -
FacilEditCommandcreates a newFacilActionbased on the facilitator to be edited and the new facilitator. -
ModelManageradds theFacilActionto theDoableActionList.
The following sequence diagram shows how the facilitator edit command works:
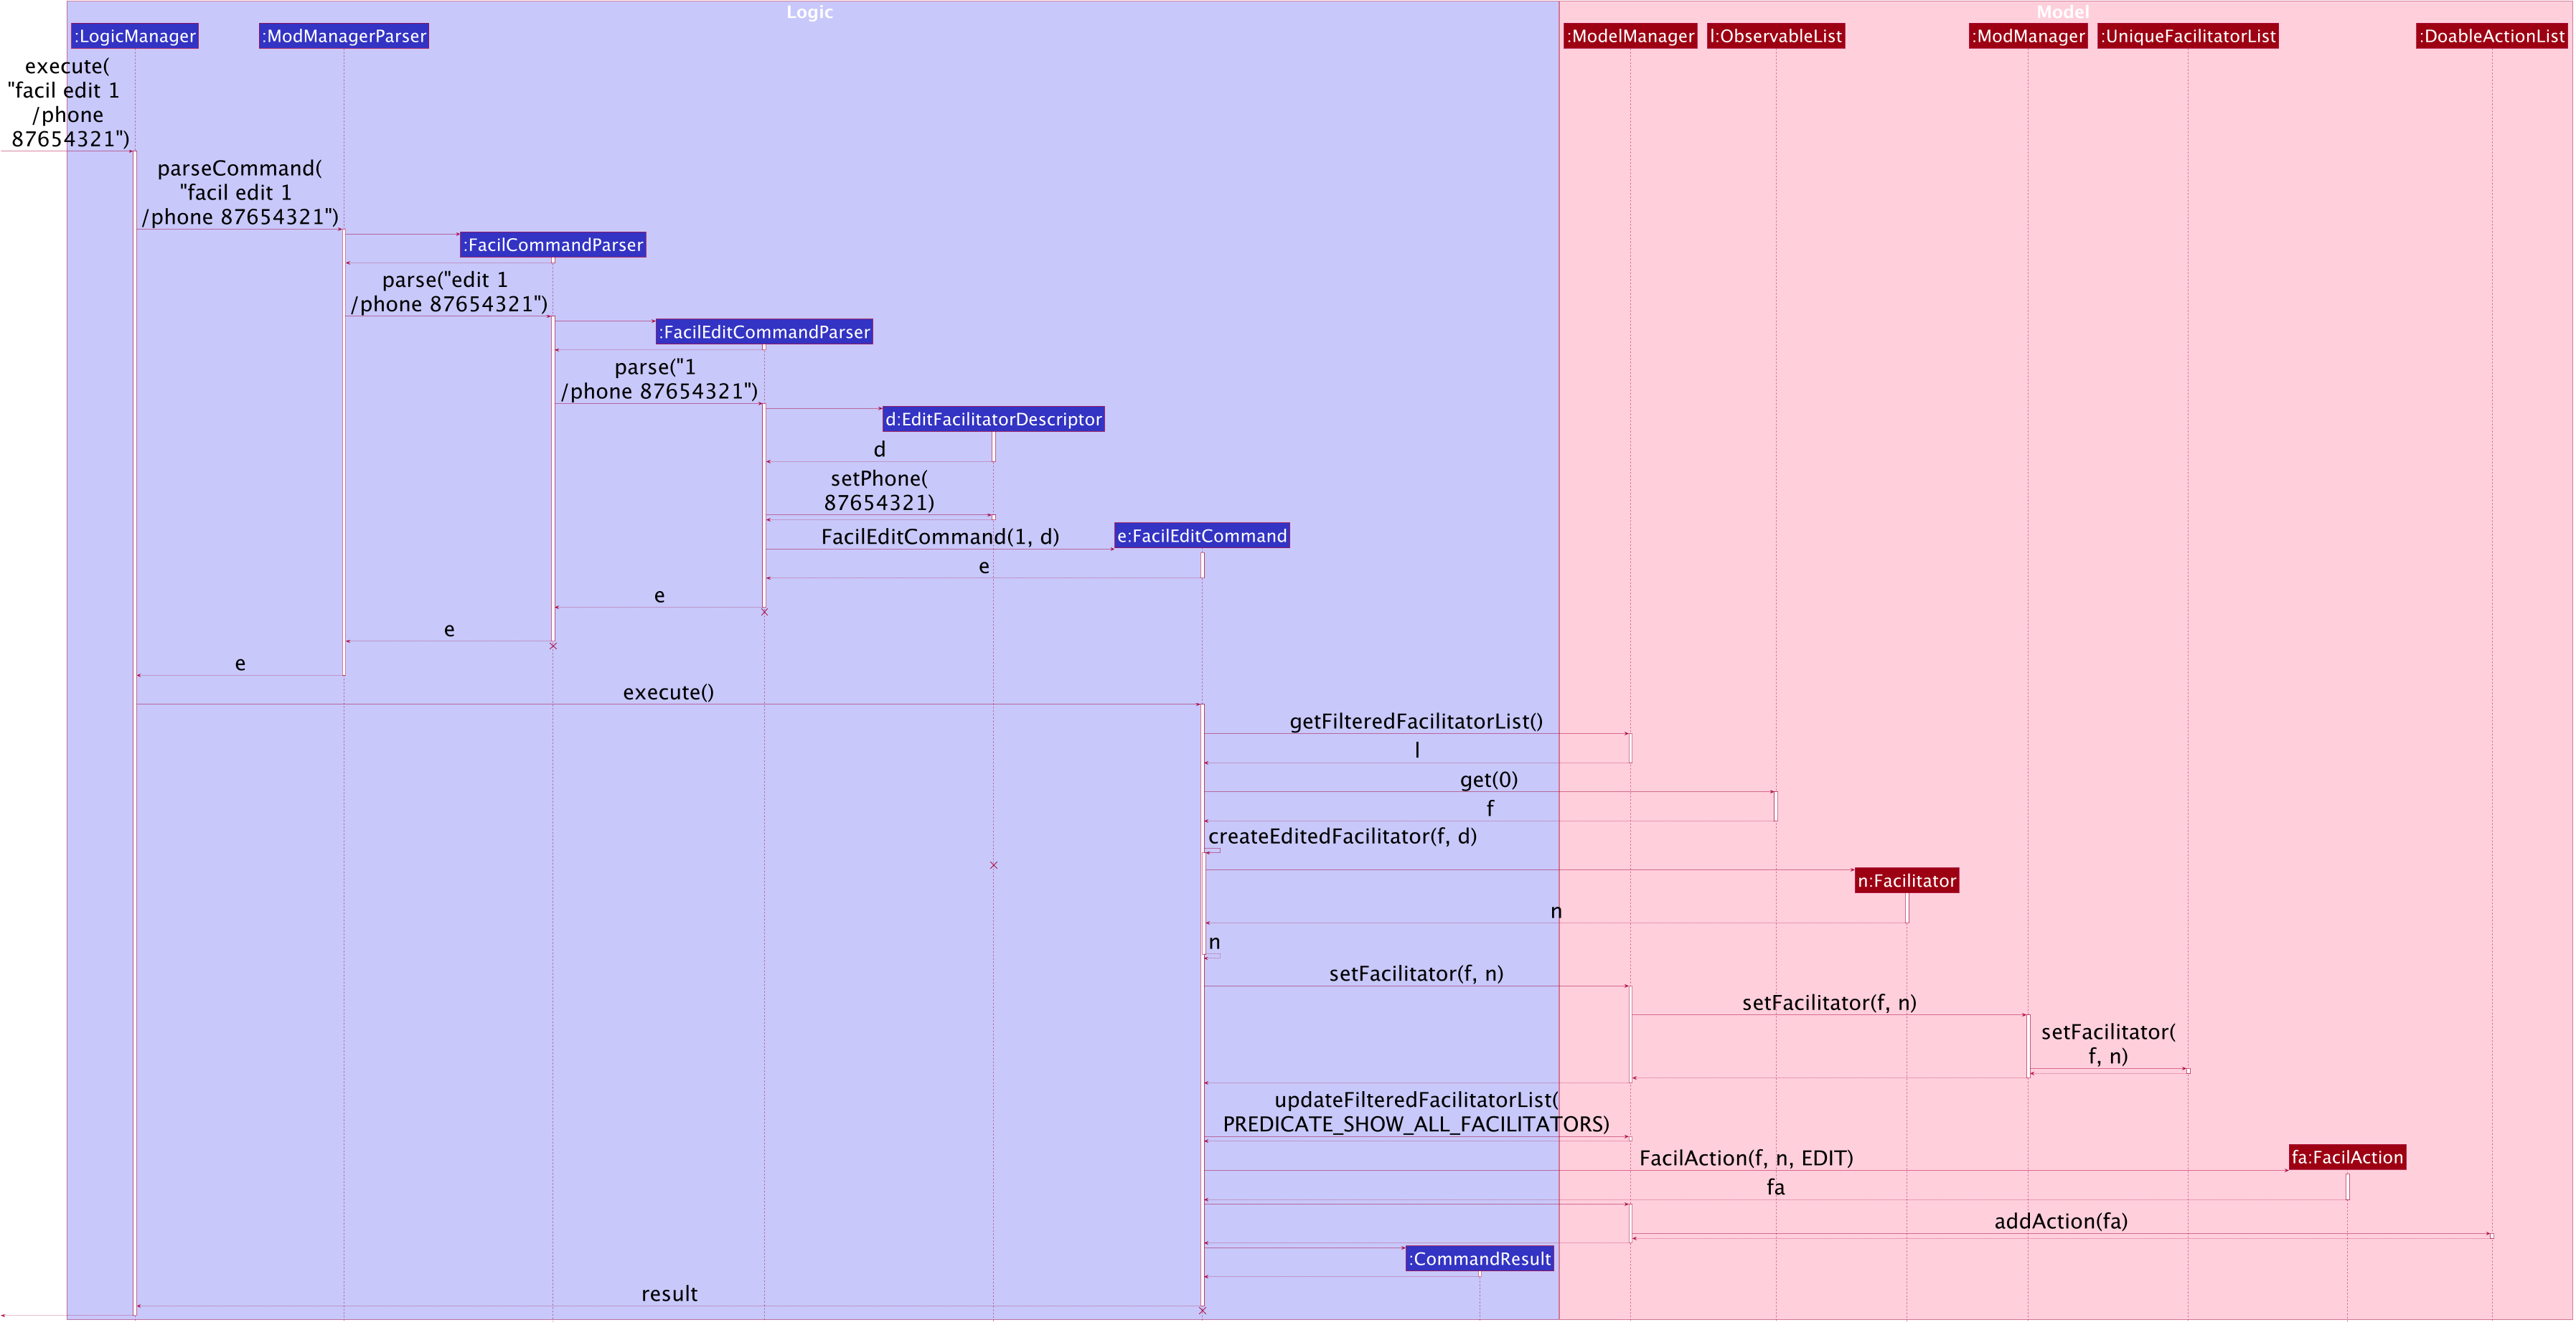
facil edit Command
The lifeline for FacilCommandParser, FacilEditCommandParser, EditFacilitatorDescriptor and FacilEditCommand should end at
the destroy marker (X) but due to a limitation of PlantUML, the lifeline reaches the end of the diagram.
|
The following activity diagram summarizes what happens when a user executes a facilitator edit command:
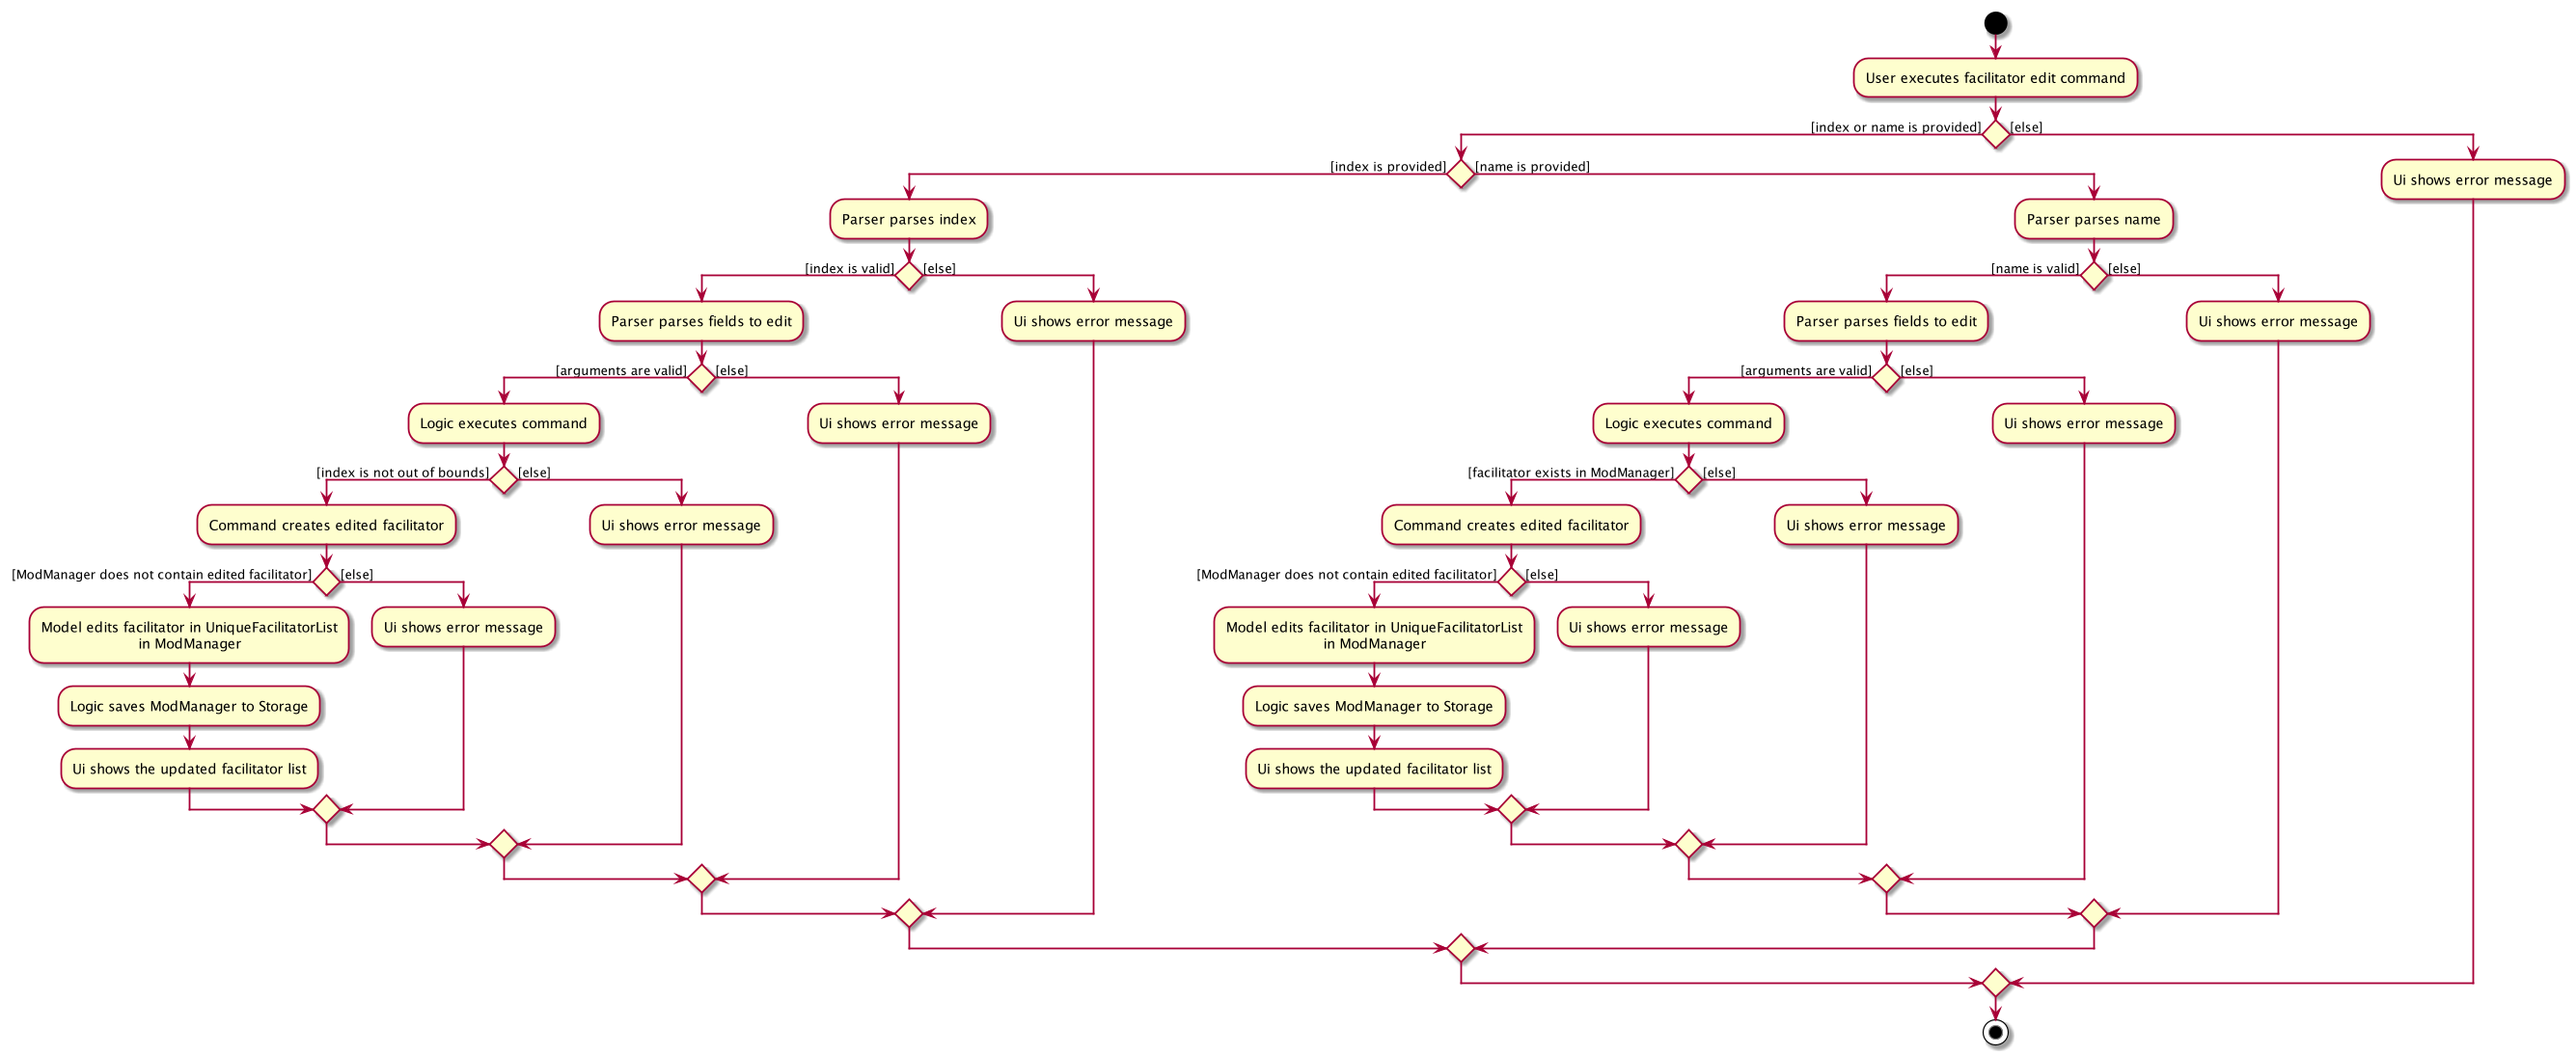
facil edit CommandDeleting a facilitator (Zi Xin)
The delete facilitator feature allows users to delete a facilitator from Mod Manager.
This feature is facilitated by FacilCommandParser, FacilDeleteCommandParser and FacilDeleteCommand.
The operation is exposed in the Model interface as Model#deleteFacilitator().
Given below is an example usage scenario and how the facilitator delete mechanism behaves at each step:
-
The user executes the facilitator delete command and provides the index or name of the facilitator to be deleted.
-
FacilDeleteCommandParsercreates a newFacilDeleteCommandbased on the index or name. -
LogicManagerexecutes theFacilDeleteCommand. -
FacilDeleteCommandretrieves the facilitator to be deleted. -
ModManagerdeletes the facilitator from theUniqueFacilitatorList. -
FacilDeleteCommandcreates a newFacilActionbased on the facilitator to be deleted. -
ModelManageradds theFacilActionto theDoableActionList.
The following sequence diagram shows how the facilitator delete command works:
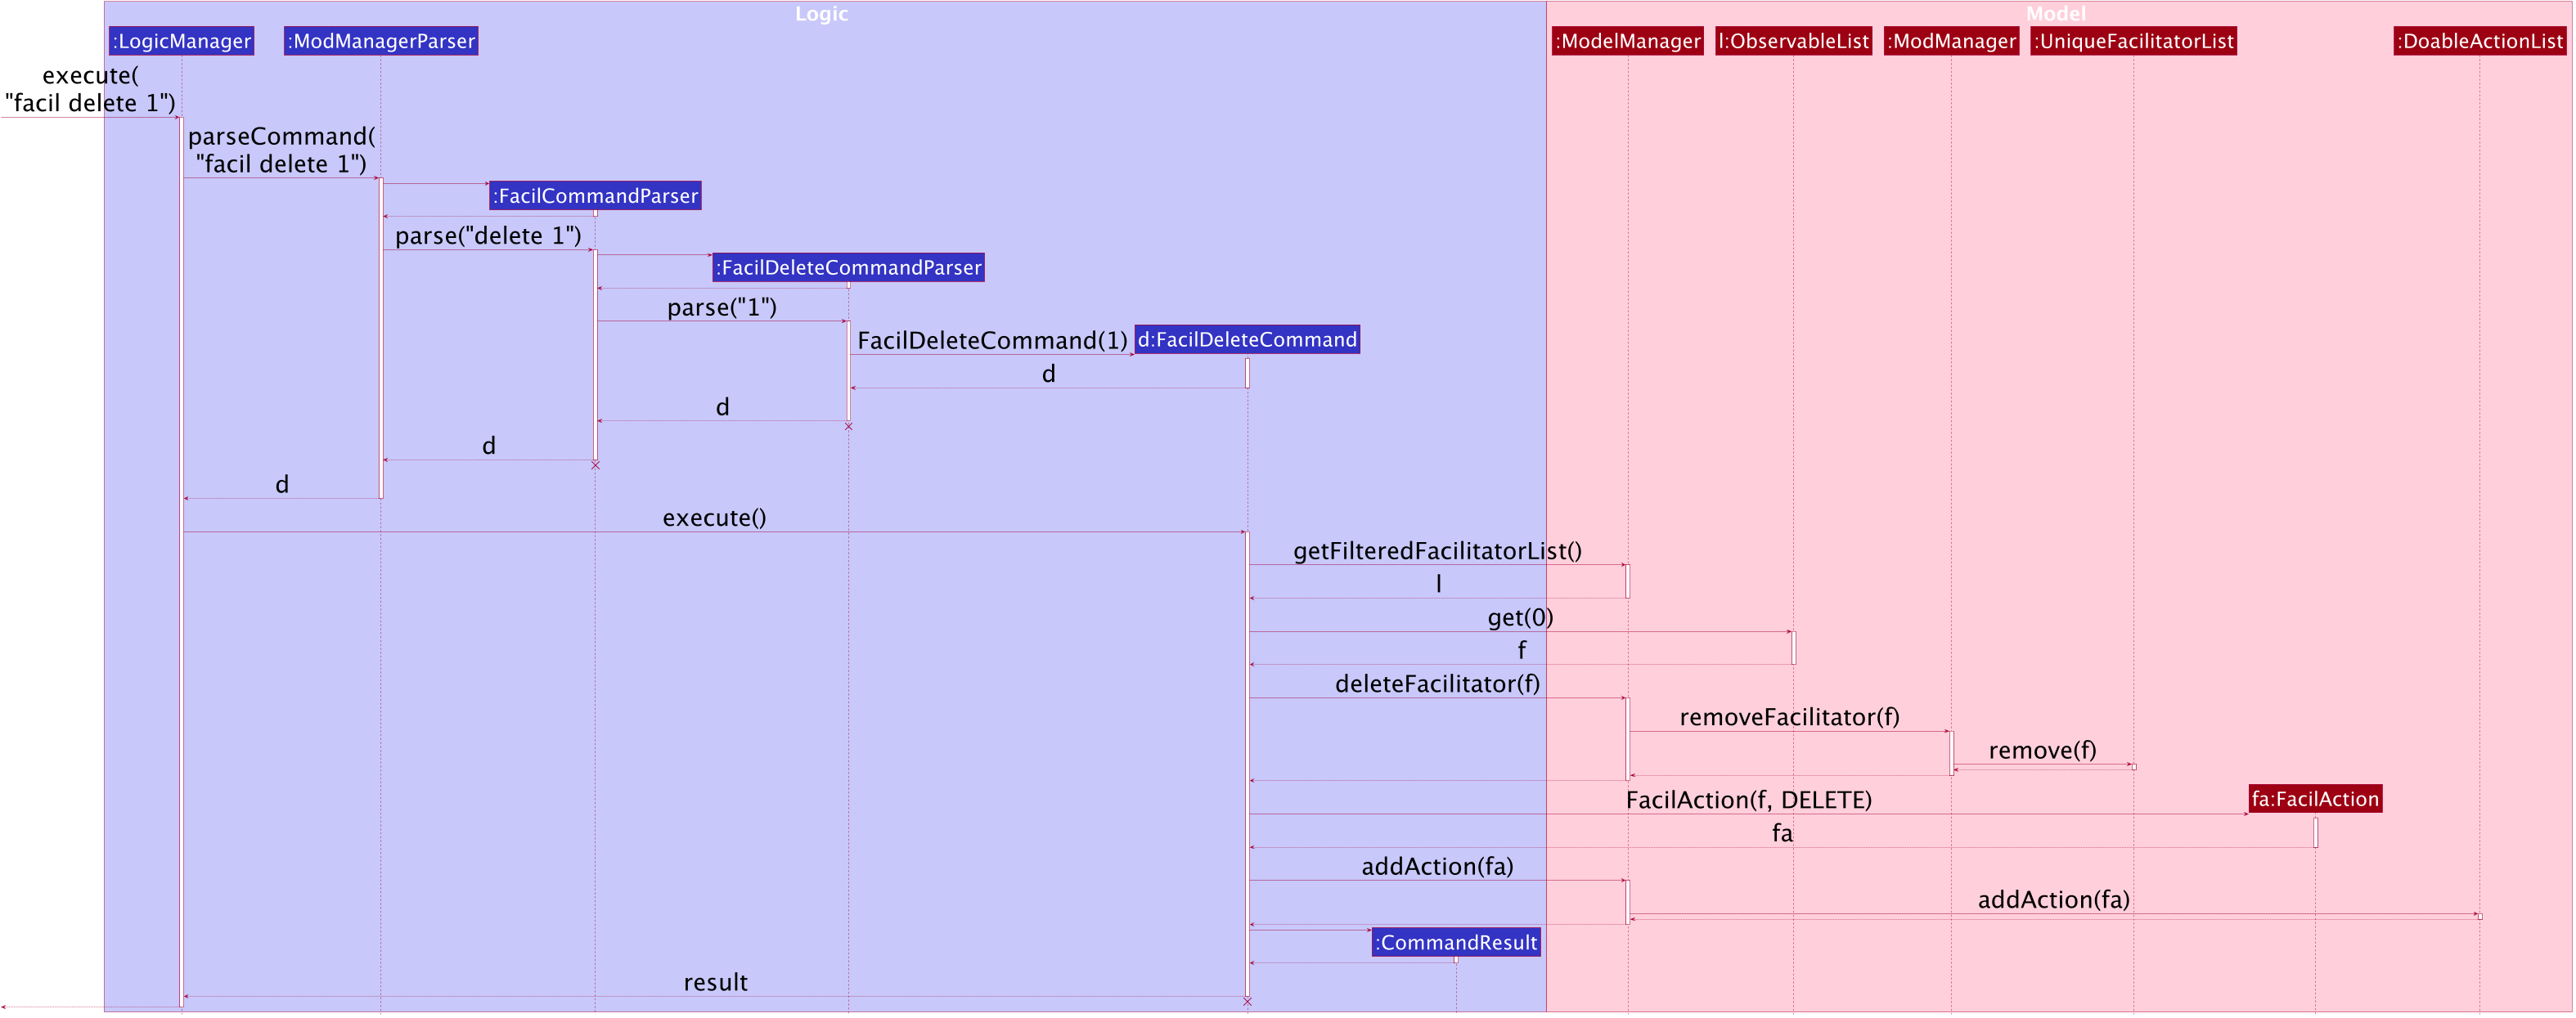
facil delete Command
The lifeline for FacilCommandParser, FacilDeleteCommandParser and FacilDeleteCommand should end at
the destroy marker (X) but due to a limitation of PlantUML, the lifeline reaches the end of the diagram.
|
The following activity diagram summarizes what happens when a user executes a facilitator delete command:
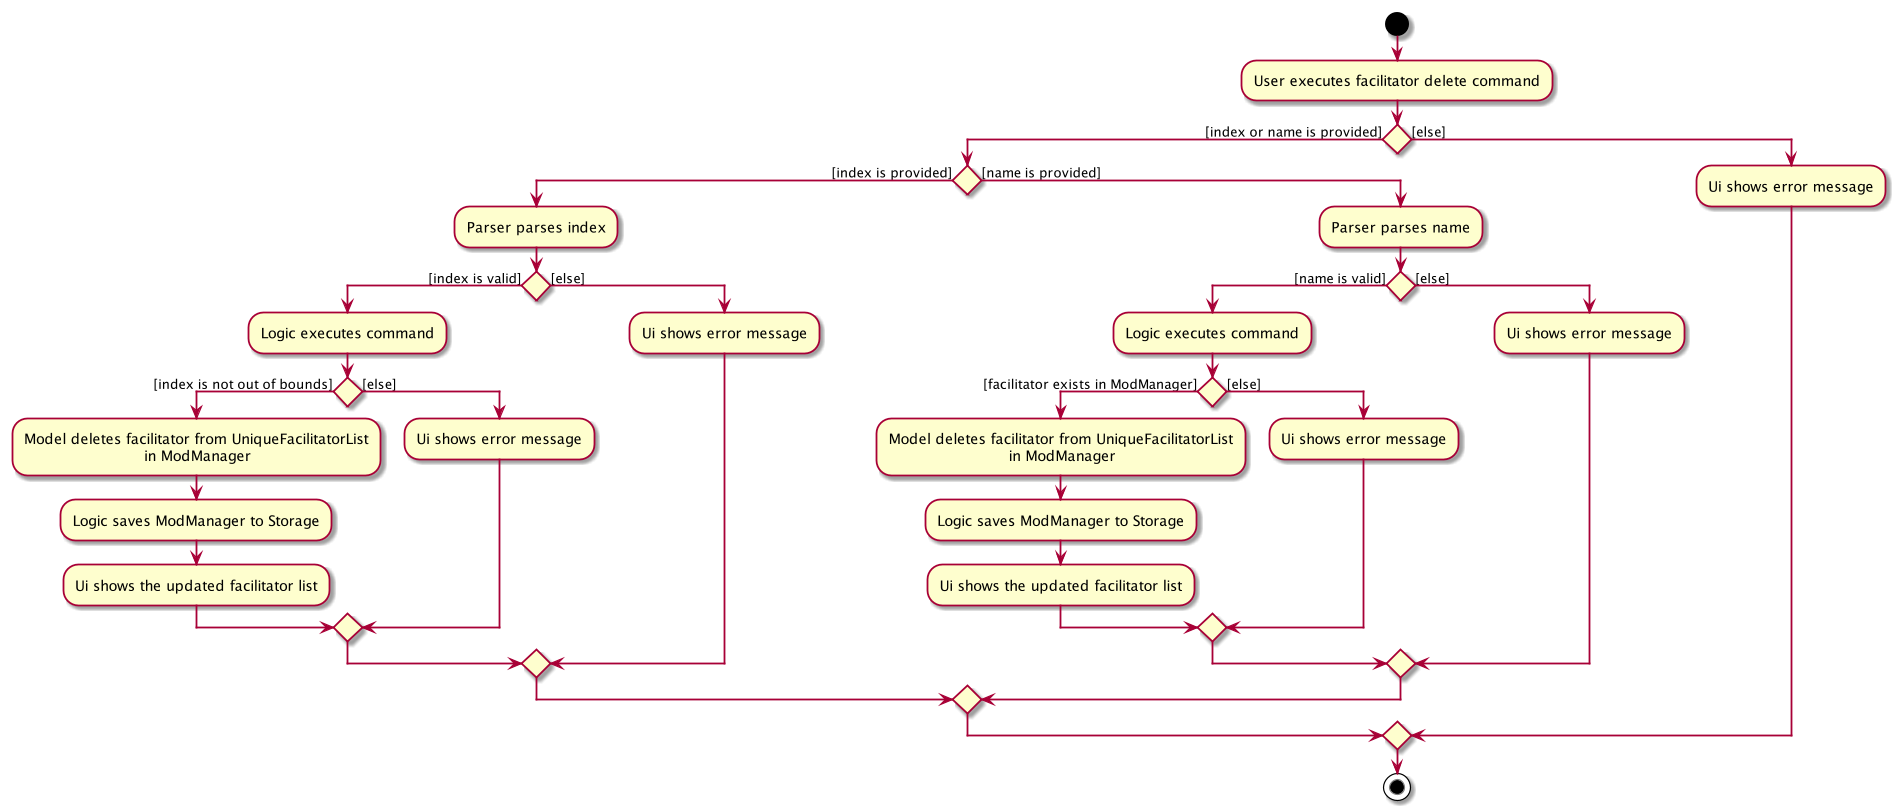
facil delete Command4.5.2. Design Considerations (Zi Xin)
Aspect: Mutability of Facilitator object
-
Alternative 1 (current choice): Create a new facilitator with the edited fields and replace the existing facilitator with the new facilitator.
-
Pros: Preserves immutability of the
Facilitatorobject. -
Cons: Overhead in creating a new
Facilitatorobject for every edit operation.
-
-
Alternative 2: Modify the existing facilitator directly.
-
Pros: More convenient and lower overhead to edit a facilitator by setting the relevant fields without creating a new
Facilitatorobject. -
Cons: Unintentional modification of the
Facilitatorobject.
-
Alternative 1 is chosen to preserve the immutability of the Facilitator object to avoid unintentional modification.
Aspect: Storage of facilitators
-
Alternative 1 (current choice): Store all facilitators in a single facilitator list.
-
Pros: Will not have to maintain multiple lists. Less memory usage as each facilitator is represented once. Will not have to iterate through multiple lists to find all instances of a particular facilitator when executing facilitator commands.
-
Cons: Have to iterate through the whole list to find facilitators for a particular module when executing module commands.
-
-
Alternative 2: Store facilitators for each module in a separate list.
-
Pros: Able to find facilitators for a particular module easily when executing module commands.
-
Cons: May contain duplicates as some facilitators may have multiple module codes. Have to iterate through multiple lists when executing facilitator commands.
-
Alternative 1 is chosen as the design is simpler without the need to maintain multiple lists and can also avoid duplicates in the storage.
Aspect: Reference of ModuleCode in Facilitator object
-
Alternative 1 (current choice): Create a new
ModuleCodeobject for eachFacilitator.-
Pros: Easier to implement.
-
Cons: Existence of multiple identical
ModuleCodeobjects.
-
-
Alternative 2: Reference each
Facilitatorto theModuleCodein theModulelist.-
Pros: Only require one
ModuleCodeobject per uniqueModuleCode. Can support editing of module codes more easily. -
Cons: Have to iterate through the module list to find the module code for the facilitator.
-
Alternative 1 is chosen because of ease of implementation due to time constraint.
4.6. Calendar Feature
The calendar feature manages the calendar in Mod Manager and is represented by the Calendar class. A calendar has a LocalDate.
It supports the following operations:
-
view- Views the schedules and tasks in a whole week in Mod Manager. -
find- Finds empty slots in a week from current day to end of the week in Mod Manager.
4.6.1. Implementation Details
Viewing the calendar (Lu Shing)
The view calendar feature allows users to view the calendar for a week in Mod Manager.
This feature is facilitated by CalCommandParser, CalViewCommandParser and CalViewCommand. The calendar is exposed in the Model interface in Module#updateCalendar() and it is retrieved in MainWindow to show the timeline for the specified week to users.
Given below is an example usage scenario and how the calendar view mechanism behaves at each step:
-
The user executes the calendar view command and provides which week to be viewed. The week to be viewed can be this or next week.
-
CalViewCommandParsercreates a newCalendarbased on the specified week. -
CalViewCommandParsercreates a newCalViewCommandbased on theCalendar. -
LogicManagerexecutes theCalViewCommand. -
ModelManagerupdates the calendar inModelManager. -
MainWindowretrieves the calendar fromLogicManagerwhich retrieves fromModelManager. -
MainWindowshows the calendar.
The following sequence diagram shows how the calendar view command works:
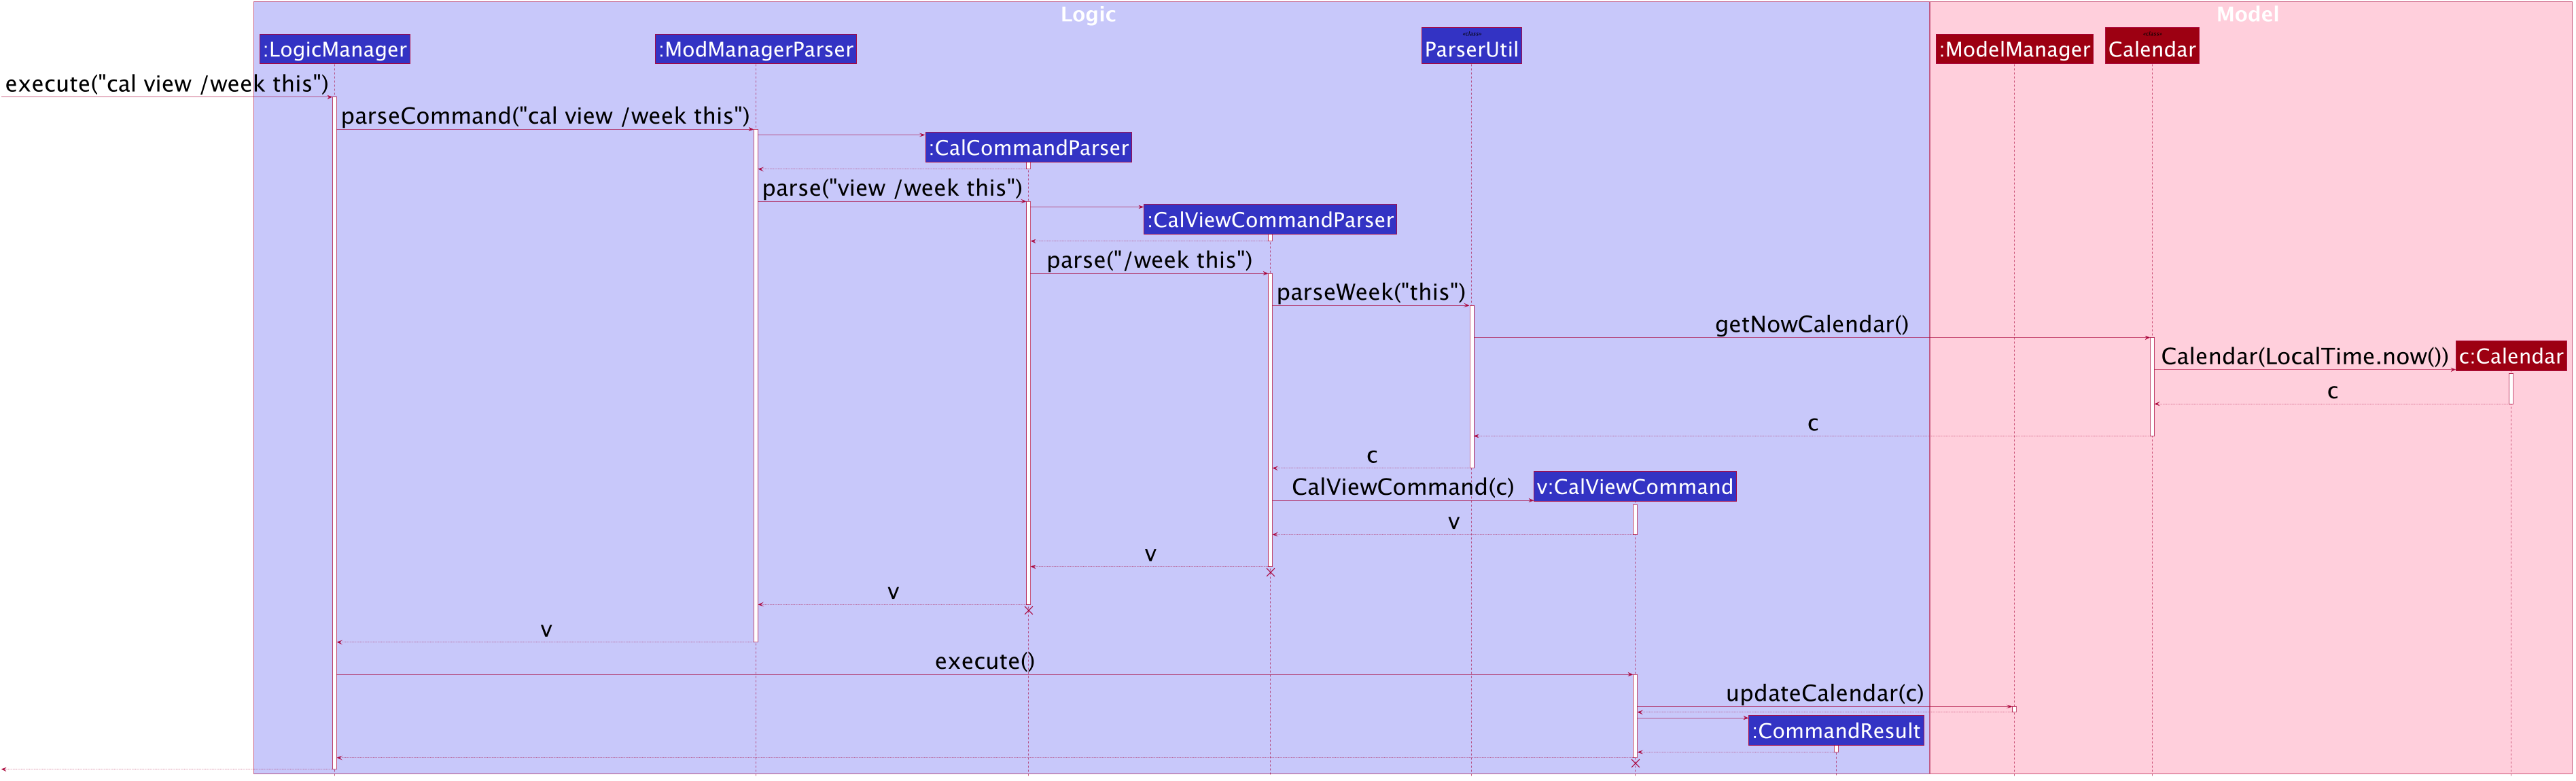
cal view Command
The lifeline for CalCommandParser, CalViewCommandParser and CalViewCommand should end at the destroy marker (X) but due to a limitation of PlantUML, the lifeline reaches the end of the diagram.
|
The following activity diagram summarizes what happens when a user executes a calendar view command:
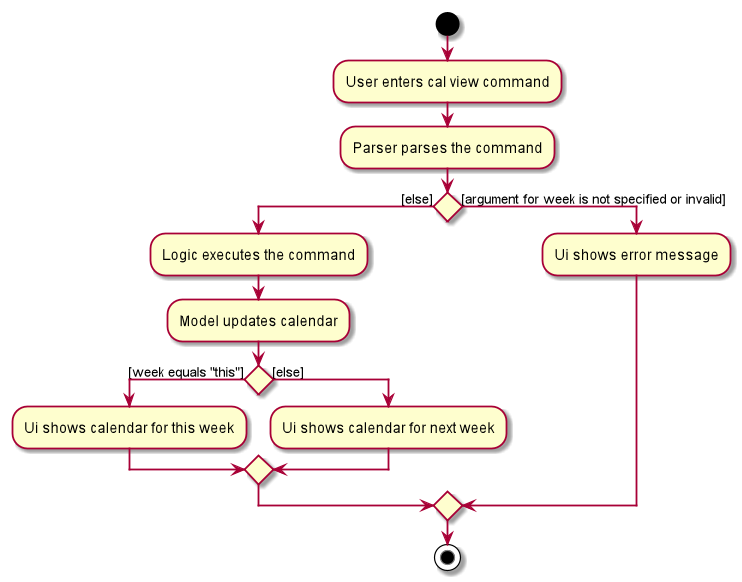
cal view CommandFinding empty slots in calendar (Lu Shing)
The find empty in calendar feature allows users to know the empty slots they have in the calendar from the current day to the end of the week in Mod Manager. This feature is facilitated by CalCommandParser, CalFindCommandParser and CalFindCommand.
Given below is an example usage scenario and how the calendar find mechanism behaves at each step:
-
The user executes the calendar find command.
-
CalFindCommandParsercreates a newCalFindCommand. -
LogicManagerexecutes theCalFindCommand.
The following sequence diagram shows how the calendar find command works:
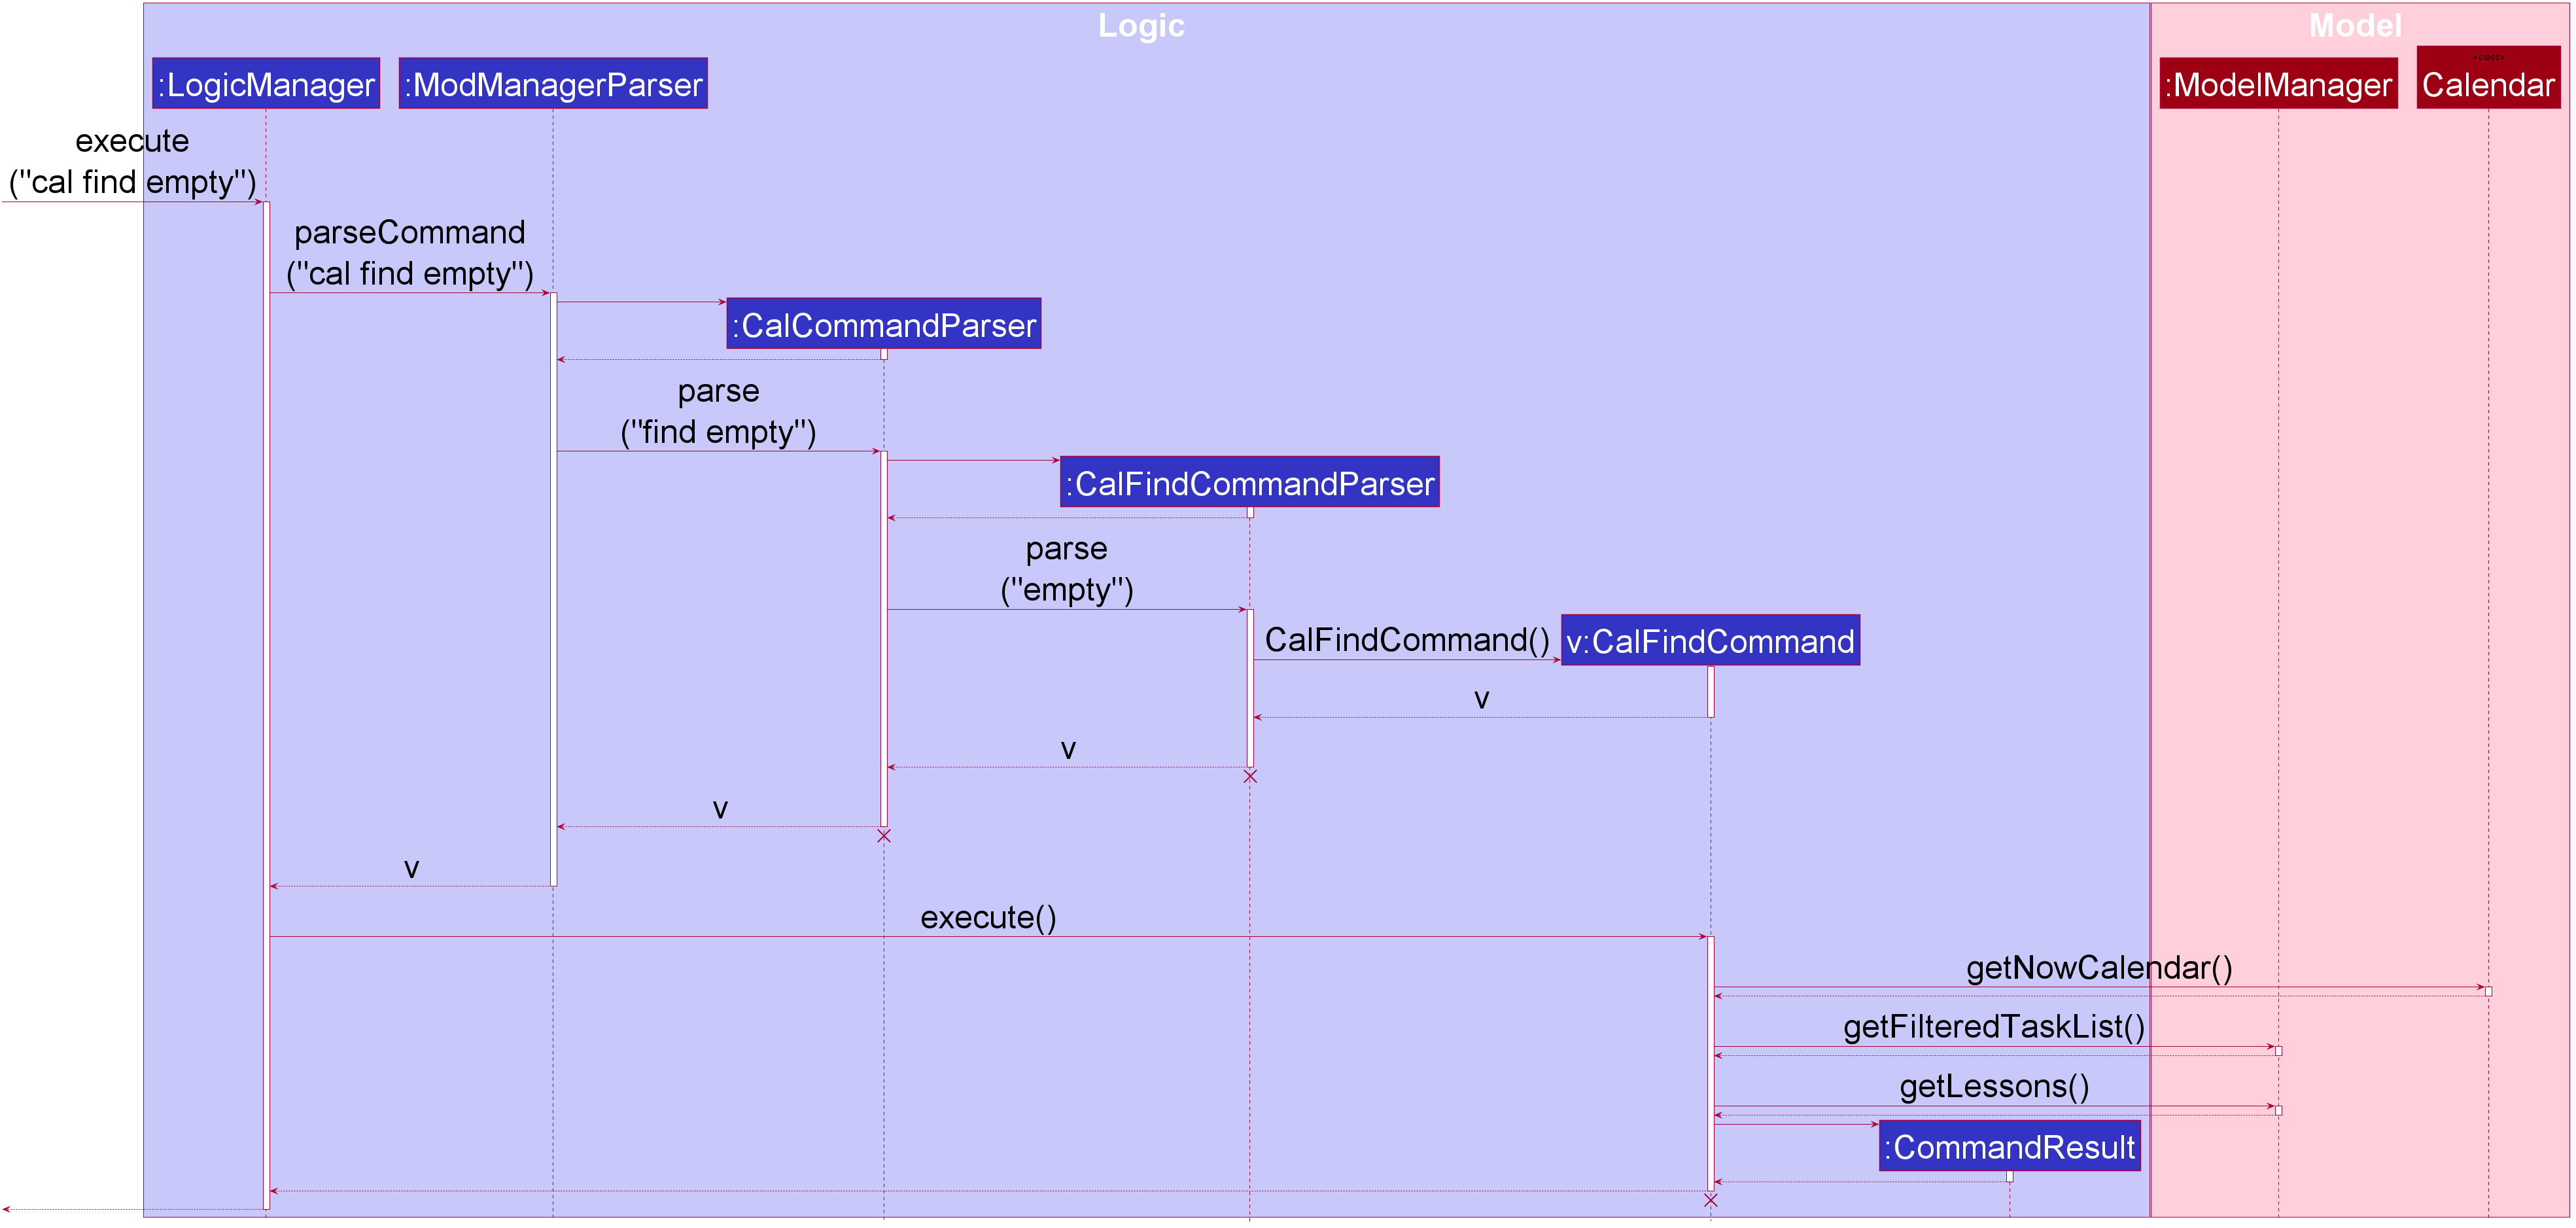
cal find Command
The lifeline for CalCommandParser, CalFindCommandParser and CalFindCommand should end at the destroy marker (X) but due to a limitation of PlantUML, the lifeline reaches the end of the diagram.
|
The following activity diagram summarizes what happens when a user executes a calendar find command:
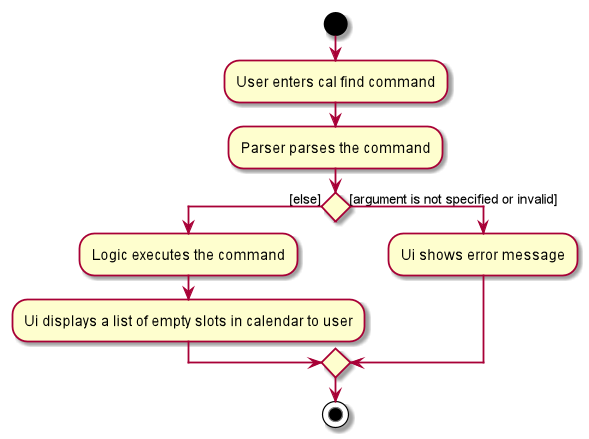
cal find Command4.6.2. Design Considerations (Lu Shing)
Aspect: Calendar appearance
-
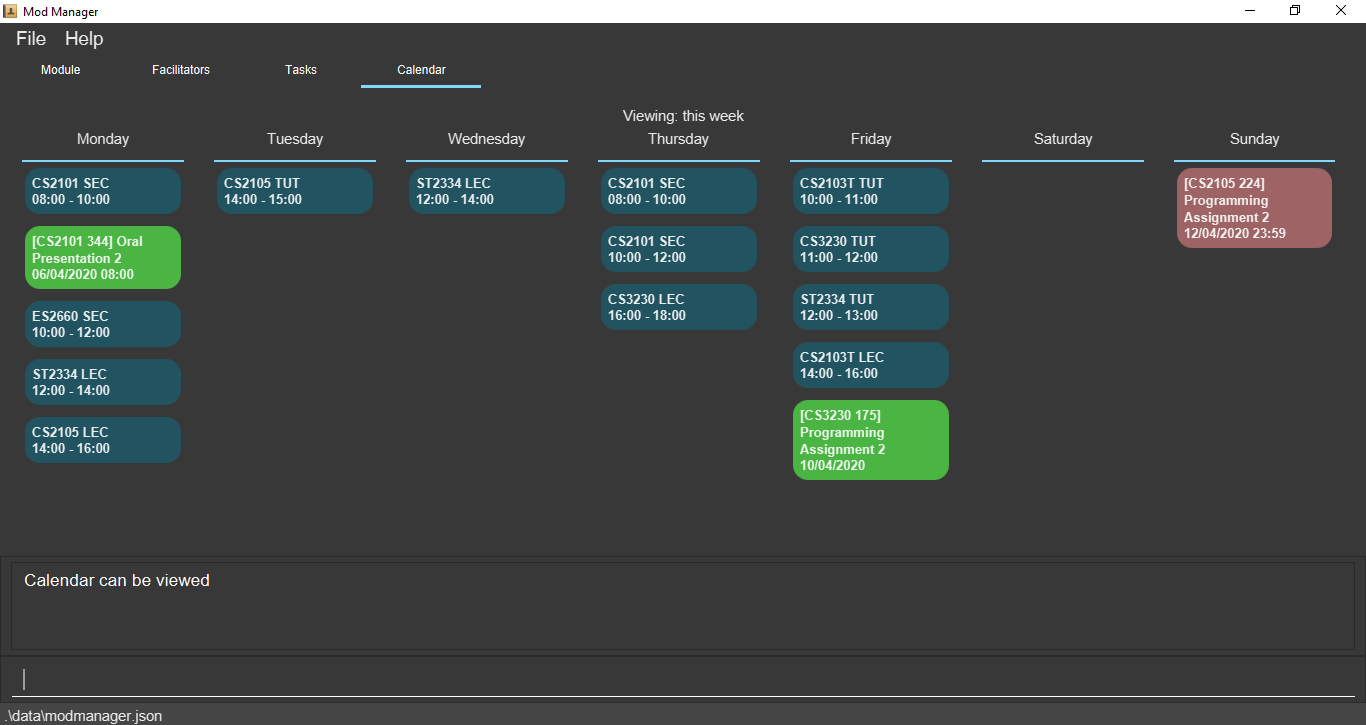
Alternative 1 (current choice): Displaying the days of a week in calendar from left to right.
-
Pros: The whole week can be seen on one screen without having users to scroll down for a particular day.
-
Cons: Words that are long in number of characters may not be able to be displayed in a single line.
-
-
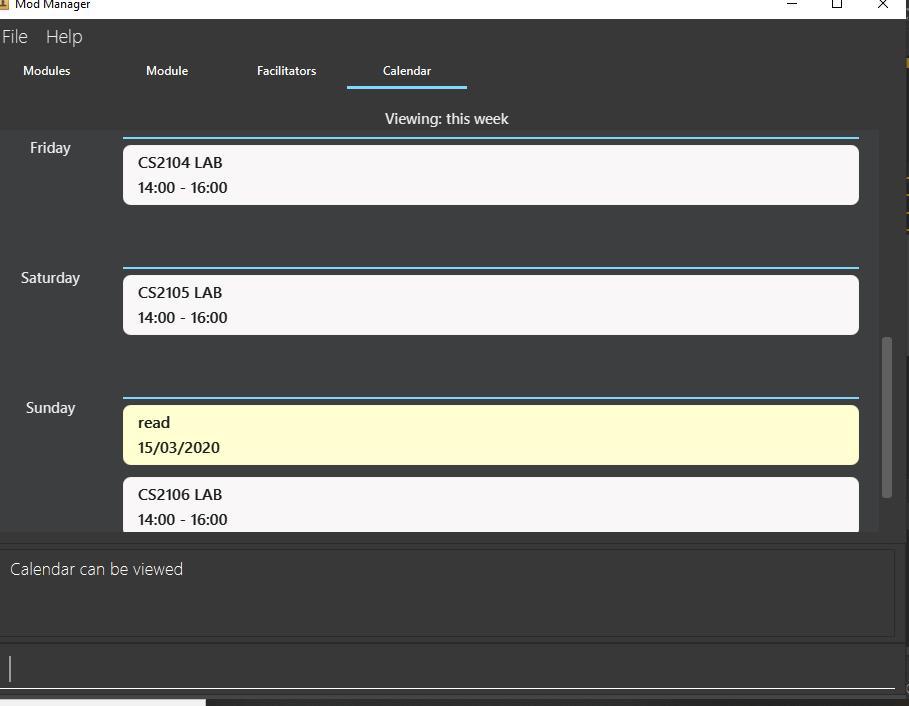
Alternative 2: Displaying the days of a week in the calendar from top to bottom.
-
Pros: Tasks and schedules that have description that are long can be displayed in a single line.
-
Cons: There is a need for users to scroll down to see a particular day. If there are many tasks and schedules in a day, the other days after it will be pushed downwards and this requires even more scrolling for users.
-
Alternative 1 is chosen as it is better that people are able to see their whole schedules and tasks for a week in one look. It makes better use of space than alternative 2 where the right side is usually not used.
Aspect: Command syntax for calendar find command
-
Alternative 1 (current choice): User is required to input
cal find empty.-
Pros: It is short in command length.
-
Cons: Since there is only one type of calendar find,
emptymay seem redundant.
-
-
Alternative 2: User is required to input
cal find /type empty.-
Pros: With the need to input
/type, it can be clear about the type of find the command is trying to do. This is because without the/type, it is possible that users thought that the command is finding the wordempty. -
Cons: It can be tedious for users to type
/typeand this increases the command length.
-
Alternative 1 is chosen because it is shorter than alternative 2 and hence it can be easier for users to type.
It is easier to implement too. The word empty is kept to allow users to know what the find command is for.
4.7. Logging
We are using java.util.logging package for logging. The LogsCenter class is used to manage the logging levels and logging destinations.
-
The logging level can be controlled using the
logLevelsetting in the configuration file (See Section 4.8, “Configuration”) -
The
Loggerfor a class can be obtained usingLogsCenter.getLogger(Class)which will log messages according to the specified logging level -
Currently log messages are output through:
Consoleand to a.logfile.
Logging Levels
-
SEVERE: Critical problem detected which may possibly cause the termination of the application -
WARNING: Can continue, but with caution -
INFO: Information showing the noteworthy actions by the App -
FINE: Details that is not usually noteworthy but may be useful in debugging e.g. print the actual list instead of just its size
4.8. Configuration
Certain properties of the application can be controlled (e.g user prefs file location, logging level) through the configuration file (default: config.json).
5. Documentation
Refer to the guide here.
6. Testing
Refer to the guide here.
7. Dev Ops
Refer to the guide here.
Appendix A: Product Scope
Target user profile:
-
is a NUS student
-
has a need to manage modules taken in a semester
-
has a need to manage classes, tasks and facilitators for each module
-
has a need to visualize schedule and tasks of the week in a calendar
-
prefer desktop apps over other types
-
can type fast
-
prefers typing over mouse input
-
is reasonably comfortable using CLI apps
Value proposition:
-
manage school-related modules faster than a typical mouse/GUI driven app
-
view schedule and tasks for the current and upcoming week easily
-
navigate easily with the command assistant for quicker management
Appendix B: User Stories
Priorities:
High (must have) - * * *
Medium (nice to have) - * *
Low (unlikely to have) - *
| Priority | As a … | I can … | so that … |
|---|---|---|---|
|
new user |
see usage instructions |
I can refer to instructions when I forget how to use the App |
|
student |
add a module I am taking |
I can keep track of the information related to the module |
|
student |
add a class |
I can keep track of the classes I have for a particular module |
|
student |
add a task |
I can keep track of the tasks I have for a particular module |
|
student |
add facilitators' information |
I can keep track of the information of the facilitators |
|
student |
view information related to a module |
I can prepare for each module |
|
student |
view all tasks across all modules |
I can organise, plan, and manage my tasks better |
|
student |
view tasks for a specific module |
I can manage and keep track of homework, programming assignments, and other tasks specifically for the module |
|
student |
view all tasks not done |
I know what tasks are not yet completed and do them |
|
student |
view facilitators' information |
I can contact them when I need help |
|
student |
edit a module |
I can update the module |
|
student |
edit a class |
I can keep my classes up to date |
|
student |
edit a task |
I can keep my tasks up to date |
|
student |
mark a task as done |
I can keep track of what tasks I have completed and what I have not yet completed |
|
student |
edit a facilitator’s information |
I can keep their contact details up to date |
|
student |
delete a module |
I can use the App for different semesters |
|
student |
delete a class |
I can remove classes that I am no longer in |
|
student |
delete a task |
I can remove tasks that I no longer need to track |
|
student |
delete a facilitator’s information |
I can remove information that I no longer need |
|
busy student |
view schedule for the current week |
I can prepare for them |
|
busy student |
view schedule for the upcoming week |
I can prepare for them |
|
new user |
view all commands |
I can learn how to use them |
|
new user |
view commands for a specific feature |
I can learn how to use them |
|
user |
import and export data |
I can easily migrate the data to another computer |
|
user |
undo or redo my commands |
I can save time from trying to fix my mistakes |
|
student |
find a facilitator by name |
I can locate details of facilitators without having to go through the entire list |
|
student |
find tasks by description |
I can find the exact tasks that I want to do, such as a particular programming assignment on multimedia streaming |
|
student |
search tasks by its date |
I know what tasks are happening today, tomorrow, this month, next month, or any other time periods |
|
student |
find upcoming tasks |
I can prioritise them |
|
busy student |
find empty slots in my schedule |
I can manage my time easily |
|
user |
see my past commands quickly |
I can re-use a command without having to type it again |
|
student |
mark a task as done |
I can not take note of them anymore |
|
student |
add a priority level to a task |
I can prioritise my tasks |
|
student |
tag my tasks |
I can categorise them |
|
student |
see countdown timers |
I can be reminded of deadlines |
|
busy student |
I can receive reminders about deadlines and events the next day |
take note of them |
|
student |
mass delete the modules |
I can delete them quickly once the semester is over |
|
advanced user |
I can use shorter versions of a command |
type a command faster |
|
careless user |
undo my commands |
I can undo the mistakes in my command |
|
visual user |
see a clear GUI |
I can navigate the App more easily |
Appendix C: Use Cases
(For all use cases below, the System is the Mod Manager and the Actor is the user, unless specified otherwise)
Use case: UC01 - Add module
-
1. User requests to add a module and provides the module code and description of the module.
-
2. Mod Manager adds the module.
Use case ends.
-
1a. Compulsory fields are not provided.
-
1a1. Mod Manager shows an error message.
Use case resumes from step 1.
-
-
1b. The module code or description is invalid.
-
1b1. Mod Manager shows an error message.
Use case resumes from step 1.
-
Use case: UC02 - List modules
-
1. User requests to list all modules.
-
2. Mod Manager shows the list of all the modules.
Use case ends.
Use case: UC03 - View module
-
1. User requests to view a module and provides the index or module code.
-
2. Mod Manager shows all information related to the module.
Use case ends.
-
1a. The given index or module code is invalid.
-
1a1. Mod Manager shows an error message.
Use case resumes from step 1.
-
Use case: UC04 - Edit module
-
1. User requests to edit a module and provides the index or module code and the new description.
-
2. Mod Manager edits the module.
Use case ends.
-
1a. The given index or module code is invalid.
-
1a1. Mod Manager shows an error message.
Use case resumes from step 1.
-
-
1b. The new description is invalid.
-
1b1. Mod Manager shows an error message.
Use case resumes from step 1.
-
Use case: UC05 - Delete module
-
1. User requests to delete a module and provides the index or module code.
-
2. Mod Manager deletes the module.
Use case ends.
-
1a. The given index or module code is invalid.
-
1a1. Mod Manager shows an error message.
Use case resumes from step 1.
-
Use case: UC06 - Add class
-
1. User request to add a class and provides the details of the new class.
-
2. Mod Manager adds a class.
Use case ends.
-
1a. Compulsory fields are not provided or fields provided are invalid.
-
1a1. Mod Manager shows an error message.
Use case resumes from step 1.
-
Use case: UC07 - Find class by day
-
1. User request to list all the classes by day and provides the day.
-
2. Mod Manager replies with the list of classes.
Use case ends.
-
1a. Day provided is invalid.
-
1a1. Mod Manager shows an error message.
Use case resumes from step 1.
-
-
1b. No class on the day provided.
Use case ends.
Use case: UC08 - Find next class
-
1. User request to find the next class.
-
2. Mod Manager replies with the next class.
Use case ends.
-
1a. No next class.
Use case ends.
Use case: UC09 - Edit class
-
1. User request to edit a class and provides the index and necessary details to be edited.
-
2. Mod Manager edits the class.
Use case ends.
-
1a. Index is not provided or invalid, or details are not provided or invalid.
-
1a1. Mod Manager shows an error message.
Use case resumes from step 1.
-
Use case: UC10 - Delete class
-
1. User requests to delete a class and provides the index.
-
2. Mod Manager deletes the class.
Use case ends.
-
1a. Index is not provided or is invalid.
-
1a1. Mod Manager shows an error message.
Use case resumes from step 1.
-
Use case: UC11 - Add task
-
1. User request to add a task and provides the details of the new task.
-
2. Mod Manager adds a task.
Use case ends.
-
1a. Compulsory fields are not provided or fields provided are invalid.
-
1a1. Mod Manager shows an error message.
Use case resumes from step 1.
-
-
1b. No optional fields are provided.
-
1b1. Mod Manager shows an error message.
Use case resumes from step 1.
-
Use case: UC12 - Edit task
-
1. User requests to edit a task and provides the task ID (with a module code and a task number) and the new details.
-
2. Mod Manager edits the task.
Use case ends.
-
1a. The given module code is invalid or the task num doesn’t exist in Mod Manager.
-
1a1. Mod Manager shows an error message.
Use case resumes from step 1.
-
-
1a. Fields provided are invalid or no optional fields are provided.
-
1a1. Mod Manager shows an error message.
Use case resumes from step 1.
-
Use case: UC13 - Delete task
-
1. User requests to delete a task and provides the task ID (with a module code and a task number).
-
2. Mod Manager deletes the task.
Use case ends.
-
1a. The given module code is invalid or the task num doesn’t exist in Mod Manager.
-
1a1. Mod Manager shows an error message.
Use case resumes from step 1.
-
Use case: UC14 - Mark a task as done
-
1. User requests to mark a task as done and provides the module code and task ID of the task.
-
2. Mod Manager marks the task as done. The corresponding task card is changed to green.
Use case ends.
-
1a. The module code and task ID provided is invalid.
-
1a1. Mod Manager shows an error message.
Use case resumes from step 1.
-
-
1b. The task is already marked as done.
-
1b1. Mod Manager shows an error message, notifying the task is already done.
Use case resumes from step 1.
-
Use case: UC15 - View all tasks across modules
-
1. User requests to list all tasks across modules in Mod Manager.
-
2. Mod Manager shows the list of all the tasks.
Use case ends.
-
1a. There are no tasks currently available in Mod Manager.
Use case ends.
Use case: UC16 - View tasks for a specific module
-
1. User requests to list tasks for a specific module and provides the module code.
-
2. Mod Manager shows the list of tasks belonging to the specified module.
Use case ends.
-
1a. The module code is invalid (module not available in Mod Manager).
-
1a1. Mod Manager shows an error message.
Use case resumes from step 1.
-
-
1b. There are no tasks currently available for the specified module.
Use case ends.
Use case: UC17 - View undone tasks
-
1. User requests to list all undone tasks across modules in Mod Manager.
-
2. Mod Manager shows the list of all undone tasks.
Use case ends.
-
1a. There are no undone tasks currently available in Mod Manager.
Use case ends.
Use case: UC18 - Find tasks by description
-
1. User requests to find a task by its description and provides a number of keywords.
-
2. Mod Manager shows the list of tasks whose descriptions contain at least one of the keywords.
Use case ends.
-
1a. None of the task descriptions contain any of the keywords.
Use case ends.
-
1b. No keywords are provided.
-
1b1. Mod Manager shows an error message.
Use case resumes from step 1.
-
Use case: UC19 - Search for tasks by date
-
1. User requests to searches for a task by its date and provides the date, month, and year, or any of which.
-
2. Mod Manager shows the list of tasks occurring on the specified date, month, and year, or any of which.
Use case ends.
-
1a. The date, month, or year provided is invalid.
-
1a1. Mod Manager shows an error message.
Use case resumes from step 1.
-
-
1b. No parameters are provided.
-
1b1. Mod Manager shows an error message.
Use case resumes from step 1.
-
-
1c. There are no tasks matching the specified date, month, and year.
Use case ends.
Use case: UC20 - Add facilitator
-
1. User requests to add a facilitator and provides the details of the facilitator.
-
2. Mod Manager adds the facilitator.
Use case ends.
-
1a. Compulsory fields are not provided or none of the optional fields provided.
-
1a1. Mod Manager shows an error message.
Use case resumes from step 1.
-
-
1b. Fields provided are invalid.
-
1b1. Mod Manager shows an error message.
Use case resumes from step 1.
-
Use case: UC21 - List facilitators
-
1. User requests to list all facilitators.
-
2. Mod Manager shows the list of all the facilitators.
Use case ends.
Use case: UC22 - Find facilitator
-
1. User requests to find a facilitator and provides a number of keywords.
-
2. Mod Manager shows the list of facilitators whose names contain at least one of the keywords.
Use case ends.
-
1a. None of the names of the facilitators contain any of the keywords.
Use case ends.
Use case: UC23 - Edit facilitator
-
1. User requests to edit a facilitator and provides the index or module code and new details.
-
2. Mod Manager edits the facilitator.
Use case ends.
-
1a. The given index or module code is invalid.
-
1a1. Mod Manager shows an error message.
Use case resumes from step 1.
-
-
1a. Fields provided are invalid.
-
1a1. Mod Manager shows an error message.
Use case resumes from step 1.
-
Use case: UC24 - Delete facilitator
-
1. User requests to delete a facilitator and provides the index or module code.
-
2. Mod Manager deletes the facilitator.
Use case ends.
-
1a. The given index or module code is invalid.
-
1a1. Mod Manager shows an error message.
Use case resumes from step 1.
-
Use case: UC25 - View calendar
-
1. User requests to view the calendar for a specified week.
-
2. Mod Manager shows the calendar for the specified week.
Use case ends.
-
1a. The specified week is invalid.
-
1a1. Mod Manager shows an error message.
Use case resumes from step 1.
-
Use case: UC26 - Find empty slots in calendar
-
1. User requests to find empty slots in the calendar.
-
2. Mod Manager shows the list of empty slots available.
Use case ends.
-
1a. The given input is invalid.
-
1a1. Mod Manager shows an error message.
Use case resumes from step 1.
-
-
2a. The list of empty slots is empty.
Use case ends.
Use case: UC27 - Undo a command
-
1. User requests to undo.
-
2. Mod Manager undoes the most previous command.
Use case ends.
-
1a. There are no commands that can be undone.
-
1a1. Mod Manager shows an error messsage.
Use case resumes from step 1.
-
Use case: UC28 - Redo a command
-
1. User requests to redo.
-
2. Mod Manager redoes the most previously undone command.
Use case ends.
-
1a. There are no commands that can be redone.
-
1a1. Mod Manager shows an error messsage.
Use case resumes from step 1.
-
Use case: UC29 - Clear all entries in Mod Manager
-
1. User requests to clear all entries.
-
2. Mod Manager clears all entries.
Use case ends.
-
1a. The given input is invalid.
-
1a1. Mod Manager shows an error message.
Use case resumes from step 1.
-
Appendix D: Non Functional Requirements
-
The product should work on any mainstream OS as long as it has Java
11or above installed. -
The product should be able to render its layout to different screen sizes.
-
The product should be able to support up to 250 modules, 250 classes, 250 facilitators, and 250 tasks.
-
The response to any command should become visible within 3 seconds.
-
A user with above average typing speed for regular English text (i.e. not code and system admin commands) should be able to accomplish most of the tasks faster than doing the same task using the mouse.
-
The product should work without any internet connection.
-
The system failure rate should be less than 5 failure per 100 commands.
-
Mod Manager’s internal storage can be transferred to other Mod Manager instances on other systems.
-
The product should be intuitive and easy to use for a novice who has never used similar Task Management applications.
-
A developer with one year of experience should be able to add a new feature, including source code modifications and testing, with no more than one week of labour.
-
The product should not conflict with other applications or processes.
-
The product is free and open source.
-
The product is not required to handle non-NUS modules, or academic programmes at NUS not following a modular system.
-
The product is not required to handle non-English characters for modules, classes, facilitators, and tasks' content.
Appendix E: Glossary
- CLI
-
Command-line interface: processes commands to a computer program in the form of lines of text.
- MSS
-
Main Success Scenario: describes the most straightforwards interaction for a given use case, which assumes that nothing goes wrong.
- Extensions
-
"Add-on"s to the MSS that describe exceptional or alternative flow of events, describe variations of the scenario that can happen if certain things are not as expected by the MSS.
- GUI
-
Graphical user interface: a form of user interface that allows user to interact with electronic devices through graphical icons.
- Mainstream OS
-
Windows, Linux, Unix, OS-X.
A dark red card represents a task that is not yet done.

A green card represents a done task.

Appendix F: Instructions for Manual Testing
Given below are instructions to test the app manually.
| These instructions only provide a starting point for testers to work on; testers are expected to do more exploratory testing. |
F.1. Testing of General Features
-
Launching the application.
-
Download the jar file and copy into an empty folder. Double-click the jar file.
Expected: Shows the GUI with a set of sample modules, classes, tasks and facilitators. The window size may not be optimum.
-
-
Exiting the application.
-
Type
exitin the command box and press Enter.
Expected: Closes the application window and saves data. -
Click on the close button on the application window.
Expected: Similar to previous.
-
-
Saving data.
-
Delete the data file if it exists. Double-click the jar file.
Expected: Shows the GUI with a set of sample modules, classes, tasks and facilitators. -
Edit the data file to contain duplicate modules. Double-click the jar file.
Expected: Shows the GUI with an empty set of modules, classes, tasks and facilitators.
-
-
Undo/Redo commands.
-
Type any valid command that adds/edits/deletes an entry of Mod Manager that can successfully execute and press Enter.
Expected: Mod Manager behaves as specified for that command. -
Type undo and press Enter.
Expected: Mod Manager returns to the state before the the add/edit/delete command was executed. -
Type redo and press Enter.
Expected: The previously undone command is executed again.
-
F.2. Testing of Module Feature
-
Adding a module.
-
Prerequisites: List all modules using the
mod listcommand. ModuleCS1101Sdoes not exist in Mod Manager. -
Test case:
mod add /code CS1101S /desc Programming Methodology
Expected: A module with the module codeCS1101Sand descriptionProgramming Methodologyis added to the list. Details of the added module shown in the status message. Timestamp in the status bar is updated. -
Test case:
mod add /desc Programming Methodology
Expected: No module is added. Error details shown in the status message. Status bar remains the same. -
Other incorrect mod add commands to try:
mod add,mod add /code,mod add /code x(where module x already exists in Mod Manager),mod add /code CS1101S /desc
Expected: Similar to previous.
-
-
Viewing a module.
-
Prerequisites: List all modules using the
mod listcommand. ModuleCS2103Texists in Mod Manager. -
Test case:
mod view CS2103T
Expected: Classes, tasks and facilitators of the moduleCS2103Tshown. Details of the viewed module shown in the status message. Timestamp in the status bar is updated. -
Test case:
mod view 0
Expected: No module is viewed. Error details shown in the status message. Status bar remains the same. -
Other incorrect mod view commands to try:
mod view,mod view x(where x is negative, 0 or larger than the list size),mod view x(where no module with module code x exists)
Expected: Similar to previous.
-
-
Editing a module.
-
Prerequisites: List all modules using the
mod listcommand. Multiple modules in the list. -
Test case:
mod edit 1 /desc SE
Expected: Description of the first module in the list is updated toSE. Details of the edited module shown in the status message. Timestamp in the status bar is updated. -
Test case:
mod edit 0
Expected: No module is edited. Error details shown in the status message. Status bar remains the same. -
Other incorrect mod edit commands to try:
mod edit,mod edit x(where x is any value),mod edit x /desc SE(where x is negative, 0 or larger than the list size),mod edit 1 /code x(where a module with module code x exists)
Expected: Similar to previous.
-
-
Deleting a module.
-
Prerequisites: List all modules using the
mod listcommand. Multiple modules in the list. -
Test case:
mod delete 1
Expected: First module is deleted from the list. Details of the deleted module shown in the status message. Timestamp in the status bar is updated. -
Test case:
mod delete 0
Expected: No module is deleted. Error details shown in the status message. Status bar remains the same. -
Other incorrect mod delete commands to try:
mod delete,mod delete x(where x is negative, 0 or larger than the list size),mod delete x(where no module with module code x exists)
Expected: Similar to previous.
-
F.3. Testing of Class Feature
-
Adding a class
-
Prerequisites: View the module using the
mod view CS2103Tcommand. Module CS2103T exists in Mod Manager and module CS1101S does not exist in Mod Manager. -
Test case:
class add /code CS2103T /type lec /at friday 10:00 12:00 /venue i3-aud
Expected: A CS2103T class of type lecture on friday from 10:00 to 12:00 at i3-Aud is added to the class list. Details of the added class is shown in the status message. -
Test case:
class add /code CS1101S /type lec /at friday 12:00 14:00
Expected: No class is added. Error details shown in the status message. -
Other incorrect class add commands to try:
class add,class add /code cs2103t,class add /code cs2103t /type lec,class add /code cs2103t /type bla /at friday 10:00 12:00
Expected: No class is added. Error details shown in the status message.
-
-
Find classes on a certain day
-
Prerequisites: -
-
Test case:
class find /at monday
Expected: Classes listed in the result display. -
Test case:
class find
Expected: No class is found. Error details shown in the status message.
-
-
Finding next class
-
Prerequisites: -
-
Test case:
class find /next
Expected: Classes listed in the result display and module display changed to the module of the next class if there is class left for this week. -
Test case:
class find
Expected: No class is found. Error details shown in the status message.
-
-
Editing a class
-
Prerequisites: View the module using the
mod view CS2103Tcommand. Module CS2103T exists in Mod Manager and module CS1101S does not exist in Mod Manager. Classes for CS2103T exists. -
Test case:
class edit 1 /code cs2103t /venue Home
Expected: Venue of the first class in the list updated toHome. -
Test case:
class edit 1 /code cs2103t /venue
Expected: Venue of the first class in the list is removed`. -
Test case:
class edit 1 /code cs1101s
Expected: No class is edited. Error details shown in the status message. -
Other incorrect class add commands to try:
class edit,class edit 0,class edit -1,class edit 1 /code cs2103t
Expected: No class is edited. Error details shown in the status message.
-
-
Deleting a class
-
Prerequisites: View the module using the
mod view CS2103Tcommand. Module CS2103T exists in Mod Manager and module CS1101S does not exist in Mod Manager. Classes for CS2103T exists. -
Test case:
class delete 1 /code cs2103t
Expected: First class of the list deleted. -
Test case:
class delete 1 /code cs1101s
Expected: No class is deleted. Error details shown in the status message. -
Other incorrect class add commands to try:
class delete,class delete 1,class delete 0,class delete -1
Expected: No class is deleted. Error details shown in the status message.
-
F.4. Testing of Task Feature
-
Viewing all tasks across all modules in Mod Manager.
-
Prerequisites: Some tasks are already available in Mod Manager.
-
Test case:
task list
Expected: All of the tasks across all modules are shown.
-
-
Marking a task as done in Mod Manager.
-
Prerequisites: List all tasks using the
task listcommand. ModuleCS2103Texists in Mod Manager. You have this task card below in your task list: However, if you do not have the above task, or module
 CS2103Tin your Mod Manager, you may choose any of the tasks already available and take note of its module code and task ID. Use that module code and task ID instead of our module code example ofCS2103Tand task ID example of986as below. -
Test case:
task done /code CS2103T /id 986
Expected: The corresponding task card changed to green. Our task has been marked as done successfully! You can try with other tasks using a different module code (currentlyCS2103T) and a valid task ID (currently986).
-
-
Viewing tasks for a specific
Module.-
Prerequisites: List all tasks using the
task listcommand. ModuleCS2103Texists in Mod Manager. -
Test case:
task module /code CS2103T
Expected: All of the tasks for moduleCS2103Tare shown.
-
-
Viewing undone tasks
-
Prerequisites: List all tasks using the
task listcommand. -
Test case:
task undone
Expected: All of the undone tasks are shown. Undone tasks are shown in dark red as in here.
-
-
Finding tasks by description.
-
Prerequisites: List all tasks using the
task listcommand. -
Test case:
task find assign home
Expected: All of the tasks that contain the keywordassignorhomein their description are shown. For example, you may see tasks with descriptions such asassignment,HomeworkorProgramming Assignment 2. Partial match and case in-sensitive is allowed.
-
-
Searching tasks by date.
-
Prerequisites: List all tasks using the
task listcommand. -
Test case:
task search /month 4 /year 2020
Expected: All of the tasks happening onApril 2020are shown. You now know what tasks are due this month (at the time of writing)!
-
F.5. Testing of Facilitator Feature
-
Adding a facilitator while all facilitators are listed.
-
Prerequisites: List all facilitators using the
facil listcommand. A facilitator with the nameAkshay Narayandoes not exist in Mod Manager. ModuleCS2103Texists in Mod Manager. ModuleCS1101Sdoes not exist in Mod Manager. -
Test case:
facil add /name Akshay Narayan /phone 98765432 /email dcsaksh@nus.edu.sg /code CS2103T
Expected: A facilitator with the nameAkshay Narayan, phone98765432and emaildcsaksh@nus.edu.sgand moduleCS2103Tis added to the list. Details of the added facilitator shown in the status message. Timestamp in the status bar is updated. -
Test case:
facil add /name Akshay Narayan /phone 98765432 /code CS1101S
Expected: No facilitator is added. Error details shown in the status message. Status bar remains the same. -
Other incorrect facil add commands to try:
facil add,facil add /name Akshay Narayan,facil add /name Akshay Narayan /office /code cs2103T,facil add /name Akshay Narayan /email abcde /code cs2103T
Expected: Similar to previous.
-
-
Finding a facilitator while all facilitators are listed.
-
Prerequisites: List all facilitators using the
facil listcommand. Multiple facilitators in the list. A facilitator with the nameAkshay Narayanexists in Mod Manager. No other facilitator’s name containsAkshay. -
Test case:
facil find Akshay
Expected: Only the facilitator with the nameAkshay Narayanis shown. Number of facilitators listed shown in the status message. Timestamp in the status bar is updated. -
Test case:
facil find
Expected: No facilitator is found. Error details shown in the status message. Status bar remains the same.
-
-
Editing a facilitator while all facilitators are listed.
-
Prerequisites: List all facilitators using the
facil listcommand. Multiple facilitators in the list. -
Test case:
facil edit 1 /office COM2-0202
Expected: Office of the first facilitator in the list is updated toCOM2-0202. Details of the edited facilitator shown in the status message. Timestamp in the status bar is updated. -
Test case:
facil edit 2 /phone
Expected: Phone of the second facilitator in the list is removed. Details of the edited facilitator shown in the status message. Timestamp in the status bar is updated. -
Test case:
facil edit 0
Expected: No facilitator is edited. Error details shown in the status message. Status bar remains the same. -
Other incorrect facil edit commands to try:
facil edit,facil edit x(where x is any value),facil edit x /phone 87654321(where x is negative, 0 or larger than the list size)
Expected: Similar to previous.
-
-
Deleting a facilitator while all facilitators are listed.
-
Prerequisites: List all facilitators using the
facil listcommand. Multiple facilitators in the list. -
Test case:
facil delete 1
Expected: First facilitator is deleted from the list. Details of the deleted facilitator shown in the status message. Timestamp in the status bar is updated. -
Test case:
facil delete 0
Expected: No facilitator is deleted. Error details shown in the status message. Status bar remains the same. -
Other incorrect facil delete commands to try:
facil delete,facil delete x(where x is negative, 0 or larger than the list size),facil delete x(where no facilitator with name x exists)
Expected: Similar to previous.
-
F.6. Testing of Calendar Feature
-
Viewing the calendar.
-
Prerequisites: The classes and tasks with date within the current week exist.
-
Test case:
cal view /week this
Expected: Classes and tasks appear in the correct day in the calendar and sorted according to time. -
Test case:
cal view /week that
Expected: Error message shown in the result display. -
Other incorrect cal view commands to try:
cal view,cal view /week
Expected: Similar to previous.
-